5. Register Your iPad Without an Apple ID in iTunes
If you do not have an Apple ID and clicked the I do not have an Apple ID option, shown in Figure 1-6, follow these steps to register your iPad and create an ID.
Type in your information and click Submit to complete your registration.
If everything has been entered correctly, you will see either the MobileMe ad (Figure 7) or the Set Up Your iPad screen (Figure 8).
6. Apple's MobileMe Sync Service
After registering your iPad for the first time, you will probably see a screen advertising MobileMe as shown in Figure 7.
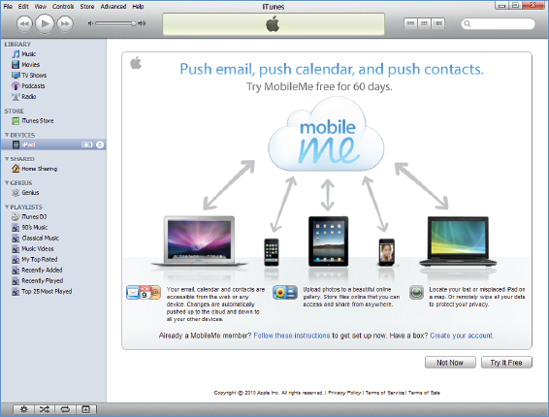
To keep moving with setting up your iPad, click the Not Now button to continue to the next screen shown on Figure 8.
7. Set Up Your iPad
The first time you connect your iPad, you have the chance to give it a name and select some other options, as shown in Figure 8.
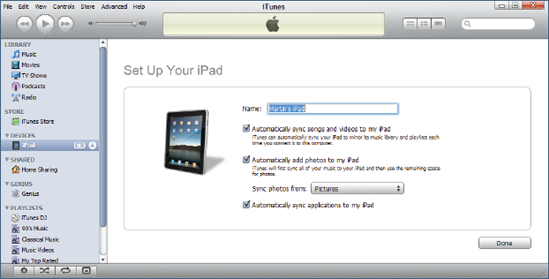
Give your iPad a Name.
Each time you plug in your iPad—to this or any other computer—your iPad
will show the name you choose here. In this case, we will call this
one: Martin's iPad.
Check the box next to Automatically sync songs and videos to my iPad if you want all of your music and videos stored in your computer's iTunes library on your new iPad.
|
Your iPad does not have as
much memory as your computer, so be careful selecting automatically sync
when you have thousands of songs, photos, or many videos in your
computer iTunes library.
|
|
Check the box next to Automatically add photos to my iPad if you want all your photos in specific folders on your computer synced to your new iPad.
Check the box next to Automatically sync applications to my iPad
if you would like applications you purchase on your iPad backed up to
your computer. This option allows you to update Apps from iTunes on your
computer and be able to manage and arrange your App icons and Home
Screens using iTunes on your computer. We recommend you check this box.
Click Done to complete the Set Up screen.
8. Setup or Restore from Backup
If you have already
synced a similar device such as an iPhone or iPodTtouch to your iTunes,
then you will probably see a screen similar to Figure 10.
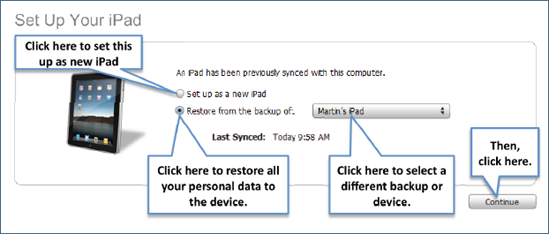
If you would like to set this up as a new iPad:
Click the selection next to Set up as a new iPad.
Click the Continue button.
You will then follow the steps in the section "Set Up Your iPad."
NOTE
If you want to keep your existing iPhone and/or iPod Touch and set up your new iPad, then you should select Set up a New iPad as shown in Figure 1-10.
If you would like to restore from a backup of another iPad or device (iPhone/iPod touch):
Click the selection next to Restore from the backup of:.
Select the particular backup file from the drop-down menu.
Click the Continue button.
|
We have heard of people
experiencing problems (lock-ups, lower battery life, and so forth) when
they restored a backup from a non-iPad (iPhone/iPod Touch) to the iPad.
Also, selecting restore here assumes you have first made a backup of
your old device (iPhone/iPod Touch) in order to restore the latest
information to your new iPad.
|
|
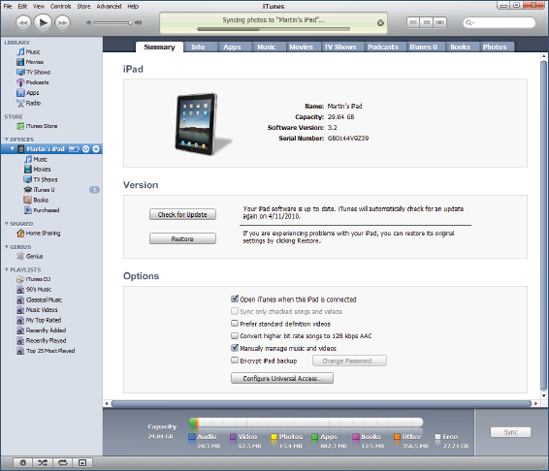
9. Setup Complete: The iPad Summary Screen
Once you confirm your choices and click Done (Figure 8), you will be taken to the main Summary screen (Figure 10).