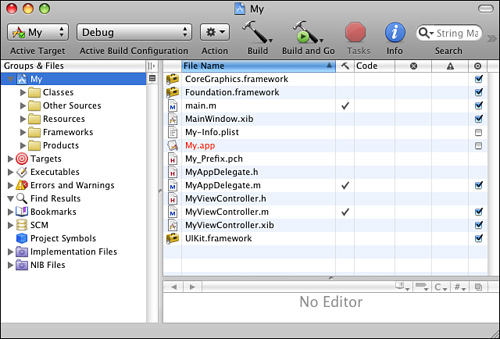
iPhone Xcode projects contain varied standard and custom components. Figure 2
shows a minimal project. Project elements include source code, linked
frameworks, and media such as image and audio files. Xcode compiles your
source, links it to the frameworks, and builds an application bundle
suitable for iPhone installation. It adds your media to this application
bundle, enabling your program to access that media as the application
runs on the iPhone.
iPhone code is normally
written in Objective-C 2.0. This is an object-oriented superset of ANSI
C, which was developed from a mix of C and Smalltalk. If you’re looking for more information about the language, Apple
provides several excellent online tutorials at its iPhone developer
site. Among these are an introduction to object-oriented programming
with Objective-C and an Objective-C 2.0 reference (http://developer.apple.com/iphone/library/documentation/Cocoa/Conceptual/ObjectiveC/).
Frameworks are software
libraries provided by Apple that supply the reusable class definitions
for Cocoa Touch. Add frameworks to Xcode by dragging them onto your
project’s Frameworks folder. After including the appropriate header
files (such as UIKit/UIKit.h or QuartzCore/QuartzCore.h), you call their
routines from your program.
Associated media might
include audio, image, and video files to be bundled with the package as
well as text-based files that help define your application to the iPhone
operating system. Drop media files into your project and reference them
from your code.
The project shown in Figure 2
is both simple and typical despite its fairly cluttered appearance. It
consists of five source files (main.m, MyAppDelegate.h, MyAppDelegate.m,
MyViewController.h, MyViewController.m) and two interface files
(MyViewController.xib, MainWindow.xib) along with the default iPhone
project frameworks (UIKit, Foundation, and Core Graphics) and a few
supporting files (Default.png, icon.png, My-Info.plist). Together these
items form all the materials needed to create an extremely basic
application.
Note
The My_Prefix.pch file is created automatically by Xcode. It contains precompiled header files.
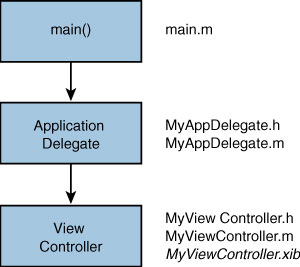
The iPhone Application Skeleton
Nearly every iPhone application you build will contain a few key source files. Figure 3
shows the most common source code pattern: a main.m file, an
application delegate, and a view controller. These five files (more if
you use Interface Builder .xibs) provide all the components necessary to
create a simple Hello World style application that displays a view
onscreen.
Some of these components may be familiar. Others may not. Here’s a rundown of the file types:
The
implementation files use a .m extension and not a .c extension. These
.m files contain Objective-C method implementations in addition to any
C-style functions. The project in Figure 3 uses three .m files.
iPhone
source files use the standard C-style .h extension for the header
files. Header files offer public declarations of class interfaces,
constants, and protocols. You usually pair each class implementation
file (in this case the application delegate and view controller .m
files) with a header file, as you can see in Figure 1-3.
XIB
files (.xib) are created in Interface Builder. These XML-based user
interface definition files are linked to your application and called by
your app at runtime in their compiled .nib format. The project in Figure 1-3
uses a single .xib, which defines the contents of the primary view. A
standard Xcode project may add a MainWindow.nib, which does little more
than create a new, empty window.
Here is a quick rundown of those files, what they are and what role they play in the actual application.
main.m
The main.m file has two
jobs. First, it creates a primary autorelease pool for your application.
Second, it invokes the application event loop. These two elements
provide critical elements to get your application started and running.
Here is what those two items are and how they work.
int main(int argc, char *argv[])
{
      NSAutoreleasePool * pool = [[NSAutoreleasePool alloc] init];
      int retVal = UIApplicationMain(argc, argv, nil, @"MyAppDelegate");
      [pool release];
      return retVal;
}
Note
The argc and argv variables passed to main()
refer to command-line arguments. Since the iPhone does not use a
command-line to launch its programs (all applications are run from a
common graphical user interface), these elements are not used. They are
included for consistency with standard ANSI C practices.
Autorelease Pools
Autorelease pools are
objects that support the iPhone’s memory management system. This memory
system is normally based on keeping track of reference counts, that is,
counting how many objects refer to an allocated part of memory.
Normally, you’re responsible for releasing those objects. That’s where
the autorelease pool steps in. The pool automatically sends a release
message to all the objects it owns at the end of every event loop cycle
so you don’t have to.
Autorelease objects are typically created with a pattern that looks like this:
[[[Someclass alloc] init] autorelease]
Once added to the
autorelease pool, these objects pass their release responsibilities
along to the pool. At the end of the event loop, the pool drains and
sends the releases.
The iPhone expects
that there will always be an autorelease pool available so memory can be
recovered from these objects at the end of their lifetime. If you ever
create a secondary thread in your application, you need to provide it
with its own autorelease pool.
The UIApplicationMain Function
The UIApplicationMain
function provides the primary entry point for creating a new
application object. It creates the new application instance and its
delegate. The delegate is responsible for handling application status
changes and providing program-specific responses to those changes.
The third and fourth arguments of the UIApplicationMain
function specify the name of the principal application class and its
delegate. If the third argument is omitted (set as nil), the iPhone
defaults to using the standard UIApplication class.
UIApplicationMain
also establishes the application’s event loop. An event loop repeatedly
looks for low-level user interactions such as touches on the screen or
sensor triggers. Those events are captured by the iPhone’s kernel and
dispatch an event queue, which is forwarded to the application for
handling.
Event loops let you
design your program around callbacks. Callbacks are where you specify
how the application should respond to these events. In Objective-C, this
corresponds to method invocations. For example, you can build methods
to determine how the application should reorient itself when the user
moves the screen from portrait to landscape or how views should update
when a finger is dragged onscreen. This style of programming is based on
the underlying event loop, which is set up in main.m.
Application Delegate
An application
delegate implements how your program should react at critical points in
the application life cycle. The delegate is responsible for initializing
a windowing system at launch and wrapping up business at termination.
It also acts as the key player for handling memory warnings. Here are
the more important delegate methods that your applications will
implement:
The applicationDidFinishLaunching: method—
This method is the first thing triggered in your program after the
application object has been instantiated. Upon launch, this is where you
create a basic window, set its contents, and tell it to become the key
responder for your application.
The applicationWillTerminate: method—
This method enables you to handle any status finalization before
handing control back to SpringBoard. Use this to save defaults, update
data, and close files.
The applicationDidReceiveMemoryWarning method— When called, your application must free up memory to whatever extent possible. This method works hand in hand with the UIViewController’s didReceiveMemoryWarning:
method. If your application is unable to release enough memory, the
iPhone terminates it, causing your user to crash back to the
SpringBoard. SpringBoard is the main iPhone GUI that presents the
application icons, allowing users to launch programs.
The application delegate
also handles responsibility for when your application suspends or
resumes, such as when the user locks the screen.
After launching and
loading the window, the application delegate takes a back seat. Nearly
all application semantics move over to some child of a UIViewController
class. The application delegate typically does not take a role again
until the application is about to finish or if memory issues arise.
View Controller
In the iPhone programming
paradigm, view controllers provide the heart of how an application
runs. Here is where you normally implement how the application responds
to selections, button presses, as well as sensor triggers. If you
haven’t used Interface Builder to create a precooked presentation, the
view controller is where you load and lay out your views. While the
main.m and application delegate files are typically small, view
controller source code is normally extensive, defining all the ways your
application accesses resources and responds to users. Some of key
methods include the following:
The loadView and viewDidLoad methods— Assuming you aren’t using XIB files to lay out your views, the loadView method must set up the screen and lay out any subviews. Make sure to either call [super loadView] or, alternatively, implement viewDidLoad, whenever you inherit from a specialized subclass such as UITableViewController or UITabBarController.
This allows the parent class to properly set up the screen before you
add your customizations to that setup. Apple’s documentation and sample
code encourage the viewDidLoad approach when basing your code off specialized subclasses.
The shouldAutorotateToInterfaceOrientation: method— Unless you have pressing reasons to force your user to remain in portrait orientation, add the should-autorotate method to allow the UIViewController method to automatically match your screen to the iPhone’s orientation. You must define how the screen elements should update.
The viewWillAppear: and viewDidAppear: methods— These methods get called whenever a view is ready to appear onscreen or a view has fully appeared onscreen. The viewWillAppear:
method should update information for views that are about to display.
When called, your view may not have been loaded yet. If you rely on
accessing IBOutlets connected to subviews, poke self.view to ensure the view hierarchy gets loaded. Use viewDidAppear: to trigger behavior for once the view is fully transitioned onscreen, such as any animations.
The number and kind of XIB files varies with how you design your project. Figure 3
assumes you’ve created a single XIB for the view controller. You can
use Interface Builder to design additional components or skip IB
entirely and create your interfaces programmatically.
Note
Only UIView instances can directly receive touch calls; UIViewController objects cannot.