4. Running the Application
We are now ready to compile
and run the project. Press F5 to begin the process. After compilation
(and assuming that there are no errors!), Visual Studio launches the
emulator. As mentioned earlier, this can take a little while to open, so
be patient while this task completes. Subsequent deployments to the
emulator will go much more quickly if the emulator is already running.
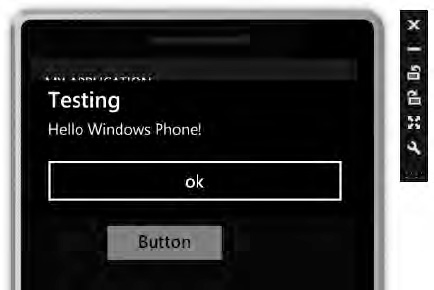
Once this is all complete, your program will launch. Clicking the button will display the MessageBox, as you would expect (see Figure 5).
To stop the program,
click the Stop Debugging button in Visual Studio. The IDE will return to
edit mode, and your program will close on the emulator. The emulator
will keep running, ready for any additional programs that you start.
Another way to stop the
program is to click the Back button on the emulator. The default
behavior when this button is clicked is to close the application and
return to the phone's main page (although this behavior can be
overridden, as we will see later on). This process will also return the
IDE to edit mode. The fact that the Back button actually closes the
application instead of simply putting it into the background is
important, as we will need to hook into this if we want to allow the
application to retain its state when it restarts.
5. Running on a Real Device
You will no doubt be pleased
to hear that running your application on a real device is no more
difficult than running it within an emulator, and it provides an
extremely similar experience. There are a few steps that you will need
to go through before you can begin working with the device, however.
Let's take a look at the details now.
5.1. Registering the Device
Before you can deploy
applications to a device, you must first have a Windows Phone developer
account. These accounts are not free, though they are relatively
inexpensive (currently priced at $99 per year, though this might change
in the future). You will need this account before you can publish any of
your finished games into the Windows Phone Marketplace, anyway, so
there is not really any way to avoid this charge, even if you develop
entirely on the emulator.
You can sign up for an account at the http://create.msdn.com
web site. You will be required to prove your identity to Microsoft as
part of this process and will receive e-mail notification telling you
how to do this. The process might take a couple of days from start to
finish.
Besides providing your
personal details, you will also be able to provide banking details so
that you can be paid for applications that you create and sell in the
Marketplace.
Once your account is
registered and active, the next step is to set the device up to connect
to your PC. First, plug the device in and allow Windows to set up its
drivers. This should be a completely automatic process.
Next you will need to
install the latest Zune client software. An up-to-date version of this
software is essential, so if you have an older version already
installed, you will need to upgrade. This application is used for all
data transfer and synchronization between the phone and your PC, and
will need to be running all the time that you are working with the
device. Without this, you will receive an error from Visual Studio when
you attempt to deploy.
Once the Zune software has
launched, you have to sign in to your Marketplace account, which allows
the software to identify that you have registered for development and
will unlock the deployment facility that Visual Studio needs to use to
transfer your games and applications to the device. The device
confirmation screens then appear, as shown in Figure 6, allowing you to set up the device for use with your PC.
The final step in setting up
the device is to run the Windows Phone Developer Registration
application on the PC. This is part of the Windows Phone Software
Development Kit, and can be found in the Start menu inside All Programs/Windows Phone Developer Tools. When launched, the application displays a screen like the one shown in Figure 7.
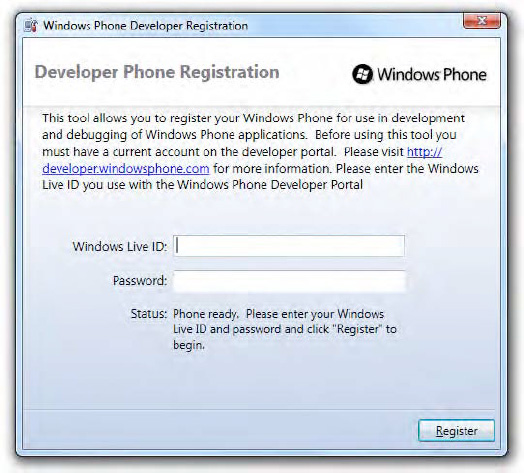
You need to enter the username and password of your developer account and then click the Register
button. After a few seconds, you should be notified that the phone was
successfully registered. At this point you are finally ready to begin
working with your phone in Visual Studio.
These steps only need to be performed once for each device that you use.
5.2. Deploying to the Device from Visual Studio
Now we are ready to deploy our project to the device from inside Visual Studio.
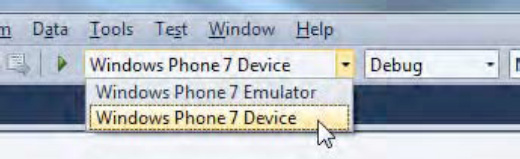
First, with the Zune software
running in the background on your PC, connect your device to the PC and
ensure that it is recognized by Windows. Once everything is ready,
choose to deploy your application to the device rather than the
emulator. This is done by dropping down the Device combo box in the
toolbar and selecting Windows Phone 7 Device, as shown in Figure 8.
When you next start your program, Visual Studio will connect to the
device and then install and launch the application executable.
NOTE
For deployment to
succeed, the phone must be switched on, and the lock screen must not be
displayed. If these conditions are not met, a deployment error will
occur, although Visual Studio usually provides good feedback about what
the problem is to help you figure out how to proceed.
Unsurprisingly, the project
running on the phone looks and behaves just as it did in the emulator.
Congratulations, you have written and deployed your first Windows Phone
application!
6. Debugging
Now that you have a simple
application written and working, let's take a closer look at some of the
debugging features that are available.
The powerful debugging tools
that can be used within the Visual Studio IDE make development systems
from the past look extremely primitive in comparison. We can use all
these tools for Windows Phone development, making tracking down problems
simple.
6.1. Breakpoints
First, try setting a breakpoint on the line of code containing the MessageBox
function call. Launch the program (on a real device or the emulator),
and click the button within the page. As you would expect, the
breakpoint triggers just as it would on a desktop application.
From here, you can explore all
the usual attributes of your application: the call stack, object
property windows, visualizers, and immediate window commands. Everything
is present and working.
The one useful feature
that is not available, however, is "edit and continue." Unfortunately,
because the application is actually running outside of Visual Studio's
controlled environment, such changes cannot be applied at runtime and
will need to be held back until the IDE returns to edit mode.
6.2. Debug Output
At any stage within your
application you can display text in Visual Studio's Output window. This
is done in just the same way as for a desktop application—by using the System.Diagnostics.Debug object. To test this, modify the button click handler as shown in Listing 2.
Example 2. Writing text to the Debug Output window
private void button1_Click(object sender, RoutedEventArgs e)
{
    System.Diagnostics.Debug.WriteLine("Debug text");
    MessageBox.Show("Hello Windows Phone!", "Testing", MessageBoxButton.OK);
}
|
Each time you click the button, you will now see your debug text appear within the IDE, as shown in Figure 9.

|
If the Output window is not
displayed, it can be opened by selecting View/Output from Visual
Studio's menu. If the Output window is open but no text is appearing,
ensure that the "Show output from" combo box in the window toolbar is
set to Debug, as shown in Figure 1-11.
|
|
7. Getting Help
Sooner or later you will run
into a development problem that you cannot solve on your own. A number
of great resources at your disposal can provide insight and inspiration
to keep you moving. Here are some of them.
7.1. MSDN
As you would expect from
one of Microsoft's products, comprehensive and detailed documentation is
available for all aspects of Windows Phone development and the .NET CF.
Provided you have it installed, MSDN is an excellent source of help and
is never farther away than a quick press of the F1 key.
7.2. Search Engines
The Web is, as
ever, an indispensible fountain of information. When searching, try to
accompany your search phrase with "windows phone" or "windows phone 7"
(including the quotation marks).
7.3. Microsoft's Windows Phone Developer Center
The Developer Center can be found at the following URL:
http://create.msdn.com/
The site hosts a large
variety of articles, development tips, frequently asked questions, and
code samples. Also of particular interest is the Forums link, which
leads to a number of very active message forums. There's a good chance
that someone will be able to offer you some assistance.
7.4. Community Sites
Some excellent community
sites have built up around the XNA and Silverlight technologies used on
Windows Phone 7, and they are a good place to read and ask questions if
you need assistance.
For XNA, you can visit http://creators.xna.com for one such community. For Silverlight, http://www.silverlight.net
provides similar resources. Besides their forums, both sites are packed
with information and downloads, and are well worth visiting.