Many iPhone and Mac users
have a, shall we say, “heightened” interest in Apple Computer; visiting
Apple’s campus in Cupertino, California, can be a life-changing
experience. For these special users, we’re going to create a Core
Location-powered application that keeps you informed of just how far
away you are.
The application will be created in two parts: The
first introduces Core Location and displays the number of miles from the
current location to Cupertino. In the second section, we use the
iPhone’s compass to display an arrow that points users in the right
direction, should they get off track.
Setting Up the Project
For the rest of this hour, we’ll be working on a new
application that uses the Core Location framework. Create a new
view-based iPhone application in Xcode and call it Cupertino.
Adding the Core Location Framework
The Core Location framework isn’t linked into our
project by default, so we need to add it. Open the Targets group in
Xcode, and right-click the Cupertino target. Right-click the Frameworks
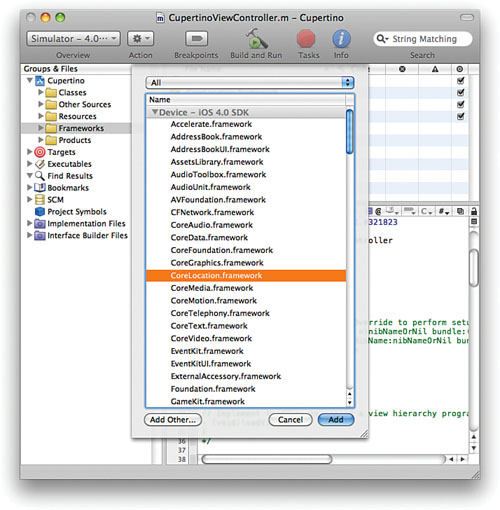
group in the Cupertino project, and then choose Add, Existing Frameworks
from the contextual menu. Scroll through the Framework list that
appears and find CoreLocation.framework. Select it, and then click Add
to add it to the project, as shown in Figure 1.
If it doesn’t add directly to the Frameworks group, drag the
CoreLocation.framework icon into the group to keep the project tidy.
Adding Background Image Resources
To make sure the user remembers where we’re going, we
have a nice picture of an apple as the application’s background image.
Locate apple.png within the project’s Images folder in the Finder, and
drag it into the Resources group within the Xcode project group. Be sure
to check the Copy Items into Destination Group’s Folder check box in
the Copy dialog. (You can also include the [email protected] file if you want
a higher-resolution version for the iPhone 4’s display.)
Adding Outlets, Properties, and Protocols
The CupertinoViewController
will serve as the location manager delegate, receiving location updates
and updating the user interface to reflect the new locations. Click the
CupertinoViewController.h file in the Classes group. Update the file by
importing the Core Location header file, indicating that we’ll be
conforming to the CLLocationManagerDelegate protocol, and adding properties for the location manager (locMan), a label with the distance to Cupertino (distanceLabel), and two subviews (distanceView and waitView), as demonstrated in Listing 1.
Listing 1.
#import <UIKit/UIKit.h>
#import <CoreLocation/CoreLocation.h>

@interface CupertinoViewController : UIViewController
    <CLLocationManagerDelegate> {

        CLLocationManager *locMan;
        IBOutlet UILabel *distanceLabel;
        IBOutlet UIView *distanceView;
        IBOutlet UIView *waitView;

}

@property (assign, nonatomic) CLLocationManager *locMan;
@property (retain, nonatomic) UILabel *distanceLabel;
@property (retain, nonatomic) UIView *distanceView;
@property (retain, nonatomic) UIView *waitView;

@end
|
For each of the properties, add a corresponding @synthesize line to the CupertinoViewController.m implementation file, following the @implementation directive:
@synthesize locMan;
@synthesize distanceLabel;
@synthesize distanceView;
@synthesize waitView;
Finally, add a release for each of these objects to the implementation file’s dealloc method:
- (void)dealloc {
    [locMan release];
    [distanceLabel release];
    [distanceView release];
    [waitView release];
    [super dealloc];
}
Creating the User Interface
The user interface for this hour’s lesson is simple:
We can’t perform any actions to change our location (teleportation isn’t
yet possible), so all we need to do is update the screen to show
information about where we are.
Double-click the CupertinoViewController.xib file in
the Resources group to open Interface Builder, and then complete the
following steps:
1. | Start by adding a UIImageView onto the view and center it so that it covers the entire view. This will serve as the background image for the application.
|
2. | With the image view selected, open the Attributes Inspector (Command+1). Select apple.png from the Image drop-down list.
|
3. | Next, drag a UIView
on top of the image view. Size it to about 80 points high and up to the
left, right, and bottom edge guidelines. This view will serve as our
primary information readout.
|
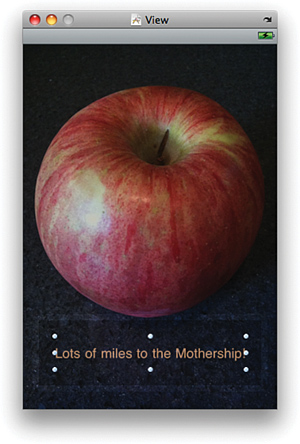
4. | Select the UIView
and open the Attributes Inspector (Command+1). Click the Background
color and set the background to black. Change the Alpha to 0.75 and
check the Hidden check box.
|
5. | Add a UILabel to the UIView. Size the label up to all four edge guidelines and change the text to read Lots of miles to the Mothership.
|
6. | Select
the label and open the Attributes Inspector (Command+1). Click the
center Layout button, uncheck the Adjust to Fit check box for the Font
Size attribute, and change the text color to white. The view should now
look like Figure 2
|
7. | Create a second semitransparent UIView with the same attributes as the first, but not hidden, and with a height of 77 points. Drag the second view to vertically center it on the background.
|
8. | Add a new label to the second view that reads Checking the Distance. Resize the label so that it takes up approximately the right two-thirds of the semitransparent view.
|
9. | From the library, drag a UIActivityIndicatorView to the new semitransparent view. Follow the guides to neatly align the activity indicator to the left of the label.
|
10. | With the activity indicator selected, open the Attributes Inspector (Command+1). Check the check box on the Animated attribute.
|
11. | Open the Document window. Control-drag from the File’s Owner icon to the Lots of Miles label, choosing the distanceLabel output when prompted. Do the same for the two views, connecting the view with the activity indicator to the waitView outlet and the view that contains the distance estimate to the distanceView outlet.
|
The final view should resemble Figure 3. When satisfied with your results, save the XIB file and return to Xcode.