Requesting and Using Heading Updates
Before asking for heading updates, we should check
with the location manager to see whether heading updates are available
via the class method headingAvailable. If heading updates
aren’t available, the arrow images will never be shown, and the
Cupertino application works just as before. If headingAvailable returns YES, set the heading filter to 10 degrees of precision and start the updates with startUpdatingHeading. Update the viewDidLoad method of the CupertinoViewController.m file, as shown in Listing 2.
Listing 2.
- (void)viewDidLoad {
    [super viewDidLoad];

    locMan = [[CLLocationManager alloc] init];
    locMan.delegate = self;
    locMan.desiredAccuracy = kCLLocationAccuracyThreeKilometers;
    locMan.distanceFilter = 1609; // a mile
    [locMan startUpdatingLocation];
    if ([CLLocationManager headingAvailable]) {
      locMan.headingFilter = 10; // 10 degrees
      [locMan startUpdatingHeading];
    }
}
|
As previously mentioned, we now need to store the
current location whenever we get an updated location from Core Location
so that we can use the most recent location in the heading calculations.
Add a line to set the recentLocation property we created to the newLocation in the locationManager:didUpdateLocation:fromLocation method and another to stop updating the heading if we are within 3 miles of the destination. The changes to the locationManager:didUpdateLocation:fromLocation method can be seen in Listing 3.
Listing 3.
- (void)locationManager:(CLLocationManager *)manager
    didUpdateToLocation:(CLLocation *)newLocation
           fromLocation:(CLLocation *)oldLocation {

    if (newLocation.horizontalAccuracy >= 0) {

         // Store the location for use during heading updates
        self.recentLocation = newLocation;

        CLLocation *Cupertino = [[[CLLocation alloc]
                                  initWithLatitude:kCupertinoLatitude
                                  longitude:kCupertinoLongitude] autorelease];
        CLLocationDistance delta = [Cupertino distanceFromLocation: newLocation];
        long miles = (delta * 0.000621371) + 0.5; // meters to rounded miles
        if (miles < 3) {
            // Turn off the location manager updates
            [manager stopUpdatingLocation];
            [manager stopUpdatingHeading];

            // Congratulate the user
            distanceLabel.text = @"Enjoy the\nMothership!";
        } else {
            NSNumberFormatter *commaDelimited = [[[NSNumberFormatter alloc]
                                                   init] autorelease];
            [commaDelimited setNumberStyle:NSNumberFormatterDecimalStyle];
            distanceLabel.text = [NSString stringWithFormat:
                                  @"%@ miles to the\nMothership",
                                  [commaDelimited stringFromNumber:
                                  [NSNumber numberWithLong:miles]]];
        }
        waitView.hidden = YES;
        distanceView.hidden = NO;
    }
}
|
Calculate the Heading to Cupertino
In
the previous two sections, we avoided doing calculations with latitude
and longitude. This time, it requires just a bit of computation on our
part to get a heading to Cupertino, and then to decide whether that
heading is straight ahead or requires the user to spin to the right or
to the left.
Given two locations such as the user’s current
location and the location of Cupertino, it is possible to use some basic
geometry of the sphere to calculate the initial heading the user would
need to use to reach Cupertino. A search of the Internet quickly finds
the formula in JavaScript (copied here in the comment), and from that,
we can easily implement the algorithm in Objective-C and provide the
heading.
First, add two constants to
CupertinoViewController.m, following the latitude and longitude for
Cupertino. Multiplying by these constants will allow us to easily
convert from radians to degrees and vice versa:
#define deg2rad 0.0174532925
#define rad2deg 57.2957795
Next, add the headingToLocation:current method in the CupertinoViewController.m file as in Listing 4.
Listing 4.
/*
 * According to Movable Type Scripts
 * http://mathforum.org/library/drmath/view/55417.html
 *
 * Javascript:
 *
 * var y = Math.sin(dLon) * Math.cos(lat2);
 * var x = Math.cos(lat1)*Math.sin(lat2) -
 * Math.sin(lat1)*Math.cos(lat2)*Math.cos(dLon);
 * var brng = Math.atan2(y, x).toDeg();
*/
-(double)headingToLocation:(CLLocationCoordinate2D)desired
                  current:(CLLocationCoordinate2D)current {

    // Gather the variables needed by the heading algorithm
    double lat1 = current.latitude*deg2rad;
    double lat2 = desired.latitude*deg2rad;
    double lon1 = current.longitude;
    double lon2 = desired.longitude;
    double dlon = (lon2-lon1)*deg2rad;

    double y = sin(dlon)*cos(lat2);
    double x = cos(lat1)*sin(lat2) - sin(lat1)*cos(lat2)*cos(dlon);

    double heading=atan2(y,x);
    heading=heading*rad2deg;
    heading=heading+360.0;
    heading=fmod(heading,360.0);
    return heading;
}
|
Handling Heading Updates
The CupertinoViewController class implements the CLLocationManagerDelegate protocol, and as you learned earlier, one of the optional methods of this protocol, locationManager:didUpdateHeading, provides heading updates anytime the heading changes by more degrees than the headingFilter amount.
For each heading update our delegate receives, use
the user’s current location to calculate the heading to Cupertino, then
compare the desired heading to the user’s current heading, and finally
display the correct arrow image: left, right, or straight ahead.
For these heading calculations to be meaningful, we
need to have the current location and some confidence in the accuracy of
the reading of the user’s current heading. Check these two conditions
in an if statement before performing the heading calculations. If this sanity check does not pass, just hide the directionArrow.
Because this heading feature is more of a novelty
than a true source of directions (unless you happen to be a bird or in
an airplane), there is no need to be overly precise. Use +/–10 degrees
from the true heading to Cupertino as close enough to display the
straight-ahead arrow. If the difference is greater than 10 degrees,
display the left or right arrow based on whichever way would result in a
shorter turn to get to the desired heading. Implement the locationManager:didUpdateHeading method in the CupertinoViewController.m file, as shown in Listing 5.
Listing 5.
- (void)locationManager:(CLLocationManager *)manager
       didUpdateHeading:(CLHeading *)newHeading {

    if (self.recentLocation != nil && newHeading.headingAccuracy >= 0) {
        CLLocation *cupertino = [[[CLLocation alloc]
                                   initWithLatitude:kCupertinoLatitude
                                   longitude:kCupertinoLongitude] autorelease];
        double course = [self headingToLocation:cupertino.coordinate
                                        current:recentLocation.coordinate];
        double delta = newHeading.trueHeading - course;
        if (abs(delta) <= 10) {
            directionArrow.image = [UIImage imageNamed:@"up_arrow.png"];
        } else {
            if (delta > 180) directionArrow.image =
                                    [UIImage imageNamed:@"right_arrow.png"];
            else if (delta > 0) directionArrow.image =
                [UIImage imageNamed:@"left_arrow.png"];
            else if (delta > -180) directionArrow.image =
                [UIImage imageNamed:@"right_arrow.png"];
            else directionArrow.image = [UIImage imageNamed:@"left_arrow.png"];
        }
        directionArrow.hidden = NO;
    } else {
        directionArrow.hidden = YES;
    }
}
|
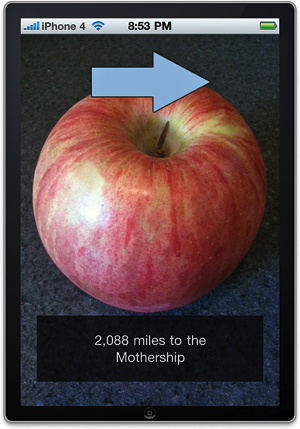
Build and run the project. If
you have a device equipped with an electromagnetic compass, you can now
spin around in your office chair and see the arrow images change to
show you the heading to Cupertino. If you run the updated Cupertino
application in the iPhone Simulator, you will have an arrow pointing to
the right as a result of the simulator’s one simulated heading update
(see Figure 2).
