In general, Silverlight is
Microsoft's cross-web browser, cross-platform, and cross-device plug-in
for delivering the nextgeneration of .NET Framework-based rich
interactive applications for the Web and the Windows desktop. On the
Web, Silverlight runs onWindows in Internet Explorer 6 or later, Mozilla
Firefox, and Chrome build 1251 and later. Silverlightalso runs on the
Apple Mac in both Safari and Firefox, as well as on Linux in Firefox as
part of theMoonlight project (www.mono-project.com/Moonlight), a collaboration project between Novell and Microsoft to bring Silverlight to Linux.
1. Silverlight for Windows Phone
Windows Phone 7 brings
Silverlight to Windows Phone. Silverlight on Windows Phone 7 is based on
Silverlight 3, with some Silverlight 4 features that were brought
forward to the platform. There are some notable differences between
Silverlight for the desktop and Silverlight for Windows Phone 7:
Silverlight
for Windows Phone 7 applications are deployed via Marketplace on the
device and via the Zune client. Silverlight applications are not
deployed from the Web or side-loaded from a PC to Windows Phone 7.
Silverlight
for Windows Phone 7 applications do not run in IE Mobile. Silverlight
applications run directly on the phone via a host process in isolation
from one another. If you are a Silverlight developer, you can think of
it as a Silverlight out-of-browser application only – applications do
not run in a browser.
Some
Silverlight Framework APIs are not applicable to Windows Phone 7. One
example is the APIs that enable Silverlight in the web browser to
communicate with the host browser. Because Silverlight does not run in
the browser on Windows Phone 7, these APIs are not applicable.
Silverlight
for Windows Phone 7 includes additional functionality to make
underlying device capabilities available to developers such as the
built-in sensors, tasks, and choosers to enable selecting a contact,
send an SMS or email, and so on.
Despite these
differences, the vast majority of the Silverlight Framework is
compatible between Silverlight for the Web/desktop and Silverlight for
Windows Phone so learning Silverlight is a great way to also learn how
to build cross-platform applications between the Web, desktop, and
Windows Phone 7.
2. Hello Silverlight for Windows Phone
Now that you have a
high-level overview of the application platform and programming model,
let's dive a little bit deeper into Silverlight development with the
Windows Phone Developer Tools. We start first with an overview of Visual
Studio 2010.
Silverlight
development was available in Visual Studio 2005 and 2008; however,
support for Silverlight really shines in Visual Studio 2010, making it a
first-class citizen development technology with great tooling support. I
also provide a very high-level overview of Expression Blend, now in its
fourth version and included as a free download for Windows Phone
development as part of the Windows Phone Developer Tools.
2.1. Visual Studio 2010 Tour
Once you have the Windows Phone Developer Tools installed, fire up Visual Studio 2010 and select File => New =>
Project... to bring up the New Project dialog. Select Silverlight for
Windows Phone on the left of the dialog and then select Windows Phone
Application. Enter a name and location and then click OK to create it.
After the project is
created, double-click on MainPage.xaml in the Solution Explorer tool
window on the right to bring up the main application form or page. Figure 1 shows the UI with key items highlighted.
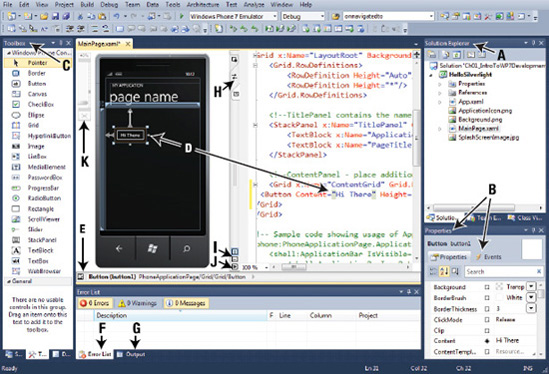
Table 1 explains the identified items in the figure. If you are an experienced
.NET developer, some of these may be obvious to you, but other items may
not be so familiar.
Table 1. Visual Studio Silverlight Developer Tools
| Letter | Description |
|---|
| A | Solution
Explorer tool window: Lists the projects and project files for the
entire solution. Right-clicked enabled for those new Visual Studio, so
you will want to explore. The toggle buttons at the top show/hide hidden
files, refresh file lists, and provide short cuts so show the code or
designer for a particular file. |
| B | Properties
tool window: Lists the properties for the selected item in the designer
or the item where the cursor is in the XAML markup file. Click the
lightning bolt to switch to view the events for the selected object. |
| C | Toolbox tool window: Lists the controls available for drag-and-drop on to the designer. |
| D | The
main area where designer and code files are viewed and edited. On the
left is the Windows Phone designer view of the XAML code on the right.
Notice the button that was dropped onto the designer. The areas point to
both the design-time visualization of the button, as well as the XAML
markup that actually defines the button. You can edit in either view and
the changes are reflected in both views. |
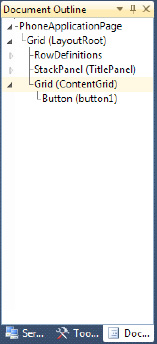
| E | Document Outline tool window: Actually the button that displays the Document Outline as shown in Figure 1-7.
It may not look like much but it presents the XAML markup, an XML tree,
in a hierarchical view. As you design and develop your application, the
nesting can be deep. When you select an item in the Document Outline,
the focus shifts to that item for the Properties tool window. The
Document Outline is an important part of your workflow to quickly find
controls, modify properties, and so on. |
| F | When
you build your project, errors show up in this tool window. Many times
you can double-click on an error and it takes you to the correct line of
code. |
| G | The
Output tool window will show you what's going on during a build. It is
also the window where Debug. WriteLine messages appear if you have them
in your code. |
| H | Click this button to swap the sides where the Windows Phone designer view and the XAML view appear. |
| I | This arrow points to two buttons that position the Windows Phone design view and XAML view either side-by-side-or vertically. |
| J | Click this button to expand the Windows Phone designer to full screen. |
| K | Use this slider to Zoom the designer in size to fit your screen best or to drill in for more exact positioning of controls. |
Figure 2
shows the Document Outline tool window. Once you start using it as part
of your development workflow, you will find it invaluable for anything
but the most trivial projects.
Now that I have provided a
quick tour of Visual Studio 2010 for Windows Phone development, let's
dive in with some code. Add a button toward the top middle portion of
the form. Double-click on the button to create the default event handler
for the control, which is the Click event for a Button control. Doing so creates the following event handler that is edited to adjust the content for the button:
private void button1_Click(object sender, RoutedEventArgs e)
{
  (sender as Button).Content = "Hi There Reader";
}
We can reference the button by name, button1, created by default. In the above code, since the button1 is also the sender, we simply cast sender to button and set the Content property. A question you may be asking is how is the event handler associated with the Button object? The answer is via the XAML markup for button1, shown here:
<Button Content="Hi There" Height="72" HorizontalAlignment="Left" Margin="47,101,0,0"
Name="button1" VerticalAlignment="Top" Width="160" Click="button1_Click" />
All of the XAML was
automatically generated when the control was dropped onto the designer
surface except for the value configured in Content property and this line of code that associates the event handler in the MainPage.xaml.cs code-behind with the Click event for the control:
Click="button1_Click"
You can also generate
event handlers by editing XAML directly. Drag another button on to the
design-surface below the first. Change the Width property to Auto for this button, more on that later. Next go to the markup and type Click= inside of the <Button ...> markup for the second Button control. Figure 3 shows the IntelliSense pop-up.
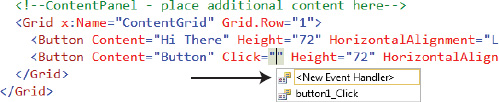
You can arrow up or down in the pop-up window shown in Figure 3 to select an existing event handler, or simply type Tab
to generate a new event handler into the code-behind file named
button2_Click by default. We copy the same code from the first event
handler into the second event handler and click F5 or the green arrow in
the toolbar in Visual Studio to run the application the emulator as
shown in Figure 4.
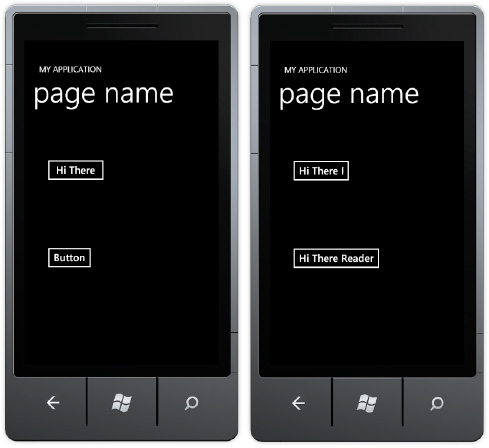
In Figure 1-9,
the image on the left shows the initial state, and the image on the
right shows the state after clicking both buttons. Notice that the text
is clipped on the top button while the bottom button automatically
expanded. Remember that when I added the second button the Width was set
to Auto. By setting the Width to Auto,
we rely on the Silverlight layout system to determine the appropriate
width for the control.
2.2. Expression Blend 4 for Windows Phone Tour
Expression Blend is a
relatively new tool available from Microsoft. It was first introduced
with Windows Presentation Foundation as the user experience design tool.
I discussed XAML as part of the overview in this section and a little
bit during the walkthrough in the previous section, but to reiterate,
the UI Markup language for WPF and Silverlight is Xml Application Markup
Language XAML, It has great tooling support provided in both Visual
Studio and Expression Blend, which I cover here.
Expression Blend is positioned as a
designer tool, more for a technical designer who takes mock-ups from
Adobe Photoshop or another drawing tool and turns it into XAML.
Expression Blend 4 can import from Adobe Photoshop as well as Adobe
Illustrator files to help jumpstart from mock-up to XAML. Figure 5 shows the Expression Blend 4 UI with the Ch01_IntroToWP7Development solution open.
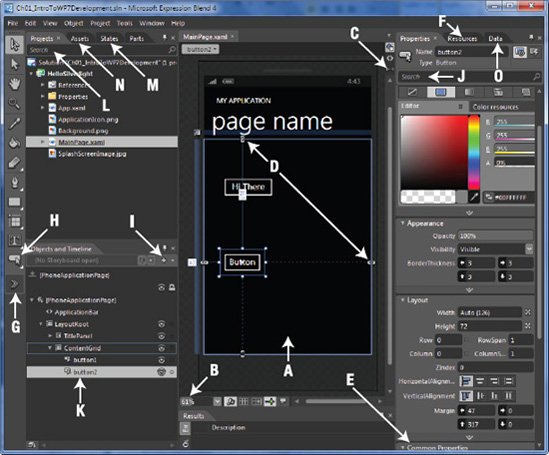
Figure 5 shows Expression Blend 4 with a simple project opened in order to provide an overview of the tool's major features. Table 2 provides a quick description of the lettered arrows.
Table 2. Expression Blend 4 Features
| Annotation | Description |
|---|
| A | This is the designer surface, also known as the Artboard, which supports drag-and-drop editing. |
| B | Use
this to zoom in or out of the designer surface as needed. Zoom out to
see the entire application, or zoom in close to perform precise visual
editing. |
| C | Tabs allow you to switch between the design surface, the XAML markup, or split view to see both the design surface and XAML. |
| D | These
represent grid lines for laying out controls in the UI. When you move
the mouse over the edge of the Grid control, the UI provides a visual
cue that you can add a grid line. |
| E | This is the Properties window; here, several sections are collapsed so that they fit in the view. |
| F | The
Resources window lists available resources such as styles and
templates. |
| G | Clicking
this chevron brings up the Asset Library, where you can search for a
control if you are not sure what the icon is or whether it is visible.
The Asset Library is similar to the Visual Studio toolbar area where
controls are listed. |
| H | The
little arrow in the lowerright-hand corner under some of the controls
shown in the Asset Library is a visual cue that related controls are
available for quick access. Clicking and holding the arrow brings up a
small window listing the related controls. Click a control and it
becomes the visual control for that section of the Asset Library. |
| I | Clicking this button creates a new Storyboard object. You use storyboards to design animations.
|
| J | This
is the extremely useful Search text box. Type a property name, and
Expression Blend 4 will search the list of properties available for the
control and bring the property into view for easy access. Be sure to
clear the Search text box when you've finished. Otherwise, it can be
confusing when you switch objects and the filter entered in the Search
text box does not apply, resulting in a blank properties window. |
| K | The
XAML visual tree is listed in this area of Expression Blend 4. The
yellow frame around the LayoutRoot control indicates that the LayoutRoot
control is the active element. This means that double-clicking a
control in the Asset Library will insert that control as a child to the
LayoutRoot control. Double-clicking another control, such as the
StackPanel, would make that one the active element and the insertion
point for child controls dragged on the visual design surface. |
| L | New in Expression Blend 4, this extremely useful Search text box allows you to find project files quickly. |
| M | The
Visual State Manager has an improved user interface in Expression Blend
4. More states for controls are displayed with a warning indicator when
a property has been changed in more than one state group. |
| N | New
in Expression Blend 4, the Assets tab provides fast access to project,
controls, styles, behaviors, and effects assets in a nicely organized
list. |
| O | The
Data tab provides designers with the ability to create either a sample
or live data source that makes it easier to design a data binding UI. |
Expression Blend has many
features that developers and designers will want to take advantage of,
such as design-time data, animations, visual states, UI templates, and
control templates.