As you build your iPhone
applications, consider how the user will be interfacing with the app.
Does it make sense to force a portrait-only view? Should the view rotate
to accommodate any of the possible orientations the phone may assume?
The more flexibility you give
the user to adapt to their own preferred working style, the happier
they’ll be. Best of all, enabling rotation is a very simple process.
Enabling Interface Rotation
To allow your
application’s interface to rotate and resize, all that is required is a
single method! When the iPhone wants to check to see if it should rotate
your interface, it sends the shouldAutorotateToInterfaceOrientation: message to your view controller, along with a parameter that indicates which orientation it wants to check.
Your implementation of shouldAutorotateToInterfaceOrientation should compare the incoming parameter against the different orientation constants in iOS, returning TRUE (or YES) if you want to support that orientation.
There are four basic screen orientation constants you’ll encounter:
| Orientation | iPhone Orientation Constant |
|---|
| Portrait | UIInterfaceOrientationPortrait |
| Portrait upside-down | UIInterfaceOrientationPortraitUpsideDown |
| Landscape left | UIInterfaceOrientationLandscapeLeft |
| Landscape right | UIInterfaceOrientationLandscapeRight |
For example, to allow your
iPhone interface to rotate to either the portrait or landscape left
orientations, you would implement shouldAutorotateToInterfaceOrientation: in your view controller with the code in Listing 1.
Listing 1.
- (BOOL)shouldAutorotateToInterfaceOrientation:
               (UIInterfaceOrientation)interfaceOrientation {
    return (interfaceOrientation == UIInterfaceOrientationPortrait ||
            interfaceOrientation == UIInterfaceOrientationLandscapeLeft);
}
|
The return statement handles everything! It returns the result of an expression comparing the incoming orientation parameter, interfaceOrientation, to UIInterfaceOrientationPortrait and UIInterfaceOrientationLandscapeLeft. If either comparison is true, TRUE is returned. If one of the other possible orientations is checked, the expression evaluates to FALSE.
In other words, just by adding this simple method to your view
controller, your application will automatically sense and rotate the
screen for portrait or landscape left orientations!
Did you Know?
To enable all possible rotation scenarios, you can simply use return YES; as your entire implementation of shouldAutorotateToInterfaceOrientation:.
At this point, adding this method to your
view controller code, returning YES for all orientations. Use Build and Run to test the applications in the iPhone simulator or on your device.
While some of the
applications will probably look just fine, you’ll notice that others,
well... don’t quite “work” in the different screen orientations, as
shown in Figure 1
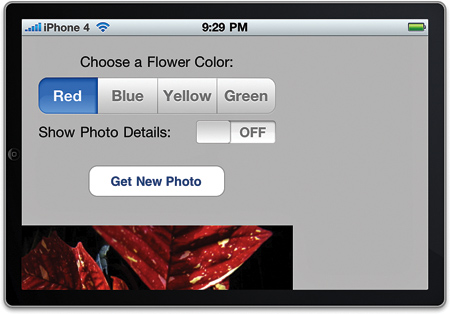
Because the iPhone screen
isn’t square, it stands to reason that landscape and portrait views
might not match up very well. Everything we’ve been building has been
designed in portrait mode, so how can we create interfaces that look
good in portrait or landscape mode? We obviously need to make some
tweaks!
I Get “Rotatable,” but What’s with the “Resizable?”
When the iPhone
rotates, the screen dimensions shift. You still have the same amount of
usable space, but it is laid out differently. To make the best use of
the available space, you can have your controls (buttons and so on)
resize for the new orientation—thus the combination of “rotatable” and “resizable” when discussing screen rotation.
Autorotation and Autoresizing
Interface Builder
provides tools for describing how your interface should react when it is
rotated. It is possible to define a single view in interface builder
that positions and sizes itself appropriately when rotated without
writing a single line of code!
This should be the
starting point for all interfaces. If you can successfully define
portrait and landscape modes in single view in Interface Builder, your
work is done.
Unfortunately,
autorotation/autoresizing doesn’t work well when there are many
irregularly positioned interface elements. A single row of buttons? No
problem! Half a dozen fields, switches, and images all mixed together?
Probably not going to work.
Reframing
As you’ve learned, each UI element is defined by a rectangular area on the screen—its frame property.
To change the size or location of something in the view, you can redefine the frame using the Core Graphics C function CGRectMake(x,y,width,height). CGRectMake accepts an x and y point coordinate, along with a width and height in points, and returns a new frame value.
By defining new frames for
everything in your view, you have complete control of each object’s
placement and size. Unfortunately, you’ll need to keep track of the
coordinate positions for each object. This isn’t difficult, per se, but
it can be frustrating when you want to shift an object up or down by a
few points and suddenly find yourself needing to adjust the coordinates
of every other object above or below it.
Swapping Views
A more dramatic approach to
changing your view to accommodate different screen orientations is to
use entirely different views for landscape and portrait layouts! When
the user rotates the device, the current view is replaced by another
view that is laid out properly for the orientation.
This means that you can
define two views in Interface Builder that look exactly the way you
want—but it also means that you’ll need to keep track of separate IBOutlets for each view! Although it is certainly possible for elements in the views to invoke the same IBActions,
they cannot share the same outlets, so you’ll potentially need to keep
track of twice as many UI widgets within a single view controller.
By the Way
To know when to change frames or swap views, you will be implementing the method willRotateToInterfaceOrientation:toInterfaceOrientation:duration: in your view controller. This method is called by the iPhone when it is about to change orientation.
Did you Know?
Apple has implemented a
screen-locking function in iOS 4 so that users can lock the screen in
portrait orientation without it changing if the device rotates. (This
can be useful for reading while lying on your side.) When the screen
lock is enabled, your application will not receive notifications about a
change in orientation. In other words, to support the screen lock, you
don’t need to do a thing!