Most games need to display
text while they are running, providing everything from the player's
score through to menus and game information pages. XNA provides a very
easy-to-use mechanism for showing text on the screen, so let's see what
it can do and how we use it.
1. Font Support
Fonts can cause all sorts of problem with regard to
licensing. The vast majority of fonts that are included with Windows or
can be downloaded from the Internet have license terms attached that
prevent you from redistributing them in your own games.
Fortunately, Microsoft has helped us out by licensing
a number of fonts that can be used and distributed in your Windows
Phone games without any threat of legal action. We will therefore
concentrate on how these particular fonts can be used in your games.
2. Creating SpriteFont Objects
Before we can display any text, we must first embed
the font into our program. XNA and Visual Studio between them take all
the pain out of doing this, and it can be mostly achieved with just a
few mouse clicks.
Just like all the image resources we have been using,
the font is added into the Content project. To add a font, right-click
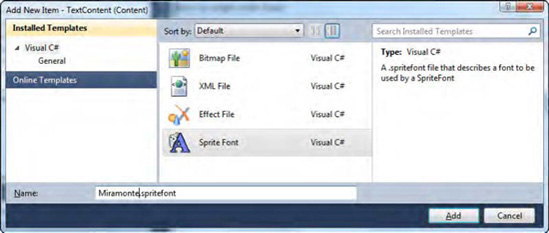
the main Content project node and select to Add a New Item. Select the SpriteFont
template in the Add New Item window and give the font a name—it's a
good idea to name it after the font that you plan to use, as shown in Figure 1.

Once the font has been added, a .spritefont
file will appear. This is an XML document that describes to the compiler
the details of the font that is to be used. When the Content project
compiles, it reads the font from disk and converts it into a bitmap
image to embed in your project. It is this image of the font rather than
the font itself that is therefore used by your program. The .spritefont file describes how this bitmap is to be constructed.
There isn't all that much within the file to change; the available items are as follows:
FontName provides the name of the
font to embed. Set it to one of the XNA licensed fonts mentioned in the
previous section or to any other font installed in Windows that you are
licensed to use.
Size
sets the size of the font to be used to generate the bitmap. If you
choose a large value, a higher-quality bitmap will be generated, but it
will require a lot more space and memory to process, which is
particularly wasteful if the font doesn't need to be displayed in large
sizes. Smaller values lower the resource requirements, but result in
blocky text appearing if the font is rendered larger than its default
size. You will need to find a balance between size and appearance when
setting this. The size is specified in points
rather than in pixels; due to the way points are handled by XNA, you
can find the approximate pixel size by adding one-third to the point
size (a point size of 12 will result in a pixel size of 16 pixels).
Spacing
sets the number of pixels that will be left as a horizontal gap between
each rendered character. Increasing it above 0 can make the text look
very spacedout, so use with caution.
UseKerning controls whether font kerning is used. Kerning
is the process whereby characters are moved closer together if it can
be achieved without the characters colliding. For example, the letters
"AV" can be positioned so that the boxes containing each letter overlap,
without the letters themselves touching. Kerning generally produces
much more natural-looking text, so should usually be left enabled.
Style allows the font style to be set to Regular, Bold, or Italic (it can also be set to Bold, Italic to combine these two styles).
CharacterRegions
provides one or more ranges of characters to be included within the
generated font bitmap. The smaller the number of characters, the smaller
the resulting bitmap. If, for example, you knew that you would be
including only uppercase letters in your game, you could omit the
lowercase letters from the font and thus reduce the resource
requirements. Multiple CharacterRegion elements can be included in the outer CharacterRegions element if required.
DefaultCharacter
optionally provides a placeholder character that will be used any time a
text string is printed that contains characters outside of the defined CharacterRegions. Without this, XNA will throw an exception if any such attempt to draw a string is made.
With the .spritefont file configured per
your requirements, Visual Studio will automatically build the bitmap
font each time the Content project is compiled.
3. Displaying Text
Our font is built and so we are ready to print with
it to the screen. This is straightforward and painless, and involves
first loading the font from the Content project, just as we did with our
sprite textures.
This is achieved by once again calling the Content.Load method from within our game's LoadContent procedure, but indicating this time that we want it to return a SpriteFont object, as shown in Listing 1.
Example 1. Loading the spritefont whose asset name is Miramonte
// Load the spritefont
        _fontMiramonte = Content.Load<SpriteFont>("Miramonte");
|
To print the text to the screen we once again use the SpriteBatch object, calling its other method for drawing: DrawString. A number of overloads for this are available, but essentially they are all the same except that some accept a String parameter, whereas others accept a StringBuilder, some expect parameters to control rotation and uniform scaling, and yet others allow non-uniform scaling.
The simplest version, which isshown in Listing 2, simply prints the text at the coordinate (100, 100) in white text.
Example 2. Using DrawString to display text to the screen
_spriteBatch.Begin();
        _spriteBatch.DrawString(_fontMiramonte, "Hello world", new Vector2(100, 100),
Color.White);
        _spriteBatch.End();
|
The text appears on the screen just as you would expect (see Figure 2). The specified coordinate refers to the top-left corner of the displayed text.

All the other features available to sprites are
available to spritefonts too, allowing us to display text in different
colors (including with variable alpha levels to allow text to fade in
and out of display), rotated to different angles, or scaled to whatever
size is required. The syntax for drawing text with these effects applied
is essentially just the same as for drawing sprites.
We also have the ability to specify an origin for the
text. When we drew sprites, we could easily identify the width and
height of the sprite by querying the Width and Height properties of the Texture2D
object used to provide the sprite image. But for text, the size will be
different for every string we draw depending on the string being
displayed.
To overcome this, the SpriteFont object provides a very useful function called MeasureString. When the function is passed the text to be displayed, it returns a Vector2 structure with the required text width stored in its X property and the text height in its Y
property. This allows us to easily determine the dimensions of the
rendered string, and this value can be used as the basis of calculating DrawString Origin parameter. Finding the center point is especially easy because the Vector2 can be multiplied or divided by a scalar value, resulting in its X and Y
values being multiplied or divided by the provided value. The center
point can thus be obtained by simply dividing the result from MeasureString by 2.
|
XNA can include line breaks within strings, both when drawing and measuring. Insert them into a string in C# using the \n character sequence.
|
|
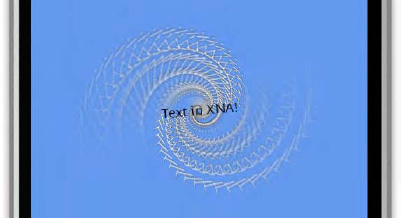
Listing 3 shows an extract from the Text
example project that does something a little more exciting-looking than
the simple "Hello world" text. It measures a text string so that it can
determine its center point and then uses it to draw a series of text
strings to the same position on the screen, with each string a little
larger, further rotated, and more faded than the last.
Example 3. A text-based graphical effect using rotation, scaling, and alpha blending
// Calculate the size of the text
        textString = "Text in XNA!";
        textsize = _fontMiramonte.MeasureString(textString);
        // Draw it lots of times
        for (int i = 25; i >= 0; i--)
        {
            // For the final iteration, use black text;
            // otherwise use white text with gradually increasing alpha levels
            if (i > 0)
            {
                textcolor = new Color(255, 255, 255, 255 - i * 10);
            }
            else
            {
                textcolor = Color.Black;
            }
            // Draw our text with its origin at the middle of the screen and
            // in the center of the text, rotated and scaled based on the
            // iteration number.
            _spriteBatch.DrawString(_fontMiramonte, textString, new Vector2(240, 400),
textcolor, MathHelper.ToRadians (_angle * ((i + 5) * 0.1f)),
textsize / 2, 1 + (i / 7.0f), SpriteEffects.None, 0);
        }
|
The code actually loops backward so that the most
faded/rotated/enlarged text is displayed first; each additional
iteration draws a more focused version on top of it. The color is
finally set to black for the very last iteration to make the text easier
to read.
The DrawString call may look a bit complex,
but if we break it down it's really very simple. We specify the
spritefont to use, the text to write, and the position of the text
origin, which is hard-coded at (240, 400) for simplicity in this
example. After the color, we then provide the rotation angle, which is
modified for each iteration so that each piece of text appears at a
slightly different angle. The origin is specified next, simply by
passing the textsize value retrieved from MeasureString, divided by 2 so that we obtain its center point. Finally we specify the scale, also set to change for each iteration, the SpriteEffect (which can be used to flip text upside down or back to front), and the layer depth.
Once this is all put together, the output is as shown in Figure 3. This can also be seen in action in the Text example project, which is another example that looks much better in motion than in a static screenshot.

Although the display of text
is a basic requirement, XNA nevertheless provides a variety of options
to make its display interesting and flexible.