Search for Tagged Notes
The real power of tagging notes is the ability to
search for specific tags and instantly retrieve the notes that are
associated with them. This becomes more and more useful over time, as
your notebook grows in size and complexity.
To begin looking for tagged notes, do the following:
1. | On the Home tab, in the Tags group, click the Find Tags button, which is located just to the right of the tags list.
|
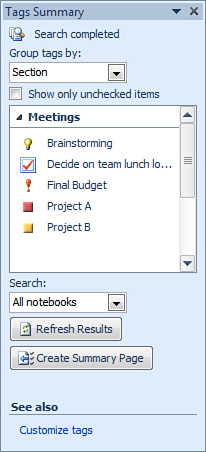
2. | In
the Tags Summary pane that opens near the right side of the OneNote
program window, OneNote will display a list of all tagged notes in the
current notebook (see Figure 3).
This initial view lets you step through all of your tagged notes so you
can review them and remind yourself about any important items that you
might have forgotten about.
|
3. | To
review the results list, use the scrollbar in the task pane (if
displayed) to go through all of the tags that OneNote found. To go to a
tagged note on its original page, click its entry in the results list.
|
|
You can customize the display of the tagged notes
results list by changing the Group tags drop-down at the top of the Tag
Summary task pane to a different sort option. For example, you could
choose to display the tagged notes by the name of the sections they
appear in. When you change this filter, the results list is instantly
updated with your new display preference.
|
If you have a large number of tags applied to
copious amounts of text, you might want to change the search scope to
narrow your results to what you’re really looking for. At the bottom of
the Tag Summary task pane, under Search, click the drop-down menu and
then change the default search scope (“This notebook”) to one of the
other options you want. For example, you could narrow the results list
to only show tags in the current section or only tags applied to notes
you’ve taken today. Likewise, if you’re having trouble finding a tagged
note again, you can temporarily change the search scope to include
tagged notes in all notebooks.
Finally, if the results list is showing you the
tagged notes you were looking for, you have the option of creating a
tag summary page, which causes OneNote to take the
note tag search results and copy them over to a new page, which you can
then use to create lists of your tagged (i.e., categorized and
prioritized) notes and follow-up items.
The multifaceted benefits of tagging your notes will
become more evident over time, when your notebooks will contain more
and more notes in a larger variety of subjects.
Removing a Tag from a Note
When a tag is no longer needed to mark a specific
part of your notes, you can remove it. This is recommended if you don’t
want to keep seeing old tagged notes in your current results when the
search scope is fairly broad.
To remove a tag, do the following:
1. | Navigate
to the note that contains the tag you want to remove. (If you still
have your tags displayed in the Tag Summary task pane, you can click
the search result containing that note and tag to quickly jump to it.)
|
2. | Click the note text that contains the tag you want to remove.
|
3. | On
the Home tab, in the Tags group, click the small downward-facing arrow
at the bottom of the tags list box. A ToolTip will say “More” if you
hover over this arrow .
|
4. | At the bottom of the pop-up menu that appears, click Remove Tag.
|
Customizing Note Tags
If some of the tag icons and their descriptions
don’t quite match your needs, you can modify any existing tag or create
your own.
To customize a note tag, do the following:
1. | On
the Home tab, in the Tags group, click the small downward-facing arrow
at the bottom of the tags list box. A ToolTip will say “More” if you
hover over this arrow .
|
2. | At the bottom of the pop-up menu that appears, click Customize Tags. |
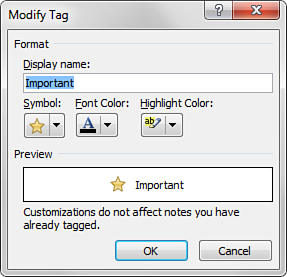
3. | In the Customize Tags dialog box that opens, do one of the following:
To customize an existing tag, select it in the list and then click Modify Tag. To create a brand new tag, click New Tag.
|
4. | After you have modified or created a tag by specifying the name, icon, and optional highlight color you want (see Figure 4),
return to the Customize Tags dialog box and then use the up and down
arrows near the upper right of the tags list to move a selected tag up
or down in the list. For example, you could move the tags you create
and modify to the top of the list so they appear before all of the
others.
|
5. | Click OK to save your changes.
|
|
If you use OneNote on more than one computer and you
want to use the note tags that you’ve created or customized on all of
your computers, you can copy a single file that stores this
information. On the computer where you created or modified your custom
note tags, find the Preferences.dat file that is located in
C:\Users\<username>\AppData\Roaming\Microsoft OneNote\14.0\ and
copy this file to the same location on any of your other computers
running Microsoft OneNote 2010.
Alternately, if you only have one or two custom tags
you want to transfer to another computer, you can quickly do so by
applying each custom tag to some notes text and then e-mailing that
page to yourself on your other computer. There, open the page in
OneNote 2010 and then right-click any custom note tag. On the shortcut
menu that appears, click Add to My Tags. Repeat this for any additional
tags. When this is done, the custom tags will be available in the Tags
list on the other computer. Note that this method only works for tags
that contain an icon. If you created custom tags that only change the
highlight color of text, for example, you’ll need to do it the long way
and transfer your preferences file.
|
When you’re done trying out the tagging features,
close the Tag Summary task pane by clicking the X in the upper-right
corner of the task pane.
Searching for tagged notes is only part of OneNote’s
powerful search capability. I’ve saved the best for last—the ability to
search for and instantly find virtually anything in your notes.