PowerPoint includes so many shape creation and
formatting options that you’re unlikely to ever use them all—and
probably shouldn’t. These features are simple enough to meet the needs
of the casual user, yet powerful enough that a sophisticated PowerPoint
designer can customize them heavily.
Inserting a Shape
To insert a shape on your slide, follow these steps:
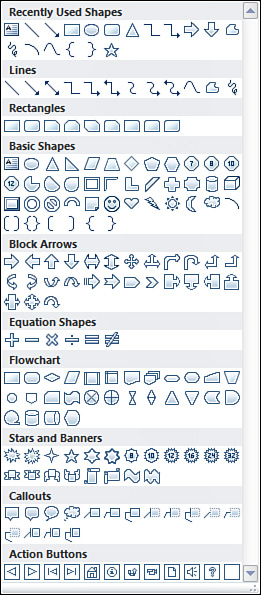
1. | On the Insert tab, click the Shapes button. The Shapes gallery opens, as shown in Figure 1.
|
If
you’ve already inserted another shape and the Drawing Tools—Format tab
appears, you can access the Shapes gallery from this tab as well.
|
| 2. | From the gallery, select the shape you want to insert. Gallery options include the following:
- Recently Used Shapes— Insert
one of the shapes you’ve most recently used in your PowerPoint
presentations. If you have a new installation of PowerPoint 2010, this
option won’t appear.
- Lines—
Insert a straight line or arrow, or a special line form such as a
curve, scribble, or freeform. Also includes six different connectors,
which draw lines between objects. When you move an object, the connector
stays attached and moves with it.
|
To force a connection
between two objects to be the shortest distance, reroute the connector.
To do this, go to the Drawing Tools—Format tab, click the Edit Shape
button in the Insert Shapes group, and choose Reroute Connectors.
|
- Rectangles— Insert one of nine different rectangular shapes, including the Rounded Rectangle and Snip Single Corner Rectangle.
- Basic Shapes— Insert a common shape, such as
Polygons, such as a hexagon, a triangle, a parallelogram, and so on 3-D shapes, such as a box and a cylinder Fun shapes, such as a crescent moon, a smiley face, and a lighting bolt Grouping and connecting shapes, such as brackets and braces
- Block Arrows— Insert a large block arrow, curved or bent arrow, or callout with arrows.
- Equation Shapes— Insert a plus, minus, multiplication, division, equal, or not equal sign.
- Flowchart— Insert a flowchart image such as a process, a decision, a document, an input, or a terminator.
- Stars and Banners— Insert a wave, a scroll, a ribbon, an explosion, or a pointed star.
- Callouts—
Insert one of several kinds of callouts. A callout is a line with a
text box connected to one end. You put the line’s free end on something
you want to highlight, place the text box to the side, and type
descriptive text in it.
- Action Buttons—
Insert an Action Button. Action Buttons make your presentation
interactive, performing actions such as navigating among slides, running
programs, and playing sounds.
| 3. | On
your slide, click where you want the shape to appear, and drag until
the shape is the size you want. You can then format the shape as you
would any other object.
|
|
Keep in mind that
although PowerPoint shapes make it easy to create an attractive graphic,
they aren’t designed for complex graphic needs. If you need something
more detailed, consider using SmartArt or inserting a Microsoft Visio
graphic.
|
Inserting Lines and Arrows
You can add lines and arrows
to your presentation to draw attention to something, show how things are
connected, or show how one thing leads to another. For example, you
might want to add a line beneath a word or phrase to draw attention to
it. You might also use an arrow to point to text or an object of special
importance. You can also draw simple graphics with the line, rectangle,
and oval shapes.
|
If
you use lines or arrows to emphasize text, remember that they don’t
move even when you add or remove text. You have to move each shape
manually.
|
Drawing a Line or Arrow
To draw a line or arrow on your slide, follow these steps:
1. | On the Insert tab, click the Shapes button to open the Shapes gallery (refer to Figure 1).
| 2. | Click one of the buttons in the Lines section of the Shapes gallery. The mouse pointer becomes a plus sign.
| 3. | Click (and hold down) where you want the line to begin, and drag to where you want the line to end.
|
|
Press the Shift key as you
drag the mouse to create straight horizontal or vertical lines. This
lets you draw lines at angles evenly divisible by 15 (0, 15, 30, 45, and
so forth), which makes it much easier to create a straight line. Press
the Ctrl key as you drag the mouse to draw a line from a center point,
lengthening the line in both directions as you drag.
|
If the line looks crooked or is
the wrong length, you can adjust it. First, select the line. Then pause
your mouse over one of the circles that appear at the end of the line.
The mouse pointer becomes a line with an arrowhead at both ends. Click
and drag the circle to lengthen the line or adjust its angle. If the
line isn’t in the right place, you can move it. First, select the line.
Then pause your mouse over the line. The mouse pointer becomes a cross
with arrowheads at all four ends. Click and drag the line to move it.
Inserting Rectangles and Ovals
|
By using the options in the
Shape Outline palette, you can easily change the appearance of a line or
arrow by adjusting its width or converting it to a dashed line.
|
You
can draw rectangular and oval shapes directly on your presentation.
Using shapes lets you emphasize important information, group
information, or illustrate other ideas or concepts.
To draw a rectangle, click one
of the buttons in the Rectangles section of the Shapes gallery. The
mouse pointer becomes a plus sign. Click where you want the rectangle to
appear, and drag to draw the rectangle.
|
To draw a perfect circle, press the Shift key while you draw the shape.
|
To draw an oval, click the
Oval button in the Basic Shapes section of the Shapes gallery. The mouse
pointer becomes a plus sign. Click where you want the oval to appear
and drag to draw the oval.
|
To draw a square, press the Shift key while you draw the shape.
|
You can then reshape and resize these images or apply other formatting to them.
You can add text to a
rectangular or oval shape. If you want to add only a word or two, select
the shape and type in the text you want to enter. Or click the Text Box
button on either the Insert tab or the Drawing Tools—Format tab and
create a text box inside the original object. Be sure, however, that the
text box fits into the object without overlapping its borders.
|