IT tutorials
 
Office
 

Microsoft Visio 2010 : Aligning and Arranging Shapes (part 1) - Working with the Dynamic Grid

- Free product key for windows 10
- Free Product Key for Microsoft office 365
- Product Key Free : Microsoft Office 2019 – Serial Number
1/9/2014 2:33:10 AM

Visio 2010 has several features for keeping your shapes neatly in order. Some help you maintain tidiness while you draw; others enable you to clean up the mess afterward.

1. Using the Dynamic Grid to Align Shapes as You Draw

If you’ve noticed thin, orange lines and arrows briefly appearing as you drop shapes on the page, you’ve already seen the Dynamic Grid in action. The Dynamic Grid aims to prevent the mess before it happens.

Working with the Dynamic Grid
1.
Create a new drawing using the Basic Flowchart template.

2.
For flowcharts, the Dynamic Grid is on by default, but you can double-check. Go to the View tab and make sure that Dynamic Grid in the Visual Aids group is checked.

3.
Drag and drop a Process shape onto the page.
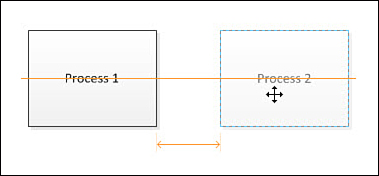
4.
Drag a second Process shape directly to the right of the first one. As you drag, notice the orange line and arrow that appear, as shown in Figure 1. The horizontal line indicates vertical alignment between the shapes. The horizontal arrows indicate uniform spacing, which doesn’t mean much when you have only two shapes on the page. For the first two shapes on a page, the Dynamic Grid uses a standard spacing that is defined for the drawing.
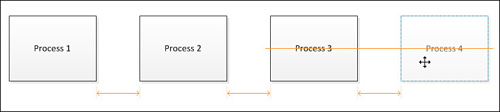
Figure 1. The Dynamic Grid appears while you drag. Here it indicates vertical alignment and standard spacing between the shapes.


5.
Drag a few more Process shapes onto the page, continuing to the right. Drop them when you see the alignment line and spacing arrows, as shown in Figure 2. The uniform spacing arrows now make a lot more sense!
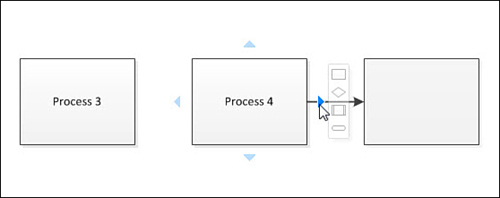
Figure 2. The Dynamic Grid helps to enforce uniform spacing between shapes.

6.
In a flowchart, you would normally connect as you go, which you haven’t done so far. Mouse over your last Process shape and use the AutoConnect arrows to add another Process shape to the right. Notice that it is aligned vertically with the other shapes and spaced equally. Figure 3 shows the result; you can see that AutoConnect uses the same standard spacing as the Dynamic Grid to place new shapes.


Figure 3. AutoConnect uses the same standard spacing that the Dynamic Grid uses when offsetting new shapes.

7.
Drag any of the existing Process shapes so that it is below one of the others. As you drag, notice that a vertical line and vertical arrows appear. The Dynamic Grid ensures alignment and uniform spacing for vertical rows of shapes as well.
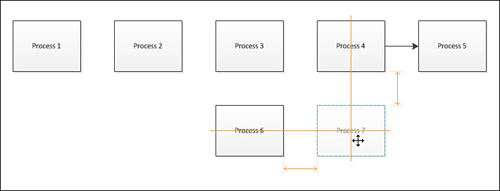
8.
Drag one last Process shape so that it aligns vertically and horizontally with the shapes already on the page. You should see alignment lines and spacing arrows in both the horizontal and vertical directions, as shown in Figure 4.

Figure 4. The Dynamic Grid works in both directions simultaneously.

 
Others
 
- Microsoft Excel 2010 : Working with Other Microsoft Office Programs - Pasting Charts into Other Documents
- Microsoft Excel 2010 : Working with Other Microsoft Office Programs - Creating Hyperlinks
- Microsoft Excel 2010 : Working with Other Microsoft Office Programs - Storing Workbooks as Parts of Other Office Documents
- Microsoft Excel 2010 : Working with Other Microsoft Office Programs - Including Office Documents in Workbooks
- Microsoft Word 2010 : Collaborating with Others - Tracking Changes
- Microsoft Word 2010 : Collaborating with Others - Working with Comments (part 1) - Adding Comments to a Document
- Microsoft PowerPoint 2010 : Customizing Themes (part 3) - Customizing Theme Effects, Working with Custom Themes
- Microsoft PowerPoint 2010 : Customizing Themes (part 2) - Customizing Theme Fonts
- Microsoft PowerPoint 2010 : Customizing Themes (part 1) - Customizing Theme Color Schemes
 
 
Top 10
 
- Microsoft Visio 2013 : Adding Structure to Your Diagrams - Finding containers and lists in Visio (part 2) - Wireframes,Legends
- Microsoft Visio 2013 : Adding Structure to Your Diagrams - Finding containers and lists in Visio (part 1) - Swimlanes
- Microsoft Visio 2013 : Adding Structure to Your Diagrams - Formatting and sizing lists
- Microsoft Visio 2013 : Adding Structure to Your Diagrams - Adding shapes to lists
- Microsoft Visio 2013 : Adding Structure to Your Diagrams - Sizing containers
- Microsoft Access 2010 : Control Properties and Why to Use Them (part 3) - The Other Properties of a Control
- Microsoft Access 2010 : Control Properties and Why to Use Them (part 2) - The Data Properties of a Control
- Microsoft Access 2010 : Control Properties and Why to Use Them (part 1) - The Format Properties of a Control
- Microsoft Access 2010 : Form Properties and Why Should You Use Them - Working with the Properties Window
- Microsoft Visio 2013 : Using the Organization Chart Wizard with new data
Technology FAQ
- Is possible to just to use a wireless router to extend wireless access to wireless access points?
- Ruby - Insert Struct to MySql
- how to find my Symantec pcAnywhere serial number
- About direct X / Open GL issue
- How to determine eclipse version?
- What SAN cert Exchange 2010 for UM, OA?
- How do I populate a SQL Express table from Excel file?
- code for express check out with Paypal.
- Problem with Templated User Control
- ShellExecute SW_HIDE
programming4us programming4us