IT tutorials
 
Office
 

Microsoft PowerPoint 2010 : Customizing Themes (part 2) - Customizing Theme Fonts

- Free product key for windows 10
- Free Product Key for Microsoft office 365
- Product Key Free : Microsoft Office 2019 – Serial Number
7/14/2013 9:36:33 PM

2. Customizing Theme Fonts

Although each theme comes with coordinating fonts, you can apply new fonts to your presentation—or create your own.

Applying New Theme Fonts

To apply new theme fonts, follow these steps:

1.
Click the Fonts button on the Design tab. The font gallery displays.

2.
Pause your mouse over each font pair to preview on your presentation. The font gallery shows two fonts in each pair. The first is for headings (both titles and subtitles) and the second is for body text, which includes all text other than title text such as text in tables, charts, and so on.

3.
Choose the font pair you prefer from the font gallery, shown in Figure 3.

Figure 3. Select the fonts you want to use in your presentation.


Creating New Theme Fonts

To create new theme fonts, follow these steps:

1.
On the Design tab, click the Fonts button.
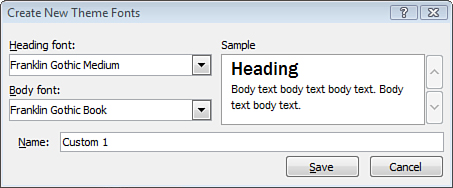
2.
In the font gallery, click Create New Theme Fonts to open the Create New Theme Fonts dialog box. Figure 4 illustrates this dialog box. If you enable multiple language support, this dialog box might contain additional options.

Figure 4. Select your own heading and body text fonts.


3.
Select a new Heading Font and a new Body Font from the drop-down lists. The Sample box previews your selections.

4.
Enter a name for your custom font pair.
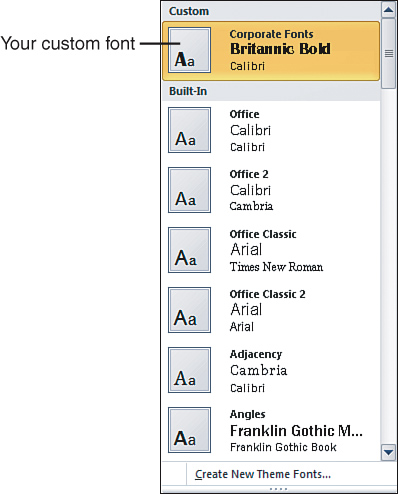
5.
Click the Save button. Your new custom font pair now displays in the font gallery (see Figure 5).

Figure 5. You can now apply your custom fonts whenever you want.


Be sure that any new fonts you apply are readable on your slides. Theme fonts are designed to be easy to read with all theme color schemes.


Editing Custom Fonts

To edit custom fonts, follow these steps:

1.
Right-click the custom font pair you want to edit in the font gallery, and choose Edit from the shortcut menu. The Edit Theme Fonts dialog box displays, which is nearly identical to the Create New Theme Fonts dialog box.

2.
Make your changes in the Edit Theme Fonts dialog box.

3.
Click the Save button.

To delete custom fonts, right-click the custom font pair in the font gallery, and choose Delete from the shortcut menu. Click Yes when prompted to confirm. Your custom fonts no longer display in the font gallery.


Others
 
- Microsoft PowerPoint 2010 : Customizing Themes (part 1) - Customizing Theme Color Schemes
- Microsoft PowerPoint 2010 : Customizing Themes and Backgrounds - Applying Themes
- Microsoft OneNore 2010 : Formatting Pictures and Screen Clippings (part 4) - Entering Alternative Text for an Image, Setting a Picture as the Page Background
- Microsoft OneNore 2010 : Formatting Pictures and Screen Clippings (part 3) - Overlapping Multiple Images on a Page, Copying Text from Pictures
- Microsoft OneNore 2010 : Formatting Pictures and Screen Clippings (part 2) - Moving a Picture to Another Place on a Page, Rotating Pictures on a Page
- Microsoft OneNore 2010 : Formatting Pictures and Screen Clippings (part 1) - Resizing or Scaling a Picture, Restoring a Modified Picture to Its Original Size
- Microsoft Outlook 2010 : Track Tasks (part 4) - Displaying Different Views of Tasks
- Microsoft Outlook 2010 : Track Tasks (part 3) - Removing Tasks and Items from Task Lists, Managing Task Assignments
- Microsoft Outlook 2010 : Track Tasks (part 2) - Updating Tasks
- Microsoft Outlook 2010 : Track Tasks (part 1) - Creating Tasks
 
 
Top 10
 
- Microsoft Visio 2013 : Adding Structure to Your Diagrams - Finding containers and lists in Visio (part 2) - Wireframes,Legends
- Microsoft Visio 2013 : Adding Structure to Your Diagrams - Finding containers and lists in Visio (part 1) - Swimlanes
- Microsoft Visio 2013 : Adding Structure to Your Diagrams - Formatting and sizing lists
- Microsoft Visio 2013 : Adding Structure to Your Diagrams - Adding shapes to lists
- Microsoft Visio 2013 : Adding Structure to Your Diagrams - Sizing containers
- Microsoft Access 2010 : Control Properties and Why to Use Them (part 3) - The Other Properties of a Control
- Microsoft Access 2010 : Control Properties and Why to Use Them (part 2) - The Data Properties of a Control
- Microsoft Access 2010 : Control Properties and Why to Use Them (part 1) - The Format Properties of a Control
- Microsoft Access 2010 : Form Properties and Why Should You Use Them - Working with the Properties Window
- Microsoft Visio 2013 : Using the Organization Chart Wizard with new data
Technology FAQ
- Is possible to just to use a wireless router to extend wireless access to wireless access points?
- Ruby - Insert Struct to MySql
- how to find my Symantec pcAnywhere serial number
- About direct X / Open GL issue
- How to determine eclipse version?
- What SAN cert Exchange 2010 for UM, OA?
- How do I populate a SQL Express table from Excel file?
- code for express check out with Paypal.
- Problem with Templated User Control
- ShellExecute SW_HIDE
programming4us programming4us