Now that you’ve learned all about importing pictures,
scanned images, and screen clippings into your notes, it’s time to
learn how to make them appear in your notes the way that you want.
1. Resizing or Scaling a Picture
Whether you insert a picture from an image file, by
using your scanner, or by creating a screen clipping, you can modify its
dimensions by resizing or scaling the picture.
Resizing lets you shrink or enlarge the appearance of
pictures that contain text or small details that you want to preserve
even at a smaller size in your notes.
Scaling can be used for making pictures appear taller
or wider so they fit into your notes. Scaling usually distorts the
original image, so it works best with pictures containing sketches or
drawings, instead of photographs or screen clippings.
To resize a picture on a page without abnormally stretching or squeezing its appearance, do the following:
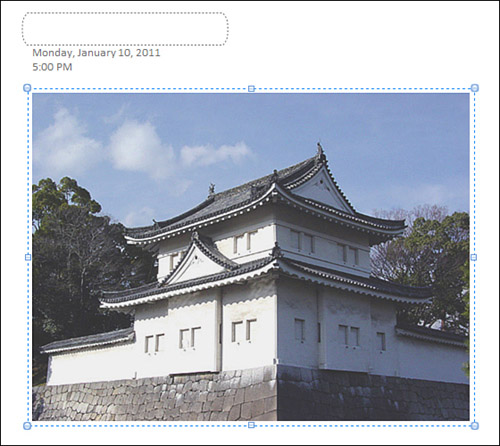
1. | Click the picture you want to resize. Eight dots (called “handles”) appear around the picture selection (see Figure 1).
|
2. | Click
the round, dot-shaped handle in the lower-right corner of the selected
picture and then drag the handle to the left or to the right to make the
picture smaller or larger. Release the mouse button when the picture is
the size you want.
|
To scale an image horizontally or vertically, do the following:
1. | Click the picture you want to scale. Eight dots appear around the picture selection.
|
2. | To
scale the image horizontally, click the small, square-shaped handle in
the middle of the picture’s right border and then drag the handle to the
left or right.
|
3. | To
scale the image vertically, click the small, square-shaped handle in
the middle of the picture’s bottom border and then drag the handle up or
down.
|
|
If you make a mistake, especially when scaling a
picture’s dimensions (which can cause the image to appear distorted),
remember that you can use the Undo command on the Quick Access Toolbar
(or by pressing the Ctrl+Z keyboard shortcut) at any time to undo the
damage and then try again.
|
If
a picture is pasted outside of a notes container, you can resize or
scale the picture with more precision by using the arrow keys on your
keyboard instead of dragging with the mouse.
To resize or scale a picture with more precision, follow these steps:
1. | Make
sure the inserted picture is not inside of a notes container. If it is,
click to select the picture, press Ctrl+X to cut it, click the page
anywhere outside of the notes container, and then press Ctrl+V. When you
reselect the picture now, you should only see the eight selection
handles around its border, not the gray notes container.
|
2. | Click
to select the picture, right-click it, and then click Resize on the
shortcut menu. (If the Resize command is not available on the menu, the
picture is still inside of a notes container.)
|
3. | When
the handles around the image have disappeared, look for a white,
four-headed arrow to appear over the middle of the selected picture. Use
any of the four directional arrow keys on your keyboard to make the
picture as small or as large as you want. If you want to resize the
picture proportionally without scaling it, you’ll need to press the up
or down arrow keys the same number of times as the right or left arrow
keys.
|
4. | If
you distort the image too much, press the Esc key and try again. When
the picture appears the way you want, press the Enter key to accept the
new dimensions.
|
2. Restoring a Modified Picture to Its Original Size
Changing the appearance of pictures in OneNote by
resizing or scaling them does not actually modify the size of the
picture file itself.
For example, if you size down an inserted photo to a
very small size on your notes page, the original, underlying image file
is still saved in its original file size and dimensions. This lets you
restore any picture that you’ve modified in OneNote to its full,
original glory at any time.
To restore a modified picture, follow these steps:
1. | Right-click a modified (resized or scaled) picture on your notes page.
|
2. | On the shortcut menu that appears, click Restore to Original Size.
|
|
If
you don’t want to restore an image on your notes page but want to save
the original picture file to your hard drive, you can right-click the
picture and then click Save As on the shortcut menu. When you open the
saved picture file in Windows Photo Viewer or any other image viewer or
editor, it will appear in its original size and appearance, not in the
way it may have appeared in OneNote.
|
Preserving the original dimensions of picture files
that you insert into your notes is just another way in which OneNote
keeps all of your source information together in one place, while still
giving you full control over how such items show up in your notes.