5. Overlapping Multiple Images on a Page
Another useful page layout feature available in
OneNote is the ability to control the layering of objects such as
pictures and screen clippings.
This is most useful when you want to overlap multiple
pictures to create a design on the page. You can also use this method
to maximize page space by overlapping multiple images in such a way that
only the parts you care about are shown.
The
fancy term for the ordering of two-dimensional objects is “Z-order,”
which refers to the order of objects along the z-axis in coordinate
geometry, where x typically refers to the horizontal axis and y
to the vertical axis. When two or more objects overlap, their Z-order
determines which object or layer appears on top of the other. For
bitmap-type images, this means that the topmost layer covers up the ones
below it. For image formats that can have a transparent background
(such as GIF and PNG files), you can control the Z-order more creatively
to create a composite picture or design from the layers of multiple,
stacked pictures.
In OneNote, you can control the Z-order of page
objects with the Arrange command, which works the same as in many
popular page layout and web design programs. You can use this command to
arrange multiple pictures that are different from each other or to
arrange multiple copies of the same picture.
Ultimately, the usefulness and result of manipulating
the Z-order in OneNote really depends on the specific objects
(pictures, scanned images, screen clippings, or notes containers) that
you will use on your own pages.
The following steps should give you an idea about how this works:
1. | On the current page, insert two to three different pictures, scanned images, or screen clippings.
|
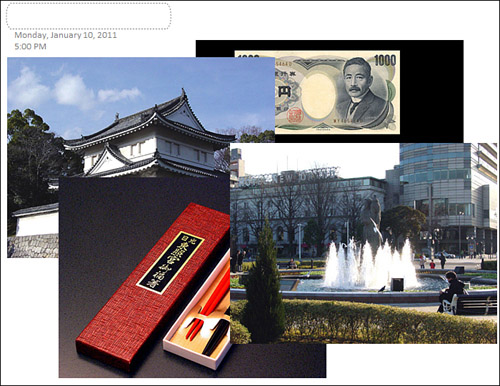
2. | Click and drag the pictures you have just inserted and drag them together so they all slightly overlap (see Figure 3).
|
3. | Click to select the picture that’s farthest underneath the other two.
|
4. | On the ribbon, on the Draw tab, in the Edit group, click Arrange.
|
5. | On
the pop-up menu that appears, rest the mouse pointer over the available
commands to read the ToolTip descriptions that appear. You can choose
from four commands:
Clicking the Bring Forward command promotes
the selected picture or notes container to one layer higher than the
current one. You can click this command multiple times, if necessary. Clicking
the Bring to Front command promotes the selected picture or notes
container to the highest possible layer, covering up all other layers
beneath it. Clicking the Send Backward
command demotes the selected picture or notes container to one layer
lower than the current one. You can click this command multiple times,
if necessary. Clicking the Send to Back
command demotes the selected picture or notes container to the lowest
possible layer, hiding it behind all other layers that appear in front
of it.
|
To conclude this procedure, you could click the Bring
to Front command to make the picture you selected in step 3 appear in
front of the other two.
It might take some practice for you to learn how to
control the Z-order of multiple objects on a page, so practice this on
your own for a bit using different types of pictures (for example, some
that have a transparent background) and using a mix of notes containers
and pictures.
One trick to mastering the arrangement of overlapping
objects on a page is to be mindful of both the order in which to select
items as well as for which items to change the ordering. If you’re
creating a design with overlapping objects and images, think of the
layers you’re controlling the same way as you might think of setting up
multiple backdrops on a theater stage. By having the order of objects
clearly in your mind, you can better differentiate between using the two
extreme commands—Bring to Front and Send to Back—as well as the more
incremental commands—Bring Forward and Send Backward—which nudge the
ordering of the selected item forward and backward by just one layer.
Practice makes perfect and, as you’ve learned, the
beauty of OneNote is that you won’t waste any paper while attempting to
master your techniques.
|
Before
moving on, I want to mention a feature that many OneNote users have
asked about because they can’t seem to find it when they work with
pictures in OneNote. It’s the Crop command, which lets you cut off the
edges of an inserted picture to strip away the parts of an image that
you don’t care about. Although cropping is available in most
image-editing programs and some of the other Microsoft Office 2010
products, such as Word, PowerPoint, and Publisher, it’s not available in
OneNote 2010.
If you want to crop your images in OneNote, there’s a
workaround that I use that gets the same result. After inserting a
picture on your page, hold the Windows key and then press S to start a
new screen clipping. When the screen dims, drag with the mouse over the
inserted image to select only the part of the image that you want to
keep. When the Select Location in OneNote dialog box appears, click Copy
to Clipboard and then use Ctrl+V to paste the screen clipping on your
page. You can then delete the original picture you inserted. It’s a
quick-and-dirty workaround, but I find that it does the trick on most
occasions.
|
6. Copying Text from Pictures
After you begin to routinely insert screen clippings
from web pages and your documents into your notes pages in OneNote,
there will undoubtedly be times when you’ll wish that you could
occasionally edit the text in a screen clipping. Well, there’s good
news.
OneNote 2010 includes a fantastic feature called
Optical Character Recognition (OCR). This is a fancy technical name for
your computer’s ability to electronically recognize and translate words
in images and convert those words to editable text. OCR software is most
commonly included with scanners, so that you can create text files from
the documents you scan. Although you can certainly make your scanner do
the work, the built-in OCR feature in OneNote lets you quickly extract
text from your inserted images whenever you want to use the text within
them.
To copy text from a picture, follow these steps:
1. | Insert
a picture, scanned image, or screen clipping that contains the text you
want to copy. For example, you could insert a picture of a scanned
business card or a screen clipping of a paragraph of text on a web page.
|
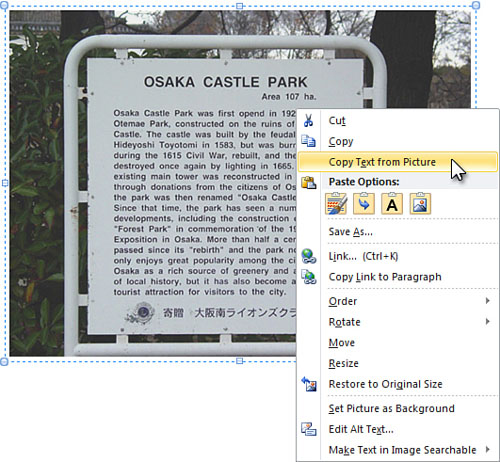
2. | Right-click the picture and then click Copy Text from Picture (see Figure 4).
|
3. | Click anywhere else on the page where you want to paste the copied text, and then press Ctrl+V.
|
The quality of text recognition depends greatly on
the quality and legibility of the picture containing the text. In most
cases, handwriting or highly stylized or script-like fonts won’t yield
very good results.
If the text recognition produces just a few errors,
you can quickly type the necessary corrections in place. This is
infinitely faster and easier than retyping the entire original text
yourself. Either way, the OCR feature in OneNote is sure to save you at
least a little time.