IT tutorials
 
Office
 

Microsoft Word 2010 : Creating an Index (part 1) - Adding an Index to a Document - Marking an Index Entry

- Free product key for windows 10
- Free Product Key for Microsoft office 365
- Product Key Free : Microsoft Office 2019 – Serial Number
10/15/2014 3:36:21 AM

An index is a list of significant terms or phrases that appear in a document, along with the number of each page where the item appears. If you’re writing for a specialized audience and your document contains a lot of key terms, your readers will appreciate having an index.

Adding an Index to a Document

Indexing is a time-consuming task, but Word makes it a simple one. To add a term or phrase to an index, you mark the text (called an entry) with a special code. When you’re done marking items, Word can compile the index at your command. Of course, indexing can be a much more complicated process, depending on how detailed you want the index to be. Here, we’ll just hit the high spots to introduce you to the basics of indexing.

Marking an Index Entry

You have to mark each word or phrase that you want to include in the index. Here’s how:

1.
Select a word or phrase.

2.
On the References tab, click Mark Entry. The Mark Index Entry dialog box appears, as shown in Figure 1. The selected text appears in the Main Entry text box.
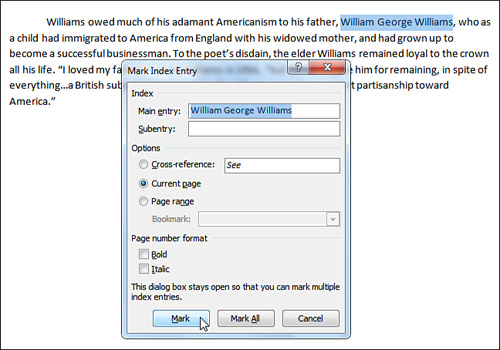
Figure 1. Marking a name for inclusion in an index.

3.
To add a subentry to the item, click the Subentry box and type a word or short phrase that puts the main entry into some context. For example, if your document includes information about butterflies and their feeding habits, your main entry might be “Monarch” and the subentry might be “Favorite snacks.”

4.
Do one of the following:

  • Click Mark to mark the selected text.

  • Click Mark All to mark every occurrence of the selected text in the document.

Either way, the Mark Index Entry dialog box remains open, so you can continue marking entries. You can click outside the dialog box to select other pieces of text in the document; then click the dialog box to edit the entry. After you mark your first entry, the Cancel button changes to a Close button.

5.
When you are finished marking index entries, click Close.

When you mark an index entry, Word automatically displays nonprinting characters, such as paragraph marks and tabs. This enables you to see the actual indexing codes as they are added to the text.

 
Others
 
- Microsoft Word 2010 : Creating a Table of Contents (part 2) - Adding a TOC to a Document - Inserting a Customized Table of Contents
- Microsoft Word 2010 : Creating a Table of Contents (part 1) - Adding a TOC to a Document - Inserting an Automatic Table of Contents
- Microsoft Word 2010 : Creating an Outline (part 3) - Building an Outline - Expanding and Collapsing Parts of an Outline , Reorganizing an Outline
- Microsoft Word 2010 : Creating an Outline (part 2) - Building an Outline - Adding Headings to an Outline, Promoting and Demoting Headings
- Microsoft Word 2010 : Creating an Outline (part 1) - Working in Outline View
- Microsoft Excel 2010 : Working with Graphics - Inserting a Diagram,Inserting an Object
- Microsoft Excel 2010 : Working with Graphics - Inserting WordArt, Using Smart Art in Excel
- Microsoft Excel 2010 : Working with Graphics - Using AutoShapes
- Microsoft PowerPoint 2010 : Preparing a Slide Show - Working with Fonts
- Microsoft PowerPoint 2010 : Preparing a Slide Show - Creating a Self-Running Presentation
 
 
Top 10
 
- Microsoft Visio 2013 : Adding Structure to Your Diagrams - Finding containers and lists in Visio (part 2) - Wireframes,Legends
- Microsoft Visio 2013 : Adding Structure to Your Diagrams - Finding containers and lists in Visio (part 1) - Swimlanes
- Microsoft Visio 2013 : Adding Structure to Your Diagrams - Formatting and sizing lists
- Microsoft Visio 2013 : Adding Structure to Your Diagrams - Adding shapes to lists
- Microsoft Visio 2013 : Adding Structure to Your Diagrams - Sizing containers
- Microsoft Access 2010 : Control Properties and Why to Use Them (part 3) - The Other Properties of a Control
- Microsoft Access 2010 : Control Properties and Why to Use Them (part 2) - The Data Properties of a Control
- Microsoft Access 2010 : Control Properties and Why to Use Them (part 1) - The Format Properties of a Control
- Microsoft Access 2010 : Form Properties and Why Should You Use Them - Working with the Properties Window
- Microsoft Visio 2013 : Using the Organization Chart Wizard with new data
Technology FAQ
- Is possible to just to use a wireless router to extend wireless access to wireless access points?
- Ruby - Insert Struct to MySql
- how to find my Symantec pcAnywhere serial number
- About direct X / Open GL issue
- How to determine eclipse version?
- What SAN cert Exchange 2010 for UM, OA?
- How do I populate a SQL Express table from Excel file?
- code for express check out with Paypal.
- Problem with Templated User Control
- ShellExecute SW_HIDE
programming4us programming4us