3. Configuring a Postmaster Address
A postmaster address is needed for the sending of
non-delivery reports (NDRs) and other related messages to recipients
outside the Exchange organization and is required by RFC 2821.
Configuring your environment takes two steps. First, either create a
new mailbox for the postmaster, or assign the address to an existing
mailbox, such as Administrator. Second, use the Exchange Management
Shell to set the external postmaster address in Exchange. To do so,
open the Exchange Management Shell and use the Set-TransportConfig cmdlet and the –ExternalPostmasterAddress parameter, using the following format:
Set-TransportConfig -ExternalPostmasterAddress
<ExternalPostmasterSMTPAddress>
Here's an example:
Set-TransportConfig -ExternalPostmasterAddress
[email protected]
4. SSL Certificate
In a production environment, using a third-party
trusted SSL certificate to security communications is highly
recommended. When Exchange 2010 is installed, Exchange installs a
self-signed certificate valid for five years. This is perfectly fine
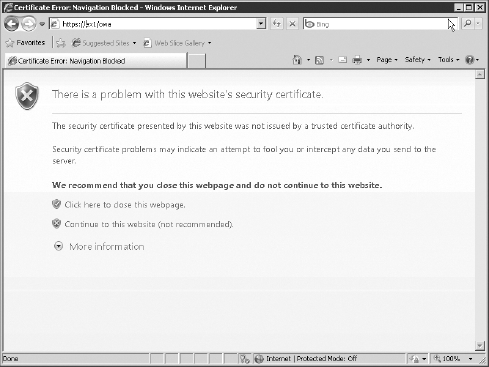
for testing in a lab environment. When testing Exchange using Outlook
Web App, for example, you will be presented with a screen indicating
that the security certificate was not issued by a trusted certificate
authority (see Figure 6). You can ignore these warnings during testing.

5. Entering the Product Key
You don't have to enter a product key in order to
test Exchange Server 2010. However, if you do have a product key and
would like to enter it into the server, it's very simple using these
steps:
Open the Exchange Management Console and navigate to Microsoft Exchange => Microsoft Exchange On-Premises (server) => Server Configuration.
In the center pane, highlight the server.
In the Actions pane on the far right, click Enter Product Key.
Enter the digits for the product key. Hyphens are automatically entered. When finished, press Enter, and then click Finish.
As with any other configuration, you can set the product key using the Exchange Management Shell with the Set-ExchangeServer cmdlet and the -ProductKey parameter:
Set-ExchangeServer –identity '<server>' -ProductKey <product key>
Here's an example:
Set-ExchangeServer –identity 'ex1' –ProductKey AAAAA-BBBBB-CCCCC-DDDDD-FFFFF
5.1. Testing Outlook Web App
You can now also test Outlook Web App (OWA), the web-based email client for Exchange 2010:
Open a web browser and type https://<servername>/owa.
Click Continue To This Website (Not Recommended) at the certificate prompt.
Enter the domain and username for a user that was mailbox-enabled previously, and enter a password. Click OK.
Set your language and time zone, and click OK.