1. Configuring Basic Options
In the Options windows, the options are broken up into multiple
categories. These categories are organized in the left pane for easy
access and include the following:
• General—This is
where users can turn on or off emoticons, modify background colors for
messages, determine the language Lync will use, turn logging on or off,
and determine notification behaviors.
• Personal—This is
where users can alter their logon information, determine Lync’s startup
behavior, opt to integrate presence information with Exchange or
Outlook, configure Lync conversation archiving to Outlook, and opt to
show photos for contacts.
• Status—This section contains options for how one’s status will be managed.
• My Picture—This is
where a user can determine whether she will present a photo with her
contact information and if so, what that photo will be.
• Phones—This is where
a user can modify his phone number information as well as opt to
integrate Lync client with the phone system, enable functions such as
TTY, or configure his behavior for joining conference calls.
• Alerts—This
is where the user can choose to be notified whether someone else adds
her to the contact list or to configure the behavior of her Do Not
Disturb status.
• Ringtones and Sounds—This is where the user can choose the incoming call ringtone or configure sounds on specific events.
• Audio Device—This is
where the user can choose which audio devices will be used by the Lync
client. He can also change the volume associated with the speakers and
ringer as well as modify the microphone sensitivity. These settings are
useful for optimizing the user experience. When adjusting the
microphone, simply slide the bar all the way to the right and then
speak into the microphone a bit louder than normal. If the resulting
signal is deemed too high, the slider will automatically move left
after you finish speaking.
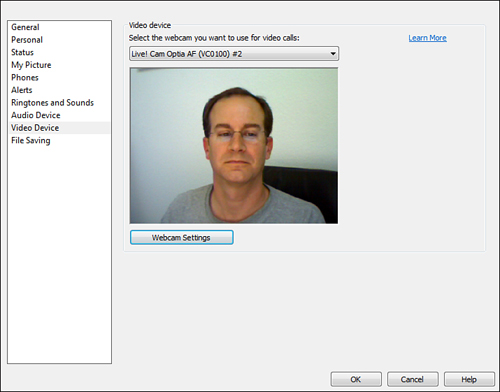
• Video Device—This is where the user can choose the video source (see Figure 1)
and access that device’s settings. These settings include Exposure,
Focus, Brightness, Contrast, Hue, Sharpness, Gamma, and Backlight
compensation. The user can also access advanced and extended settings
to include zoom, white balance, and even face tracking, if the device
supports it.
Figure 1 Testing the Video Device

• File Saving—This is where the user determines where file transfers and Lync recordings will be saved.
2. Managing Contacts
Most people are accustomed to the behaviors in Outlook where you can
quickly look up a user in the contacts or by starting to type that
person’s name. The Lync 2010 client follows this model by organizing
contacts by groups and by enabling users to quickly search for contacts
by simply typing the person’s name.
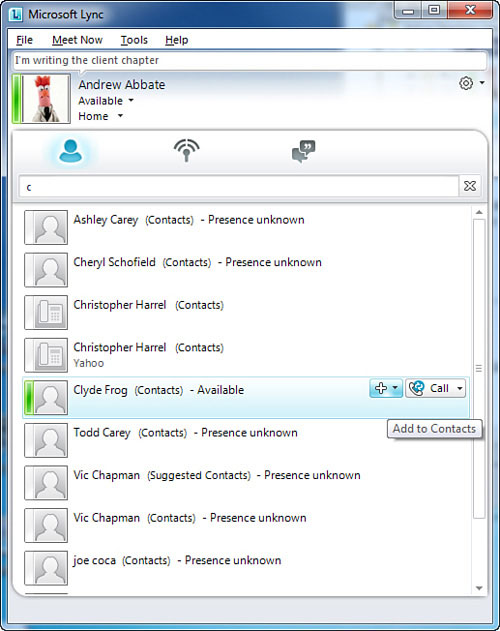
For example, on the Find a contact line, if you type a name, the client suggests names based on the contacts. From here, simply click Add to add the contact to a contact group as shown in Figure 2.
When this occurs, the person you added receives a notification of the
addition and has the option to add you as well. Once added, the
contacts appear in the group you selected and you are able to see their
presence information at any time.
Figure 2 Adding Contacts

After a contact is added, he can be moved from one contact
group to another by simply left-clicking and dragging the contact from
one group to another. By holding the mouse over the name of the
contact, you can see any notes he has set in the client as well as his
picture.
3. Managing Groups
The Lync 2010 client enables users to organize their contacts by placing them inside groups. By default, the groups are
• Frequent Contacts
• All Contacts
Frequent Contacts is automatically populated by the client based on
how often particular contacts are used. The All Contacts group becomes
the Other Contacts group as soon as a user creates the first custom
group. Groups can be deleted or renamed using the right-click function.
Caution
Contacts can be dragged back and forth
between groups but can exist only in one “real” group at a time. This
is to say that any contacts that appear in Frequent Contacts must also
exist in some other group because Frequent Contacts isn’t a true group.
A convenient use of groups is to organize members of a project or
department. By right-clicking the group name, you can choose to launch
a conference call that invites all members of that group. Similar
functionality can be achieved by selecting multiple contacts by
Ctrl-clicking them and then right-clicking to choose Start a Conference
Call. This call can use Lync’s PC-to-PC call features or the phone
system.
Groups can be organized within the client by either using
the right-click–accessed Move Group Up or Move Group Down functions or
by simply dragging them from one position to another.
4. Status View
The second view supported in the client is the status view. This
arranges your contacts based on their current status. In this view,
their group membership is irrelevant and only their current status
affects where their contact appears. Statuses include
• Online
• Away
• Unknown
• Unavailable
The status view is a quick and easy way to determine which of your contacts are available.
5. Relationship View
The third view available in the Lync 2010 client is the relationship
view. This view is a bit more interesting because the relationships
actually enforce behaviors on the contacts that are members of them.
The relationships include the following:
• Friends and Family—Contacts in this relationship can view all your contact information except meeting details.
• Workgroup—Contacts
in this relationship can view all your contact information except Home
and Other phone; they can interrupt Do Not Disturb status.
• Colleagues—Contacts in this relationship can view all your contact information except Home, Other and Mobile phone, and meeting details.
• External Contacts—Contacts in this relationship can view only your name, title, email address, company, and picture.
• Blocked Contacts—Contacts in this relationship can view only you name, e-mail address, office, and picture; they can’t reach you through Lync.
Beyond these permissions, the Relationship view operates
the same way as the other two views in terms of initiating IMs with
contacts.