2. Creating a New Website Using a Different Port
For IIS, the TCP port is the communications channel
that is set up between the web browser and the web server. The
traditional port used for the HTTP protocol is port 80, and that’s the
port used by the Windows Home Server default website and by any website
you
create using a different IP address, as described in the previous
section. However, you don’t have to use port 80. In fact, you can host
multiple websites on a single server by assigning each of those
websites a different port.
To access a site on a different port, you specify
the port number in the address, after the host or domain name, as in
the following general case:
Here, server is the hostname or domain name of the website, and port is the port number. In most cases, the server
name is the same as the name you use to access the default site on port
80. In Windows Home Server, this means you specify the name of the
server. For example, suppose your Windows Home Server PC is named
SERVER, and you set up a new website and assign it to port 81. Then to
access that site, you’d use the following address:
Similarly, if you have a Windows Live Custom Domains name of ourfamily.homeserver.com, you can access a website on port 81 as follows:
http://ourfamily.homeserver.com:81
Note, too, that you can also use an IP address
instead of the host or domain name, which means you can set up a
website that uses a different IP address and a different port. For example, here’s the address you’d use to access a website using IP address 192.168.1.253 and port 81:
Note
It’s traditional to use HTTP ports that begin with
the number 8. For example, because IIS already uses ports 80, 808, and
8001, you can use 81 to 89. 8080 is a commonly used custom HTTP port
number. For a complete list of ports that Windows Server systems use,
Microsoft offers an Excel workbook that you can download. Go to the
Microsoft Download Center (www.microsoft.com/downloads/en/default.aspx), and search for “Port Requirements for Microsoft Windows Server System.”
You can also get information on the ports used by
Windows Home Server using the Port Reporter tool. For information and a
download link, see the following Microsoft Knowledge Base article at support.microsoft.com/kb/837243.
Creating a Website Using a Different Port
Here are the steps to follow to create a website that uses a different port number:
1. | In IIS Manager, open the SERVER, Sites branch (where SERVER is the name of your Windows Home Server PC).
|
2. | In the Actions pane, click Add Web Site. IIS Manager opens the Add Web Site dialog box.
|
3. | Use
the Site Name text box to type a name for the website. This is the name
that appears in IIS Manager, within the Sites branch.
|
4. | Either
type the full pathname (drive and folders) in the Physical Path text
box, or click Browse and use the Browse for Folder dialog box to select
the folder or create a new folder.
|
5. | Use the IP Address list to select the main IP address assigned to your Windows Home Server PC.
|
6. | Enter a new value in the Port text box, as shown in Figure 6.

|
7. | Click OK. IIS Manager adds the new site to the Sites branch.
|
Adding a Firewall Exception for the Website Port
As things stand now, your new website will work
properly when you access it using a web browser running on the Windows
Home Server PC. If you try to access the site on any other computer (or
from a location outside your network), you get an error message.
The problem is that the Windows Firewall on Windows
Home Server hasn’t been configured to allow data traffic using the port
you assigned to your new website. For your site to work from any remote
location, you need to set up an exception for the port in Windows
Firewall. Here are the steps to follow:
1. | Log on to Windows Home Server.
|
2. | Select Start, Control Panel, Windows Firewall.
|
3. | Click Advanced Settings to open the Windows Firewall with Advanced Security snap-in.
|
4. | |
5. | In the Actions pane, click New Rule to start the New Inbound Rule Wizard.
|
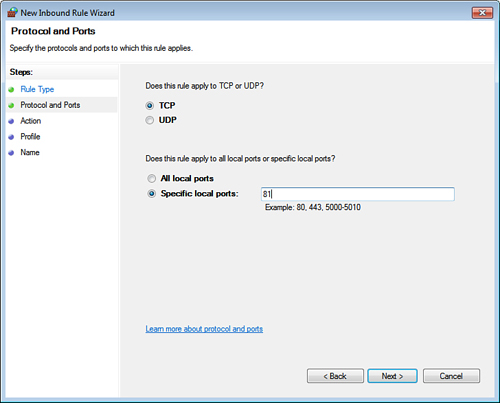
6. | Activate the Port option, and then click Next. The wizard displays the Protocol and Ports dialog box.
|
7. | Activate the TCP option, and use the Specific Local Ports text box to type the port you assigned to the site. Figure 7 shows the dialog box set up to allow traffic on port 81.

|
8. | Click Next. The wizard displays the Action dialog box.
|
9. | Make sure the Allow the Connection option is activated, and then click Next. The wizard displays the Profile dialog box.
|
10. | You have two choices. (You can ignore the Domain option.)
- Private— Select this option if you only want computers on your network to access the website.
- Public— Select this option if you want to be able to access this website from the Internet.
|
11. | Click Next. The wizard displays the Name dialog box.
|
12. | In the Name text box, type TCP Port n, where n is the port number you assigned to your website.
|
13. | Click Finish.
|
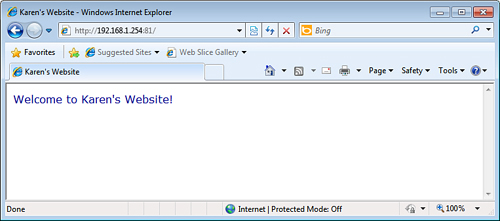
You can now access the site on port 81, as shown in Figure 8.

Forwarding the Port in Your Router
In the previous section, you may have set up the
Windows Firewall port exception with the Any Computer scope to allow
Internet access to your new website. However, users still can’t access
the site because your network’s router doesn’t know that it’s supposed
to allow data to come through the port you assigned to the website.
To allow traffic on that port, you need to configure
the router to forward any data that comes in on that port to the IP
address of the Windows Home Server PC. How you do this depends on the
router. Figure 9
shows the Port Forwarding screen of the D-Link router on my system. In
this case, I’ve forwarded TCP port 81 to the address 192.168.1.254,
which is the static IP address of my Windows Home Server. Consult your
device documentation for information on configuring port forwarding.
