Setting up the Search Service application may be a
one time job, but managing the search is not. Getting good search
results to the community is the job of a vigilant administrator. As we
have seen in previous recipes, the Search Administrator does not have to
be the same person as the Farm Administrator.
Obtaining good search results requires monitoring
trends and ensuring that content is being crawled in a timely manner.
Using this information, the administrator can make appropriate decisions
on how to improve performance.
This recipe introduces us to the Search Administration screen, which is used to manage the Search Service.
Getting ready
There are two ways to manage the search service:
How to do it...
Open the Central Administration site and click Application Management.
The third section is Service Applications. Under this section, click Manage service applications.
Find the Search Service Application
option and click on it (this is the name SharePoint assigns by default
if not modified when creating the Search Service). The ribbon will light
up. Click Manage.
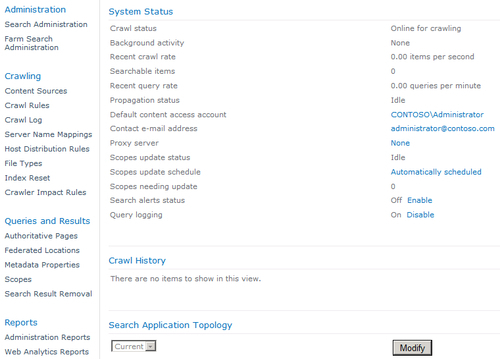
The following form appears:

Click on the domain/username adjacent to the Default Content Access Account option.
A pop-up form titled Default Content Access Account appears. Put in the account that was set up for the previous recipe. Then type in the password. Click OK.&;
Click on the e-mail address adjacent to the Contact e-mail address option. Change this to the appropriate e-mail for your organization. Click OK.
The changes for both items should be reflected in the Search Administration screen.
How it works...
SharePoint 2010 has an extensive Search Administration screen as shown. It is broken down into four sections.
The first section is the Administration
navigation. This is the left-hand panel, where the quick launch is
typically located in SharePoint. It contains four subgroups comprising
of Administration, Crawling, Queries and Results, and Reports. Other
recipes will address these areas.
The second section is the System Status.
This is where the performance of the crawls and queries are documented.
We changed the e-mail and content account. It is important to always
keep in mind the least privileged accounts. In step 6, we used the same
account as the Search Service. Based on the security rules of your
organization, it is a best practice to set up a different account and
use it here.
The default content access account is
the crawl account. Having too much access may result in the account
crawling information that should not show up in the index.
The third section is the Crawl History results.
This is a summary of current and past crawls. It also shows the length
of time a crawl takes, the type of crawl (Full, Incremental), and
whether the crawl succeeded or failed.
The last section is the Search Application Topology.
This is where administrators can scale out a search. It shows the
components of a search implemented by the server. Changing the server
will show the associated components. The components shown are the
following: Administration, Crawl, Databases, and Index Partition.
There's more...
The changes made in this recipe were done through the
user interface. Using PowerShell is another way to make changes to
Search Administration. SPEnterprisesearchserviceapplication&; is the cmdlet used to make changes to the Search Server application.
PowerShell: New Content Account
Set-SPEnterprisesearchserviceapplication -identity <SearchServiceApplication>-DefaultContentAccessAccountName
<accountname>-DefaultContentAccessAccountPassword <password>