You configure client agents to enable
specific client features such as hardware inventory, software updates,
and software distribution. Client agents are always configured at the
primary site level, which means that all clients assigned to that site
will receive the same client agent settings. All ConfigMgr clients are
assigned to a primary site—although clients may use a secondary site
for proxy management points and other client communication, the client
agent configuration is from the primary site.
|
Most
environments with multiple primary sites attempt to configure client
agents consistently throughout the hierarchy; you can manage this
easily using the Transfer Site Settings Wizard.
Alternatively,
some environments implement a new primary site just to configure the
clients assigned to that site differently. As an example, you may have
an office in a country that prohibits collecting user information. You
could configure a new primary site in that office and disable the
hardware inventory client agent, but still collect hardware inventory
from client computers in other locations.
|
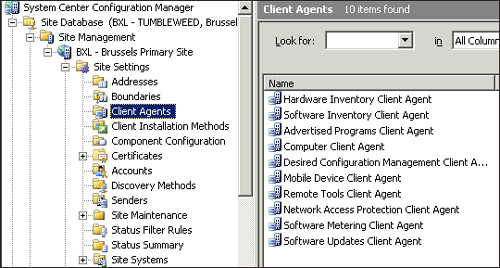
Figure 1 displays all the client agents, which are described in the next sections, along with configurations for consideration.

After
the client agents are configured, all clients assigned to that site
will receive policy to enable (or disable) the appropriate agents. Most
agents have a schedule for when they should perform an operation on the
client.
Hardware Inventory
To a new ConfigMgr administrator, hardware inventory
sounds like collecting specific hardware information for a client.
Although true, that is only a small subset of the information you can
collect in hardware inventory. Hardware information is collected from
Windows Management Instrumentation (WMI) and the Windows Registry (via
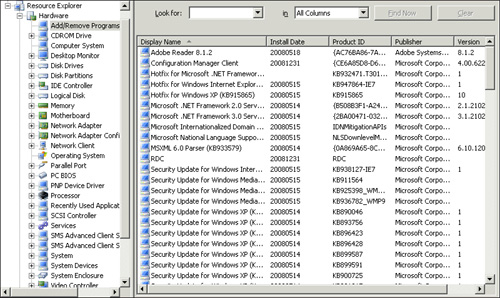
WMI). Refer to Figure 2,
which displays the standard hardware inventory queried from a Windows
XP Professional client named Tarzan in the SCCMUnleashed domain.

As the Resource Explorer in Figure 2
shows, ConfigMgr inventories a significant amount of hardware by
default, such as network adapters, SCSI controllers, disk drives, and
partitions. You also see information such as Add/Remove Programs
(software that appears in Add/Remove Programs), Services (Windows
services on the inventoried system), and various operating system
information. To launch the Resource Explorer, simply right-click a
computer object in a collection and select Start -> Resource
Explorer.
Once you are introduced to
hardware inventory, you will probably find it to be vital information
you want to collect in your environment. Perform the following steps to
enable hardware inventory:
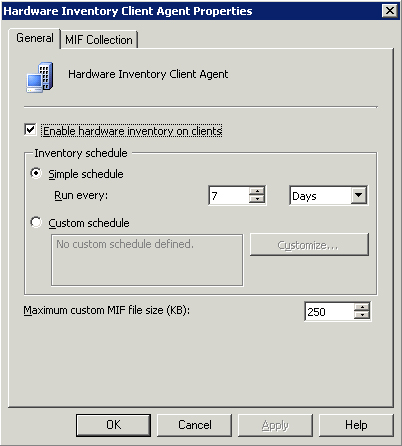
1. | Right-click Hardware Inventory Client Agent and then select Properties to view the General tab, displayed in Figure 3.

|
2. | Simply
check the box “Enable hardware inventory on clients” to enable hardware
inventory for the site. Most administrators will select the simple
schedule for inventory.
|
Some
client agents (such as hardware inventory) perform actions on a
recurring schedule. When you configure the client agent, you have the
ability to determine the frequency of that recurrence. The two types of
recurring schedules are simple and custom.
With
a simple schedule, you specify the frequency that hardware inventory
will run. By default, inventory will run every 7 days. The start time
is configured from the ConfigMgr client install time. This means that
if a client was installed at 7:00 a.m. on a Monday, and inventory is
configured to run on a simple schedule every 7 days, hardware inventory
will run every Monday at 7:00 a.m. Because not all clients were
installed at exactly the same time, each client will have its own
schedule for executing hardware inventory, which helps reduce peak
usage times. The alternative schedule is
the custom schedule, which allows you to specify the exact time and day
that inventory will run. When you configure a custom schedule for
hardware inventory, it forces all clients to report inventory at the
same time. This can cause an overload on your site, depending on the
number of clients assigned to that site.
|
|
3. | The last option on the General tab of Figure 3
(Maximum custom MIF file size) is a bit confusing, because it really
applies to the settings on the MIF Collection tab. You can specify the
maximum size of MIF or NOIDMIF files that the site can process (choose
between 1KB and 5,000KB). ConfigMgr moves MIF files that are larger
than the specified size to the \inboxes\auth\dataldr.box\badmifs
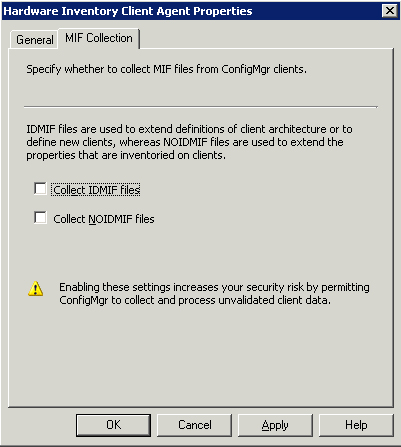
folder. For the MIF file size configuration to be used at all, you must
enable at least one of the check boxes on the MIF Collection tab
displayed in Figure 4.

Figure 4
shows you can collect IDMIF and NOIDMIF files. Both these file types
are legacy, and should be avoided if possible.
|