Using MMC technology gives you the ability
to create your own custom console. You can use custom consoles to hide
those features you do not use or features you want to restrict to
certain individuals, because not everyone may require access to the
full console. Custom consoles are also useful when you have multiple
administrators with specific roles. Those administrators can create
their own consoles with their most commonly used features.
To create a custom console, perform the following steps:
1. | Open a new MMC by going to Start -> Run, type mmc, and then click the OK button. This brings up an empty console root, as displayed in Figure 1.

|
2. | In the new console, select File -> Add/Remove Snap-in, as shown in Figure 2.

|
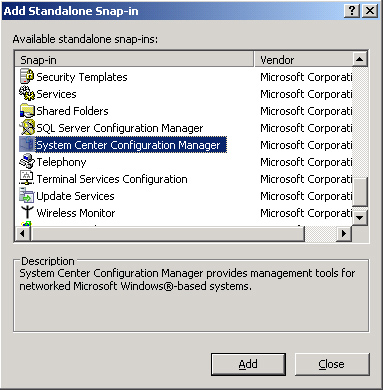
3. | In
the Add/Remove Snap-in dialog box, click Add and choose the System
Center Configuration Manager snap-in. Click the Add button at the
bottom of Figure 3.

|
4. | The next screen begins the Database Connection Wizard. Click Next at the Welcome screen, displayed in Figure 4.

|
5. | In the Locate Site Database screen shown in Figure 5,
verify you selected the correct site database (this example shows the
Bluebonnet site server, the central site server for the SCCMUnleashed
hierarchy) and then choose the Select console tree items to be loaded (custom) option at the bottom of the screen. Click Next to continue.

|
6. | The next screen of the Database Connection Wizard, shown in Figure 6,
allows you to select the items you want to appear in the console tree.
Check the items you want to be available in the console and click Next
to continue.

|
7. | Figure 7
displays the Summary screen. To change any of your selections, click
the Previous button. Otherwise, click Finish to complete the wizard.

|
You can now close the Add/Remove Snap-in dialog box and click OK to open the custom snap-in. The custom console, displayed in Figure 8, will now load. To save the console, select File -> Save.

When
you create a custom console, be aware you can only add a single
Configuration Manager snap-in to the console. However, this does not
limit you in managing multiple sites in a hierarchy. You can manage
child sites by connecting to them directly, or from their parent site.
When managing a child from its parent, you are not connecting directly
to the child, but to the database of the parent.
If
you face any site communication issues, you can also directly connect
to a child site by adding a separate site database connection. Figure 9 shows the central site with a separate connection to a primary child site.

To
add a site database connection with a custom console tree to a
previously created custom console, perform the following steps:
1. | In
your current custom console, right-click the main System Center
Configuration Manager node and select Connect to Site database.
|
2. | The Database Connection Wizard will start. Click Next at the Welcome screen.
|
3. | In
the Locate Site Database screen, select the option Connect to the site
database for the following site server. Then choose the Select Console
tree items to be loaded (custom) option at the bottom of the screen.
Click Next to continue.
|
4. | The
next screen of the Database Connection Wizard allows you to select the
items you want to appear in the console tree. Check the items you want
to be available in the console and click Next to continue.
|
5. | At
the Summary screen, check your configuration. To change any of your
selections, click the Previous button. Otherwise, click Finish to
complete the wizard.
|
Figure 9 displays a single console containing a custom configuration for two sites.