1. Copying Files to a Shared Folder
Most of the Windows Home Server shares are empty
after the initial installation. To make these shares useful, you need to
copy (or move) files from a client machine to the server. It’s quite
common to load up Windows Home Server with a huge number of media
files—music, photos, videos, and so on—to give other people on the
network access to those files to stream to an Xbox 360 or other network
media device.
Before you initiate such a large copy operation, you
need to check to see whether the destination folder is included in the
Windows Home Server media library. If it is, Windows Home Server starts
indexing the media while the file transfer is in progress which, again,
only slows everything down. Temporarily remove the folder from the media
library before starting the file transfer, and then add it back again
afterward.
Follow these steps to copy or move files from a client machine to a Windows Home Server shared folder:
1. | On the client or server, double-click the desktop’s Shared Folders on Server icon (where Server is the name of your Windows Home Server).
| 2. | Open the Windows Home Server shared folder or subfolder you want to use as the file destination.
| 3. | On the client or server, open Windows Explorer, and navigate to the client folder that contains the files you want to work with.
| 4. | Select the client files, and then press either Ctrl+C (if you’re copying them) or Ctrl+X (if you’re moving them).
| 5. | Switch to the window containing the Windows Home Server share.
| 6. | Press Ctrl+V to paste the files.
|
Tip
It’s often easier to copy
files by selecting them in the client folder, dragging them to the
window containing the Windows Home Server share, and then dropping
inside the shared folder. (If you want to move the files instead, hold
down Shift while dragging and dropping the files.) If you can’t see the
window containing the Windows Home Server share, first drag the mouse
pointer to the taskbar and hover it over the share’s taskbar button.
After a second or two, the share window will come to the front, and you
can then drop the files inside the window. Windows Home Server will ask
you to confirm that you want to move or copy the files. Click Yes.
One of the pleasant surprises
in Windows Vista was a new program called Windows Calendar. It’s not as
powerful as Outlook’s Calendar feature, but it does all the basic jobs
that a calendar should: You can create appointments (one-time and
recurring), set up all-day events, schedule tasks, apply reminders to
appointments and tasks, and view appointments by day, week, or month.
For our purposes, Windows Calendar even does something that Outlook’s
Calendar can’t: It can publish a calendar to a network share. (With
Outlook, you need to be on a Microsoft Exchange network to do this.) You
can set things up so that the published calendar is updated
automatically, so the remote calendar always has
current data. Your family members can then subscribe to the calendar to
see your appointments (and, optionally, your notes, reminders, and
tasks). 2. Publishing a Windows Vista Calendar to the Server
This means that you can create a new shared folder—called, say, Calendars—and publish your calendar to that folder. After you’ve done that, start Windows Calendar using any of the following methods:
- Select Start, All Programs, Windows Calendar.
- Press Windows Logo+R (or select Start, All Programs, Accessories, Run) to open the Run dialog box, type wincal, and click OK.
- In Windows Mail, select Tools, Windows Calendar, or press Ctrl+Shift+L.
Publishing Your Calendar
Here are the steps you need to follow in Windows Calendar to publish your calendar:
1. | In the Calendars list, click the calendar you want to publish.
| 2. | Select Share, Publish to open the Publish Calendar dialog box.
| 3. | Edit the calendar name, if necessary.
Tip
After the calendar publishes, you have the option of
sending an email message that includes the address of the shared
calendar. Most email clients display this address as a link. However, if
the address includes spaces, the link stops at the first space.
Therefore, consider changing the calendar name to remove any spaces.
| 4. | Use the Location to Publish Calendar text box to type the address of the shared folder you created on Windows Home Server (see Figure 1).
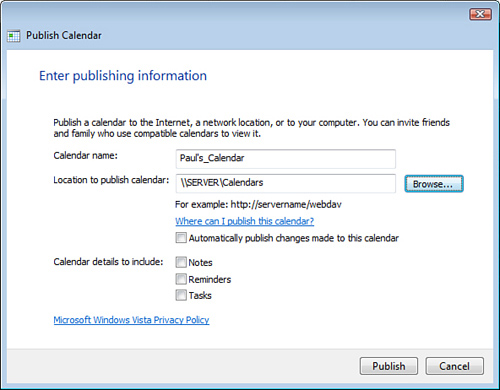
| 5. | If
you want Windows Calendar to update your calendar whenever you make
changes to it, activate the Automatically Publish Changes Made to This
Calendar check box. (If you leave this option deactivated, you can still
publish your changes by hand, as described later; see “Working with Shared Calendars.”)
| 6. | In
the Calendar Details to Include section, activate the check box beside
each item you want in your published calendar: Notes, Reminders, and
Tasks.
| 7. | Click Publish. Windows Calendar publishes the calendar to Windows Home Server by creating a file in the iCalendar format (.ics
extension) and copying that file to the share. Windows Calendar then
displays a dialog box to let you know the operation was successful.
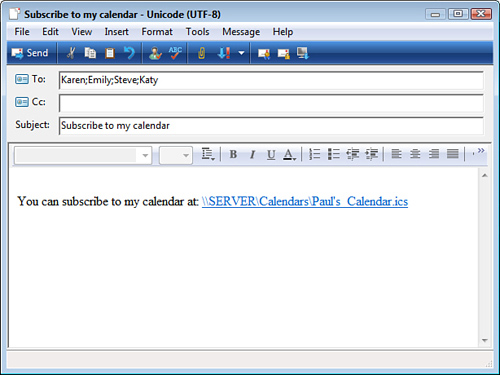
| 8. | To
let other people know that your calendar is shared and where it can be
found, click Announce. Windows Calendar creates a new email message that
includes the following in the body (where address is the address of your published calendar; see Figure 2 for an example):
You can subscribe to my calendar at address
| 9. | Click Finish.
|
Subscribing to a Calendar
You
can add another person’s published calendar to your Calendars list. How
you do this depends on whether you’ve received a subscription
invitation via email.
If you have such a message, follow these steps:
1. | Open the invitation message.
| 2. | Click the link to the published calendar. Windows Mail asks you to confirm that you want to open the iCalendar file.
Tip
If the calendar address contains a space, you won’t
be able to click the link because it will be broken. In that case,
select the address text and press Ctrl+C to copy it. Press Windows
Logo+R (or select Start, All Programs, Accessories, Run) to open the Run
dialog box, press Ctrl+V to paste the calendar address, and then click
OK.
| 3. | Click Open. Windows Calendar opens and displays the Import dialog box, shown in Figure 3.
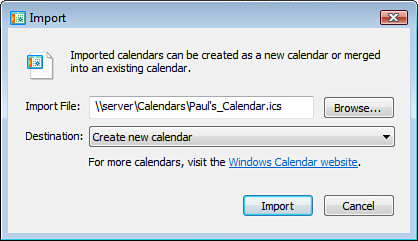
| 4. | If
you want to merge the published calendar into your own calendar, use
the Destination list to select the name of your calendar; otherwise, the
published calendar appears as a separate calendar.
| 5. | Click Import. Windows Calendar adds the published calendar.
|
If you don’t have a subscription invitation message, follow these steps instead:
1. | Select Share, Subscribe to open the Subscribe to a Calendar dialog box.
| 2. | Use the Calendar to Subscribe To text box to type the address of the published calendar.
| 3. | Click Next. Calendar subscribes you to the published calendar and then displays the Calendar Subscription Settings dialog box.
| 4. | Edit the calendar name, if necessary.
| 5. | Use
the Update Interval list to select the interval at which you want
Calendar to update the subscribed calendar: Every 15 Minutes, Every
Hour, Every Day, Every Week, or No Update.
| 6. | If you want to receive reminders in the calendar, activate the Include Reminders check box.
| 7. | If you also want to see the published calendar’s tasks, activate the Include Tasks check box.
| 8. | Click Finish. The published calendar appears in your Calendars list.
|
Working with Shared Calendars
After you publish one or more of your calendars and
subscribe to one or more remote calendars, Windows Calendar offers a
number of techniques for working with these items. Here’s a summary:
Changing a calendar’s sharing information—
When you select a published or subscribed calendar, the Details pane
displays a Sharing Information section, and you use the controls in that
section to configure the calendar’s sharing options. Publishing calendar changes—
If your published calendar isn’t configured to automatically publish
changes, you can republish by hand by selecting the calendar and then
selecting Share, Sync. Updating a subscribed calendar—
If you didn’t configure an update interval for a subscribed calendar,
or if you want to see the latest data in that calendar before the next
update is scheduled, select the calendar and then select Share, Sync. Synchronizing all shared calendars—
If you have multiple shared calendars (published and subscribed), you
can synchronize them all at once by selecting Share, Sync All. Sending a published calendar announcement—
If you didn’t send an announcement about your published calendar, or if
you want to send the announcement to different people, select the
calendar and then select Share, Send Publish E-Mail. Stopping a published calendar—
If you no longer want other people to subscribe to your calendar,
select it and then select Stop Publishing. When Calendar asks you to
confirm, click Unpublish. (Note, however, that if you want your calendar
file to remain on the server, you first need to deactivate the Delete
Calendar on Server check box.) Stopping a subscribed calendar—
If you no longer want to subscribe to a remote calendar, select it and
then press Delete. When Calendar asks you to confirm, click Yes.
|