3. Take Charge of Drag-Drop
The
"desktop metaphor" used as the basis for the interface in Windows Vista
revolves around a handful of concepts, one of the most basic being that
you can drag an item with the mouse to move it from one place to
another.
But when dragging produces inconsistent results, the whole system starts to break down; unfortunately, that's the case in Vista.
Depending
on where the item currently lives and where you're trying to put it, a
variety of things can happen. The good news is that with an
understanding of what's happening, combined with the visual cues you get
from Windows Explorer, you can predict what will happen every single
time you drag and drop. What's more, you can use some basic tricks to
change what happens.
Here are the basic drag-drop rules by which Vista lives:
If you drag an object from one place to another on the same physical drive (C:\docs to C:\files), Windows moves the object.
If you drag an object from one physical drive to another physical drive (C:\docs to D:\files), Windows copies the object, resulting in two identical files on your PC.
If you drag an object from one place to another in the same folder, Windows does nothing.
If you drag an object into the Recycle Bin, Windows moves the file into the Recycle Bin folder, where it is eventually deleted.
If you drag an object into a ZIP folder anywhere, Windows copies the file.
If you drag certain system objects, such as Control Panel icons, anywhere else, Windows makes shortcuts to those items.
If you drag any file onto an application executable (.exe) file, Windows opens the target application and then sends a signal to the application to open the dropped document.
That's
about it. It used to be that Windows did different things with
different types of files, such as creating a shortcut any time you
dragged an .exe file, but thankfully, those days are over.
Now, here's how to override those rules:
Always copy.
To copy an object, hold the Ctrl key while dragging. If you press Ctrl
before you click, Windows assumes you're still selecting files (explained in the previous section), so make sure to press it only after
you've started dragging but before you let go of the mouse button. (The
exceptions are system objects, like Control Panel icons, that cannot be
copied.)
Duplicate an object.
Hold the Ctrl key while dragging an object from one part of a folder to another part of the same folder.
Always move.
To move an object, hold the Shift key while dragging. Likewise, if you press Shift
before you click, Windows assumes you're still selecting files, so make
sure to press it only after you've started dragging but before you let
go. (Of course, system objects and read-only files, like those on a CD,
cannot be moved.)
Always create a shortcut.
To create a shortcut to an object under any situation, hold the Alt key while dragging.
Choose on the fly.
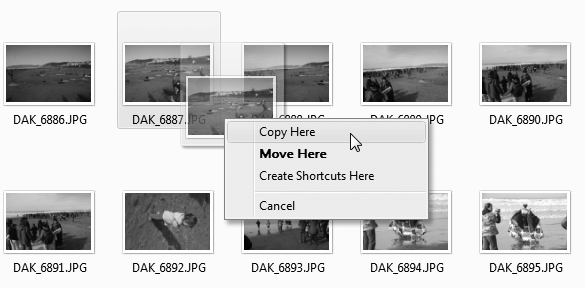
To choose what happens to dragged files each time without having to press any keys, drag your files with the right mouse button, and a special menu like the one in Figure 5
will appear when you drop the files. This context menu is especially
helpful, because it will display only options appropriate to the type of
object you're dragging and the place where you've dropped it.
To
help you predict what will happen, even if you haven't memorized the
rules, Windows changes the mouse cursor to indicate what it intends to
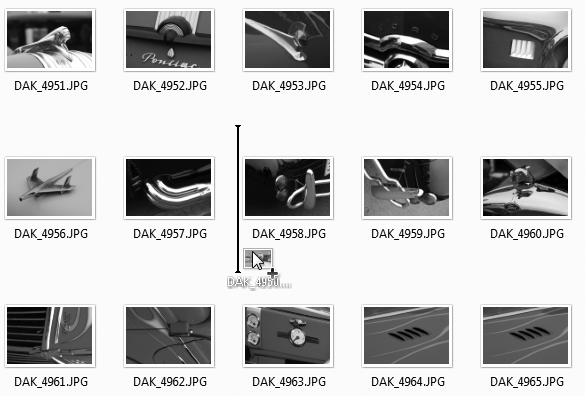
do. While dragging an item, press and release the Ctrl, Shift, and Alt keys and watch Windows change the cursors in real time. As illustrated by Figure 6,
you'll see a small plus sign whenever you're copying, a straight arrow
when moving, or a curved arrow when creating a shortcut. This visual
feedback is very important; it can eliminate a lot of stupid mistakes if
you pay attention to it.
There's
no way to set the default action for dragging and therefore no way to
avoid using keystrokes or the right mouse button to achieve the desired
results. Even if there were a way to change the default behavior, you
probably wouldn't want to do it; imagine if someone else sat down at
your computer and started dragging icons: oh, the horror.
Make a mistake? Press Ctrl-Z
to undo most types of file operations. If you're not sure what the last
file operation was, open Windows Explorer. Then right-click an empty
area of the folder and hover the mouse over the Undo menu item. Depending on the last action you took, the menu item will read Undo Copy, Undo Move, Undo Rename, or Undo Delete. Additionally, if you have the Status bar visible (press the Alt key to show the menu and then select View → Status bar), Explorer will usually explain what you're about to undo.
4. Copy or Move to a Specified Path
Dragging
and dropping is generally the quickest and easiest way to copy or move
files and folders from one place to another. Typically, though, it helps
if the source and destination folders are both visible at the same
time. But what if they're not?
4.1. Solution 1: Drag patiently
In
Windows Explorer, navigate to the source folder. Next, drag one or more
items over the tree pane on the left, then hover the mouse cursor over
the visible branch of the destination folder, and Explorer will
automatically expand the branch. You can also hover near the top or
bottom of the Navigation pane to scroll up or down, respectively.
If
the destination folder you're looking for is buried several layers
deep, you'll have to wait for Explorer to expand each level. This
requires a steady hand and a lot of patience.
4.2. Solution 2: Use cut, copy, and paste
Select the file(s) you want to copy, right-click, and select Copy to copy the items or Cut to move them. (Or, to use the keyboard, press Ctrl-C or Ctrl-V, respectively.
When you cut
a file, its icon appears faded (as though it were a hidden file) until
you paste it somewhere, or abandon the operation. (Abandoning a cut operation does not delete the file, by the way.) Explorer makes no visual distinction for files you copy. |
|
Next, open the destination folder, right-click an empty area, and select Paste (or press Ctrl-V).
4.3. Solution 3: Use a third-party add-on
If
you're not satisfied with the tools Windows Explorer provides, you can
use one of the tools that comes with Creative Element Power Tools (http://www.creativelement.com/powertools). In the Creative Element Power Tools Control Panel, turn on the Copy or Move files anywhere tool, and click Accept.
Then, right-click any file or folder, select Move To or Copy To,
and then type or point to the destination folder. You can also create
new folders on the fly and duplicate paths in the destination folder;
the software even remembers the last dozen destinations you specified.