The process of creating and sending new mail
is almost as easy as receiving it. To open a New Message composition
window, click the New button on the Windows Live Mail toolbar.
Tip
In Outlook Express, you
had to install Microsoft Word to have a spell-checking option when
composing mail. In Windows Live Mail, spell checking is built in. Click
the Check Spelling icon in the toolbar when composing a message (the
button with ABC and a red check mark). Adjust your spelling options by
going to Tools, Options, and clicking the Spelling tab. |
Addressing messages properly is important. A
single misplaced character, or an extra one, in an email address can
send the message to the wrong person or to no one at all. Typical email
addresses can look like these:
[email protected]
[email protected]
[email protected]
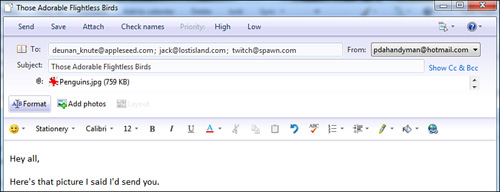
Notice
that Windows Live Mail only has the To: address field that appears by
default. The To: field is the only required field when sending email;
all the others, including the Subject line and even the message body,
can be blank. The To: field usually contains the email address of the
primary recipient, although it can contain more than one address, as
shown in Figure 1. Separate multiple addresses with a semicolon (;).
Tip
Some mail servers are case sensitive. If you’re not sure whether yours is, just type the whole address in lowercase letters. |
To send email to several people, use the Cc:
field. Cc: is short for Carbon Copy or, these days when that messy blue
paper is nearly extinct, Courtesy Copy. To send to several people
without allowing its recipients to see the names or email addresses of
others who also received it, enter addresses in the Bcc: field (Blind
Carbon/Courtesy Copy). To make the Cc: and Bcc: fields appear, click the
link called Show Cc & Bcc at the right end of the Subject field.
Tip
It is a good idea to use
the Bcc: field when you are sending an email to a large audience. This
hides the addresses from prying eyes and potential spammers who might
then pick up the addresses. Use the Cc: line if you are corresponding
with a few people on a project and want everyone to be in the loop and
be able to see everyone else’s address. This also allows any recipient
to click Reply All and send a response to the group, whereas Bcc: does
not. |
When you are finished composing the message, just
click Send on the toolbar. If you want to save the message for later
editing, and not send it yet, click File, Save. The file is then saved
in your Drafts folder, where you can open it again later, edit it, and
send it.
What
do you do if you don’t like the name Windows Live Mail uses to identify
you in outgoing messages? The name Windows Live Mail uses could be
indicative of several things. First, if you have multiple accounts or
identities configured in Windows Live Mail, make sure you are selecting
the desired account in the From: pull-down menu when you send the
messages. You can also open the Accounts dialog box and check the
settings for your email address(es). To open the Accounts dialog, you
will need to activate the Show Menu Bar option in the Tools menu. The
Name field under User Information on the General tab is the name used to
identify you on outgoing mail. |
|
Sending and Receiving Attachments
Of
the many features that make email a versatile method for communication,
perhaps the most useful is the capability to send files along with an
email message. You can attach any electronic file stored on disk to an
email message in Windows Live Mail and then send it to someone else.
Note
Some email accounts do
not allow you to send or receive file attachments with messages. Others,
particularly HTTP accounts, limit the number and size of attachments
allowed. Check with your account provider to find out whether you have
this capability. Also, make sure that the recipient has the capability
to receive attachments. |
Attaching a file to an outgoing message is easy.
In the message composition window, click the Attach button on the
toolbar and locate the file you want to send in the Insert Attachment
dialog box. After you have selected the file, click Attach. The file
attachment should appear in the header information, as shown earlier in Figure 15.7.
Before you send any attached files, consider the
bandwidth it will require. Even if you have a fast network or Internet
connection, if the recipient connects to the Internet via a dial-up
modem, downloading the attachment could take a long time. In general,
you should avoid sending any attachments that are larger than 1 or 2MB
unless you are sure the recipient’s connection can handle them or that
the recipient knows in advance that they’re about to receive some rather
large files. It’s best to ask your recipient first. Many mail servers
(especially web-based accounts) limit the total amount of space a person
can use, and many also set a limit to the size of attachments allowed
(often capping the attachment size at 1 or 2MB, though some high-speed
servers such as Comcast cap it at 10MB at the time we wrote this).
One more thing: If you or the recipient uses a
56Kbps or slower Internet connection, it is usually a good idea to
compress large attachments before you send them. Simply right-click the
document(s) you wish to send, choose Send To, and then Compressed
(Zipped) Folder. Attach the compressed version to your email.
Tip
Here is a tip that can
save you a significant amount of cash. You can view and print Microsoft
Word, Excel, PowerPoint, and Visio attachments without having to
purchase Microsoft Office. You can’t edit the documents, but you can
view and print them. All you need to do is download the free Word,
Excel, and PowerPoint viewer programs from Microsoft. Go to www.microsoft.com/downloads and search for Office viewers. |
To open an attachment in a message you receive,
right-click the attachment (listed in the header) and choose Save As to
save it to disk, or Open to simply open it. If the attachment is a
picture file, it often appears in the body of the message as well,
depending on the format of the image file.
Guarding Yourself Against Email Viruses
Computer
viruses often propagate themselves through email attachments. Hackers
seem to get their jollies out of slowing down the Internet or bringing
corporate business to a crawl. One way to do this seems to be to target
the most popular email programs, such as Outlook and Windows Live Mail’s
predecessor, Outlook Express. As a result, the bulk of email-borne
contagion exists in the form of attachments whose payloads prey on the
weaknesses in those two programs. Personally, I think that both these
programs are excellent email clients, so I don’t suggest changing your
email program just to avoid the onslaughts of malicious Internet
hackers.
As you might suspect, Microsoft doesn’t want to
lose customers either, so it makes a point of looking for viruses and
posting critical updates to its site for easy download. A good approach
is to run a Windows System Update regularly. Automatic Updates are
turned on for just this reason.
In addition, security has been improved in
Windows Live Mail to specifically combat this problem. By going to
Menus, Safety Options, you’ll notice a wide range of new options for
protecting yourself from malicious email. On the Security tab you will
note that Windows Live Mail offers an option to warn you if another
program attempts to send a message appearing to be from you. As you may
be aware, this is a common way for viruses to spread. I recommend that
you keep this option selected.
There is also an option that deals with
potential threats from incoming email attachments. If you click the box
next to Do Not Allow Attachments to Be Saved or Opened That Could
Potentially Be a Virus, you’ll be more protected, but your ability to
access any attachment to email in Windows Live Mail will be limited. If
you’re diligent about it, a better way of dealing with the possibility
of attachment-borne viruses is to carefully look over your incoming
email before opening any attachment, following the tips presented a
little later in this section. I’ve found that when enabling the
automatic feature in Windows Live Mail, even the most innocuous
attachments are prevented from opening. (You can regain access to these
attachments simply by returning to the Security dialog box and
deselecting this option.)
Yet another option is to download and use one of many available antivirus programs. A reliable source is www.mcafee.com,
and its website is another good place to check for the latest
discovered viruses and how to protect your computer from them. I like a
freebie called Avast (www.avast.com)
and have had good luck with it for several years. AVG also offers a
free version of its commercial package. You can find it at http://free.avg.com.
Contrary to popular belief, simply downloading
an infected attachment virtually never harms your computer. With few
exceptions, it is only if you open an attached executable file that
there could be dire consequences. If possible, save the file attachment
on a separate disk and then scan it with antivirus software.
Be especially wary of the following:
Attachments you weren’t expecting (even
from people you know). If in doubt, write back to the sender and ask
whether they intended to send you the attachment. Their computer may
have a virus they are unaware of. Ask whether the attachment is safe and whether they’ve run it on their computer.
Executable attachments (filenames ending in .exe, .vbs, or .js). Be aware that sometimes filenames are misleading on purpose. For example, you might see an attachment such as party.jpg.vbs. This is not a picture. The final extension (.vbs) is the one that counts.
Emails
with cryptic or odd subjects and messages, such as “I Luv U,” “Here’s
that document you requested,” or “CHECK THIS OUT!!!”
Anything that comes from a source you are unfamiliar with.
Setting Up a Signature
If you use email for much of your personal and
business communication, you may like to “sign” outgoing messages with an
electronic signature file. These signatures frequently include
additional information about you, such as an address, title, phone
number, company name, web URL, or a witty quote. Windows Live Mail makes
it easy to set up a standard signature that will be included in every
message you compose. You can configure your own signature by following
these steps:
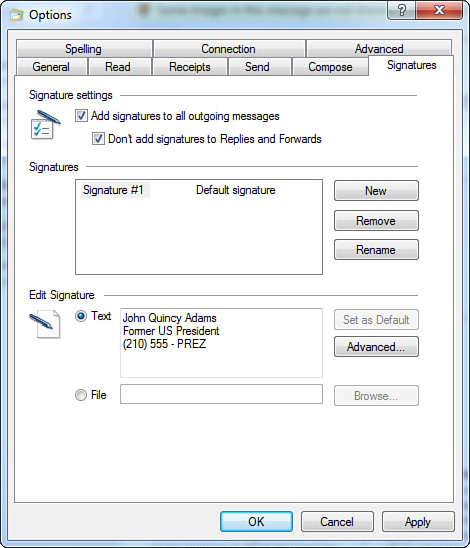
1. | Choose Menus, Options. Click the Signatures tab, shown in Figure 2.
|
2. | Click New to begin typing a new signature. Type your signature information.
Tip Consider creating
several signatures, with varying levels of personal information. You can
then choose a signature in the message window by selecting Tools,
Insert Signature in the message composition. If you have more that one
signature configured, you will see a menu allowing you to select from
the available choices. |
|
3. | If you have multiple email accounts, click Advanced and select the account or accounts you want this signature to be used with.
|
4. | Place
a check mark next to Add Signatures to All Outgoing Messages to enable
this feature. Notice that, by default, your signatures will not be added
to replies and forwards. Click OK when you’re finished. |