IT tutorials
 
Windows
 

Windows 7: Writing Your Text

- Free product key for windows 10
- Free Product Key for Microsoft office 365
- Malwarebytes Premium 3.7.1 Serial Keys (LifeTime) 2019
12/13/2012 5:15:12 PM

The Tablet PC Input Panel isn't just for Tablet PCs anymore! You can enter text in a program by writing on the Input Panel using a pen-sensitive computer (such as a Tablet PC) or a touch-sensitive computer, or you can use a digitizing pad with a stylus or similar interface tool, or even just your mouse. The Input Panel has two writing modes—freehand style, in which you write as you would on paper, and character by character, in which you write one character at a time. However, these two modes are similar—you can even use the Character Pad to make corrections to your text when you use the Writing Pad. Whichever method you use to write your text, the program recognizes your writing and converts it into standard digital text. You can then insert the text into a document.
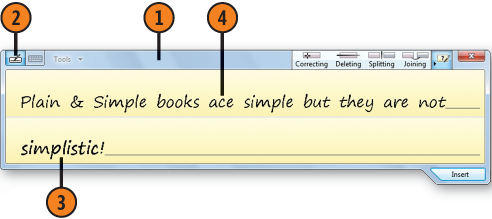
1. Write Your Text

  1. Make sure that the program into which you want to insert your text is running. Then click the Start button, and either type inp in the Search box of the Start menu and then click Input Panel, or choose Tablet PC Input Panel from the Tablet PC submenu to start the program. If the Input Panel is already running but is minimized, click or tap the Input Panel tab.

  2. Click the Writing Pad button if it isn't already selected.

  3. Write your text.

  4. If your text isn't recognized correctly, click the incorrect word.

  5. Do either of the following:

    • Click one of the alternative words.

    • Rewrite the incorrect letter or letters.

  6. Click Close or click outside the word.

  7. Click Insert to insert the text into your program.


Tip:

With so many different input methods and types of hardware, we can't describe in exact detail all the ways you can use your equipment. For example, if you're using your mouse, hold down the left mouse button to write. If you're using a stylus or a finger, just write and tap to execute a mouse-click. You'll need to experiment to find the best way to use your input system with these Tablet PC tools.


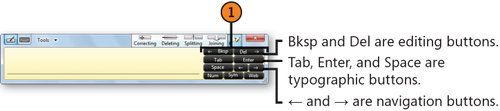
2. Add Other Elements

  1. With no written text in the Input Panel, use the navigation buttons to move the insertion point to the location where you want it in the program.

  2. Tap or click any of the following:

    • The typographic element you want

    • The editing keys to delete any content

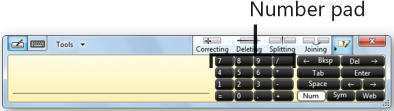
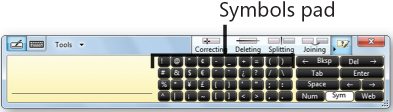
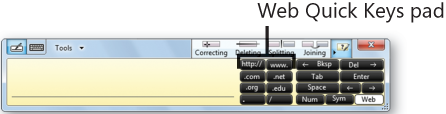
    • The Num button to display the Number pad, the Sym button to display the Symbols pad, or the Web button to display the Web Quick Keys pad, and then the item you want to insert into your document


Tip:

If you click the Close button, the Input Panel moves off the Desktop but doesn't close. To use it again, click the edge of the Input Panel to restore it. To close the Input Panel, choose Exit from the Options menu.


Tip:

To modify the Input Panel's location; to improve the handwriting recognition; or to change the way the Input Panel opens, edits existing text, and displays handwritten text, open the Tools menu before you write any text.

 
Others
 
- Windows 7 : Running Multiple Copies of One Program, Copying Your Screen Content
- Configuring Windows 8 Computers : Managing System Properties (part 3)
- Configuring Windows 8 Computers : Managing System Properties (part 2)
- Configuring Windows 8 Computers : Managing System Properties (part 1)
- Windows Server 2008 : Planning a Terminal Services Deployment (part 2)
- Windows Server 2008 : Planning a Terminal Services Deployment (part 1) - Terminal Services Licensing
- Configuring Windows 8 Computers : Using System Support Tools (part 2) - Managing System Configuration, Startup, and Boot
- Configuring Windows 8 Computers : Using System Support Tools (part 1) - Working with Disk Cleanup, Verifying System Files with File Signature Verification
- Windows Server 2008 Server Core : Working with Data - Working with File Associations and Types, Working with ODBC Data Sources
- Windows Server 2008 Server Core : Working with Data - Performing Bulk File Transfers with the XCopy Utility
 
 
Top 10
 
- Microsoft Visio 2013 : Adding Structure to Your Diagrams - Finding containers and lists in Visio (part 2) - Wireframes,Legends
- Microsoft Visio 2013 : Adding Structure to Your Diagrams - Finding containers and lists in Visio (part 1) - Swimlanes
- Microsoft Visio 2013 : Adding Structure to Your Diagrams - Formatting and sizing lists
- Microsoft Visio 2013 : Adding Structure to Your Diagrams - Adding shapes to lists
- Microsoft Visio 2013 : Adding Structure to Your Diagrams - Sizing containers
- Microsoft Access 2010 : Control Properties and Why to Use Them (part 3) - The Other Properties of a Control
- Microsoft Access 2010 : Control Properties and Why to Use Them (part 2) - The Data Properties of a Control
- Microsoft Access 2010 : Control Properties and Why to Use Them (part 1) - The Format Properties of a Control
- Microsoft Access 2010 : Form Properties and Why Should You Use Them - Working with the Properties Window
- Microsoft Visio 2013 : Using the Organization Chart Wizard with new data
Technology FAQ
- Is possible to just to use a wireless router to extend wireless access to wireless access points?
- Ruby - Insert Struct to MySql
- how to find my Symantec pcAnywhere serial number
- About direct X / Open GL issue
- How to determine eclipse version?
- What SAN cert Exchange 2010 for UM, OA?
- How do I populate a SQL Express table from Excel file?
- code for express check out with Paypal.
- Problem with Templated User Control
- ShellExecute SW_HIDE
programming4us programming4us