In Windows Server 2008 R2, the distinction between volumes and
partitions is somewhat murky. When using Disk Management, a regular
partition on a basic disk is called a simple
volume, even though technically a simple volume requires
that the disk be a dynamic disk.
As long as you use only simple volumes or partitions, you can
easily convert between a basic disk (and partition) and a dynamic disk
(and a volume). After you use a feature that is supported only on
dynamic disks, however, changing back to a basic disk will result in
data loss.
Tip:
BEST PRACTICES Recovering
or rebuilding a server that has a dynamic disk for the boot disk can
be tricky. We suggest keeping your boot disk (C) a basic disk, and
that you use hardware mirroring (RAID-1) to safeguard its contents
and use dynamic disks only for other disks on your server.
|
We used to be big fans of dynamic disks. They provided
increased flexibility and functionality in a way that was pretty
transparent. And they were a huge step forward when they were introduced in Windows 2000. At the
time, RAID controllers were both more expensive and less functional,
and many servers didn’t have hardware RAID on them. That’s simply not the case
anymore.
If using dynamic disks increases your options, isn’t that a
good thing? Well, yes. But—and it’s a big but—a dynamic disk
complicates the disaster recovery process, and we dislike anything
that creates potential issues in a disaster recovery scenario. We
definitely don’t think dynamic disks are appropriate for a system
disk. And we just have a hard time seeing the upside, given the
functionality that a good RAID controller provides.
Dynamic disks and virtualization don’t go well together, and
if you’re choosing to run SBS virtualized, we strongly suggest that
you not use dynamic disks on either the SBS virtual machine or the
host storage on which its virtual hard disks reside.
If you do find a need that can’t be solved any other way, by
all means use dynamic disks. There’s no apparent performance cost,
and you use the same tools to manage both dynamic disks in SBS and
basic disks. But avoid converting your system disk to dynamic. And
make sure your disaster recovery procedures are updated
appropriately.
|
1. Adding a Partition or Volume
Adding a new drive or partition to an SBS server is
straightforward. First, obviously, you need to physically install
and connect the drive. If you have a hot-swappable backplane and
array, you don’t even have to shut the system down to accomplish
this task. If you’re using conventional drives, however, you need to
shut down and turn off the system.
After the drive is installed and the system is turned on
again, SBS automatically recognizes the new hardware and makes it
available. If the disk is a basic disk that is already partitioned
and formatted, you can use it immediately. If it’s a new disk that
has never been partitioned or formatted, you need to prepare it
first. If it’s a dynamic disk or disks, but from another computer,
you can use it as soon as you import it. If the disk is a basic disk
that has already been formatted, you aren’t prompted to upgrade it
to a dynamic disk. If the disk has never been used before, the
Initialize And Convert Disk Wizard prompts you to initialize the
disk.
1.1. Adding a New Disk Using the Initialize Disk Wizard
When you install a new hard drive, the drive is
automatically recognized, and the Initialize And Convert Disk
Wizard starts when you open Disk Management. To add a new disk,
complete the following steps:
If Disk Management recognizes a new disk, you see the
first page of the Initialize Disk Wizard, shown in Figure 1. This wizard
initializes a disk so that it can be recognized by Windows
Small Business Server 2011, and it lets you select whether the
disk should be an MBR or GPT disk.

Clear the check box for any disks you don’t want to
initialize, and select the partition style for the
disks.
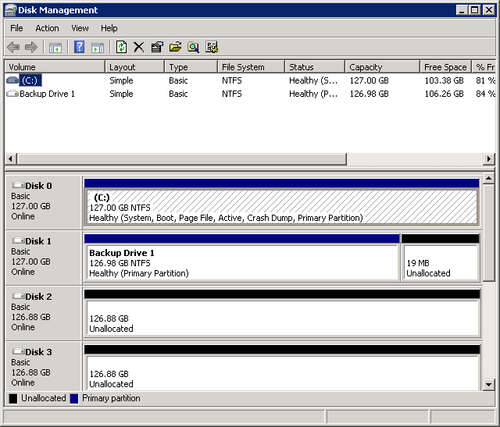
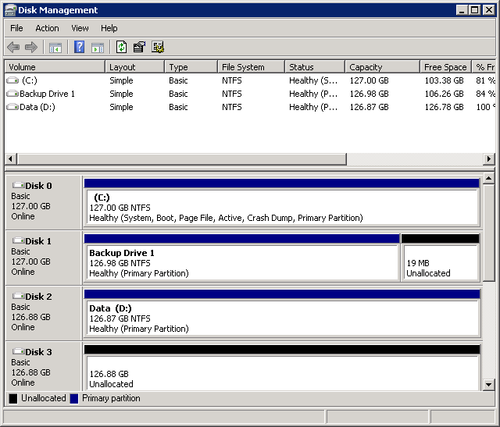
When the wizard finishes, you’re at the main Disk Management
console, shown in Figure 2. Notice that
the disk is still not formatted or allocated and is highlighted in
black (if you haven’t changed the default color settings for the
Disk Management console).
1.2. Creating a Simple Volume or Partition
To create a new simple volume or partition, complete the following
steps:
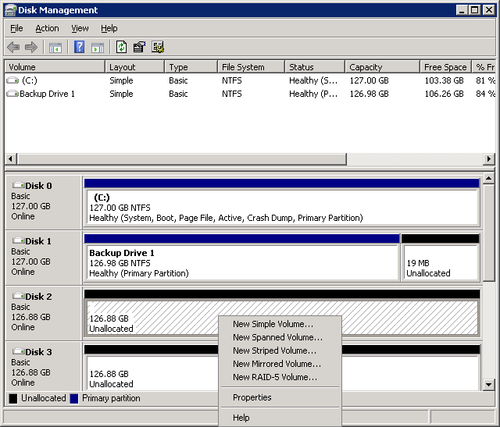
In the Disk Management console, right-click the
unallocated disk and choose the type of new volume you want to
create. To create a partition, select New Simple Volume, as
shown in Figure 3.
The New Simple Volume Wizard opens to guide you through
the process of creating the new volume on the dynamic
disk.
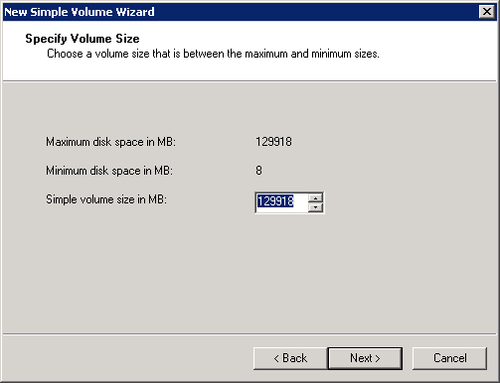
Click Next to open the Specify Volume Size page. Specify
the size of the volume you’ll be creating, as shown in Figure 4.
Click Next to open the Assign Drive Letter Or Path page.
The next available drive letter will be selected by default.
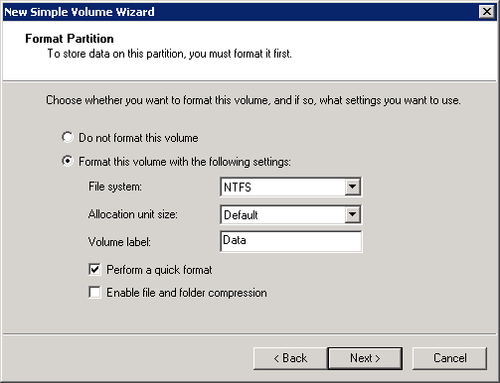
Click Next to open the Format Partition page shown in
Figure 5.
Specify the format options for the volume, including
File System The only
supported file system for Windows Small Business Server
2011 is NTFS, except for removable devices such as USB key
drives.
Allocation Unit Size
The default value is 4 Kb sectors. This is a reasonable
balance, but choose a larger size, such as 16 Kb or even
64 Kb if you know that this volume will be used to hold
only very large files (such as volume dedicated to virtual
hard disks, for example, or large database files).
Volume Label Specify
a meaningful label that identifies the volume.
Perform A Quick
Format Saves waiting for full formatting, but
it’s not recommended on new disks because no verification
pass is performed.
Enable File And Folder
Compression Only an option if the allocation unit
size is less than 16 Kb—and it’s never recommended.
Click Finish to close the wizard and begin provisioning
the volume. You return to the Disk Management console, where
you see the new volume, as shown in Figure 6.
|
SBS adds to the system administrator’s toolkit a complete
command-line interface for managing disks—Diskpart.exe. This command-line utility is
scriptable or can be used interactively. The following
simple script creates a volume on an existing
dynamic disk and assigns it to the next available drive
letter:
REM Filename: MakeVol.txt
REM
REM This is a DiskPart.exe Script. Run from the command line
REM or from another script, using the syntax:
REM
REM diskpart /s MakeVol.txt > logfile.log
REM
REM to run this script and dump the results out to a log file.
REM
REM This script creates a simple volume of 28 Gb on disk #3, and then
REM assigns a drive letter to it. Note that this does NOT format
REM the volume -- that requires using the format command, not part
REM of diskpart.exe

REM First, list out our disks. Not required for scripting, but useful
REM to show the overall environment if we need to troubleshoot problems
list disk

REM Next, select which disk will have the simple volume created on it.
select disk 3

REM Now, create the volume...
create volume simple size=28672

REM Assign without parameters will choose the next available HD letter.
Assign
|
1.3. Creating a RAID-5 or RAID-1 (Mirror) Volume
The process of creating a mirrored (RAID-1) or RAID-5 volume is similar to creating a simple
volume, except that the disks will be converted to dynamic disks
first, and you’ll need to select the disks to add to the
volume.
Note:
Creating a mirror or RAID-5 volume will convert the disks used to
dynamic disks. This is usually not the best solution for
providing redundancy on an SBS server, and we strongly recommend
using hardware RAID wherever possible.
To create a new simple volume or partition, complete the
following steps:
In the Disk Management console, right-click an
unallocated disk and choose New RAID-5 Volume or New Mirrored
Volume to open the New RAID-5 Volume Wizard (or New Mirrored
Volume Wizard).
Click Next to open the Select Disks page, as shown in
Figure 7.
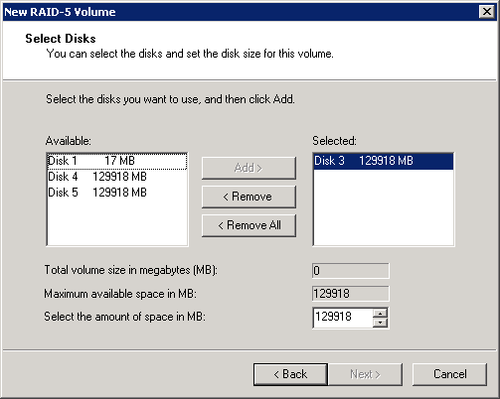
Select the disks to add to the volume, and then specify
the amount of space on each disk to use for the volume. The
maximum for all disks is the amount of unallocated space on
the disk with the least available space.
Click Next to open the Assign Drive Letter Or Path page shown in Figure 8.

Click Next to open the Format Volume page. The
formatting options are the same as for a simple volume or
partition:
File System The only
supported file system for Windows Small Business Server
2011 is NTFS, except for removable devices such as USB key
drives.
Allocation Unit
Size The default value is 4-Kb sectors. This is
a reasonable balance, but choose a larger size, such as 16
Kb or even 64 Kb, if you know that this
volume will be used to hold only very large
files (such as volumes dedicated to virtual hard disks,
for example, or large database files).
Volume
Label Specify a meaningful label that identifies
the volume.
Perform A Quick
Format Saves you from waiting for full
formatting, but is not recommended on new disks because no
verification pass is performed.
Enable File And Folder
Compression Only an option if the allocation unit size is less than 16 Kb—and
it’s never recommended.
Click Finish to accept your settings and provision the
RAID volume. If the disks are currently basic disks, you’ll
see the warning message shown in Figure 9.
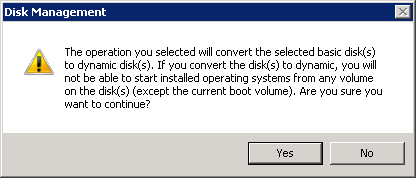
Click Yes, and the disks will be converted and the
provisioning will begin.
|
Even though SBS can recognize hard drives that are
formatted in any of the three file system formats (FAT, FAT32, and NTFS), only NTFS is supported by Windows Small
Business Server 2011. Although it is technically possible to
format any drive except the system drive as FAT or FAT32, it is
neither recommended nor supported.
You can choose to quick-format a drive to make it
available more quickly, but this option simply removes the file
entries from the disk and does no checking for bad sectors.
Choose quick formatting only when recycling a disk that has
already been formatted and you are confident it hasn’t been
damaged.
On an NTFS volume or partition, you can specify the
allocation unit size. This option lets you tune the disk for a
particular purpose, depending on the disk’s size and intended
function. A database storage volume that will contain large
database files managed by the database program might lend itself
to large allocation units (also called
clusters), whereas a disk that must hold
many small files is a candidate for smaller clusters. However,
the default sizes are an excellent compromise for most
situations—modify them only with caution and with a clear
understanding of the consequences for your
environment.
You can also choose to enable disk and folder compression on NTFS volumes and partitions. This
causes all files and folders on the volume (as opposed to individual files or folders you select) to be compressed.
Compression can minimize the amount of hard disk
space used by files, but it has a negative impact on performance
while making disaster recovery more problematic. Given the cost
of hard drive space today, we think this is just a bad
idea.
|
1.4. Deleting a Partition or Volume
Deleting a partition and deleting a volume are essentially
the same task. When you delete a partition or volume, the entire
volume or partition is deleted. However, if you’ve got an older
disk with an extended partition on it that you use with SBS, you
won’t be able to delete the extended partition until you delete
all of the logical drives in the partition. You can directly
delete a primary partition or a volume.
In all cases, when you delete a volume, logical drive, or
partition, you end up with free or unallocated space and no data
on the volume, drive, or partition when you’re done, so make sure
you have a good backup if there’s a chance you might later need
any of the data. To delete a partition or volume, follow these
steps:
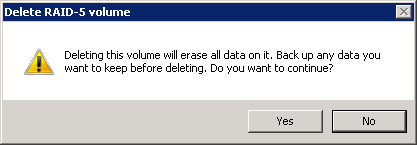
Right-click the partition or volume and select Delete
Volume.
At the Delete Volume warning, shown in Figure 10, click Yes to
delete the volume.
When the volume or partition is completely deleted, the
space it occupied will be unallocated. Space that is unallocated
on dynamic disks can be used to create mirrors, extend an existing
volume, create a RAID array, or otherwise manage the storage on
your server. Space that is unallocated on basic disks can be
partitioned or used to extend a partition.
Extended partitions were a mechanism used by earlier
versions of Windows to get around the limitation of MBR disks
that allowed a maximum of only four partitions. If you have an
extended partition on your disk for some reason,
you can create logical drives on the partition using
DiskPart.exe. However, you no longer have a graphical way to
create an extended partition or a logical drive, nor any
real need to do so. With Windows Small Business Server 2011
providing full support for GPT disks, the old limit of a maximum
of four partitions on a disk is gone—GPT disks in Windows Server
2008 R2 support 128 partitions. If you have any existing MBR
disks that include an extended partition because you moved a
disk from another computer to your SBS computer, we suggest you
remove the existing extended partition and convert the disk to
GPT.