Over the past few years, digital cameras have become
the photography tool of choice for everyone from novices to
professionals. And it’s no wonder: Digitals give photographers
tremendous freedom to shoot at will without having to worry about
paying processing costs or running out of film. If there’s a downside to
all this photographic freedom, it’s that most of us end up with huge
numbers of photos cluttering our hard drives. The result has been a
thriving market for third-party programs to import, view, and manage all
those digital images.
Digital-image management seems like the kind of
thing that ought to be part of the operating system. However, although
Windows has had programs such as the Windows Picture and Fax Viewer, it
has never had a program designed to perform the full range of
image-management tasks, from importing and viewing to organizing and
burning.
Windows Vista changes all that by introducing a
new program called Windows Photo Gallery (WPG). This program can import
images and videos from a camera, a scanner, removable media, the
network, or the Web. You can then view the images, add metadata such as
captions and tags, rate the images, search for images, and even apply
common fixes to improve the look of photos. You can also burn selected
images to a DVD.
You launch the program by selecting Start, All
Programs, Windows Photo Gallery. WPG immediately begins gathering the
images on your hard disk. You can also import images by hand using the
following File menu commands:
Add Folder to Gallery— This command displays the Add Folder to Gallery dialog box, which enables you to import images from a specific folder.
Import from Scanner or Camera—
This command launches the Scanner and Camera Wizard, which takes you
step by step through the process of importing images from a digital
camera, a document scanner, or a removable medium.
Grouping Images
By default, WPG groups the images by date, but
you can change that using the View, Group By command, which enables you
to group on a number of metadata properties, including Date Taken, File
Size, Image Size, and Camera. You can then select View, Table of
Contents to see links that take you to each group. For example, Figure 1 shows images grouped by File Size with the Table of Contents showing links to each group (Largest, Larger, Medium, and so on).
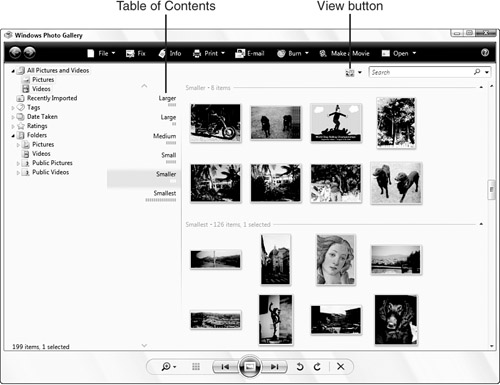
Image Metadata and Tagging
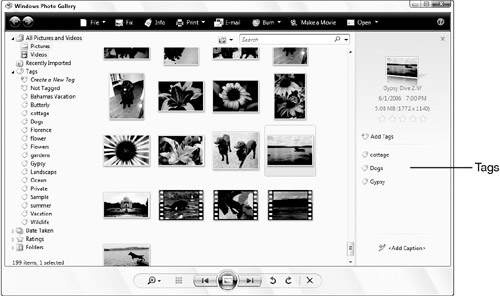
You can also create your own metadata for each image. WPG enables you to change a number of properties, including Caption, Date Taken, Rating, and Tags. The Tags property enables you to add one or more descriptive keywords—tags—to the image, similar to what you do at photo-sharing websites such as Flickr (www.flickr.com).
In WPG, you click the image you want to work with, display the Info
pane (click Info or Tags, Create a New Tag), click Add Tags, type the
tag, and press Enter. Figure 2
shows an image with several tags added. Notice that the tag you create
also appears in the Tags list, which enables you to filter the images
based on the tag you select. (You can also filter images based on the Date Taken and Ratings properties, as well on Recently Imported and Folders.)
Searching Images with Instant Search
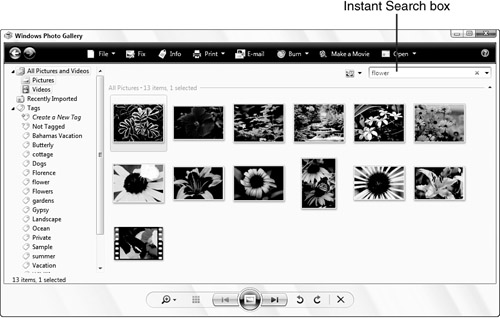
As
with so many other Vista windows, WPG comes with an integrated Instant
Search box that supports as-you-type searches. After you type text in
the Instant Search box, WPG searches filenames and all metadata
(including your tags) for matching images and then shows the results in
the WPG window. Figure 3 shows an example.
Editing an Image
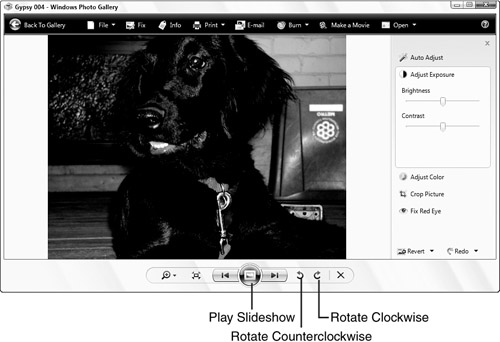
WPG also comes with a limited set of tools for
altering images. Click the image you want to work with and then click
Fix to display the image in the window shown in Figure 7.10.
Here you get sliders to adjust the brightness, contrast, color
temperature, and tint. (You can also click Auto Adjust to have WPG make
the adjustments for you.) In all WPG windows, you can also rotate the
image, as pointed out in Figure 4.
More Tools
WPG also supports the following features:
To preview any image, double-click it. WPG expands the image to take up most of the WPG window.
To view a slideshow, click the Play Slideshow button (see Figure 7.10)
or press F11. Note that the Vista slideshow engine comes with 12
different playback modes. During the slideshow, move the mouse to
display the controls, and then click Themes to choose the playback mode
you prefer.
To set an image as the desktop background, right-click the image and then click Set as Background.
To burn images to a disc, click Burn and then click either Data Disc or Video DVD.