1. Color Sampling and Conversion
Here’s
an example that demonstrates how you work with colors in an expression.
The idea here is that you want to vary the opacity of an animated small
layer based on the lightness (or luminosity) of the pixels of a
background layer that currently happen to be under the moving layer. The
smaller layer will become more transparent as it passes over dark areas
of the background and more opaque as it passes over lighter areas.
Fortunately, the expression language supplies a couple of useful tools
to help out.
Before examining the expression, we need to talk
about the way color data is represented in expressions. An individual
color channel (red, blue, green, hue, saturation, lightness, or alpha)
is represented as a number between 0.0 (fully off) and 1.0 (fully on). A
complete color space representation consists of an array of four such
channels. Most of the time you’ll be working in red, blue, green, and
alpha (RGBA) color space, but you can convert to and from hue,
saturation, lightness, and alpha (HSLA) color space. This example uses sampleImage() to extract RGBA data from a target layer called background. Then rgbToHsl()
converts the RGBA data to HSLA color space so that you can extract the
lightness channel, which will then be used to drive the Opacity
parameter of the small animated layer. Here’s the expression:
sampleSize = [width, height]/2;
target = thisComp.layer("background");
rgba = target.sampleImage(transform.position,
sampleSize, true, time);
hsla = rgbToHsl(rgba);
hsla[2]*100
First you create the variable sampleSize and
set its value as an array consisting of half the width and height of
the layer whose opacity will be controlled with the expression.
Essentially this means that you’ll be sampling all of the pixels of the
background layer that are under smaller layers at any given time.
The second line just creates the variable target, which will be a shorthand way to refer to the background layer. Then sampleImage() retrieves the RGBA data for the area of the background under the smaller layer and stores the resulting array in the variable rgba.
Next rgbToHsl() converts the RGBA data to HSLA color space and stores the result in variable hsla.
Finally, because the lightness channel is the third value in the HSLA
array, you use the array index of [2] to extract it .
Because it will be a value between 0.0 and 1.0, you just need to
multiply it by 100 to get it into a range suitable to control the
Opacity parameter (Figure 1).

2. Extra Credit
Congratulations on making it this far. The remaining
examples build on concepts covered earlier, but I have saved them for
this section because they are particularly tricky or involve some
complex math. I’m presenting them mainly to entice you to take some time
to figure out how they work.
Fade as Turn Away from Camera
Let’s briefly return to the world of layer space
transforms and examine a simple idea that requires only a short
expression, but one with a lot of complicated vector math going on under
the hood. The idea is that you want a 3D layer to fade out as it turns
away from the camera. This needs to work not only when the layer rotates
away from the camera, but also if the camera orbits the layer. And of
course, it should still work if either the layer or the camera happens
to be the child of another layer. Take a look at an expression for
Opacity that will accomplish this:
minAngle = 20;
maxAngle = 70;

C = thisComp.activeCamera.toWorld([0,0,0]);
v1 = normalize(toWorld(transform.anchorPoint) – C);
v2 = toWorldVec([0,0,1]);
angle = radiansToDegrees(Math.acos(dot(v1, v2)));
ease(angle, minAngle, maxAngle, 100, 0)
The first two lines just create two variables (minAngle and maxAngle)
that establish the range of the effect. Here you set their values so
that when the layer is within 20 degrees of facing the camera, it will
be at 100% Opacity and Opacity will fade from 100% to 0% as the angle
increases to 70 degrees. Beyond 70 degrees, Opacity will be 0%.
Next you create a variable C that represents
the position of the comp’s active camera in world space. You’ve seen
this before, in the expression where the layer fades as it moves away
from the camera.
Now starts the vector math. Things get a little bumpy from here. Briefly, a vector
is an entity that has a length and a direction, but has no definite
position in space. I like to think of vectors as arrows that you can
move around, but they always keep the same heading. Fortunately the
expression language provides a pretty good arsenal of tools to deal with
vectors.
To figure out the angle between the camera and the
layer with the expression, you’re going to need two vectors. One will be
the vector that points from the center of the layer toward the camera.
The other will be a vector that points outward from the center of the
layer along the z-axis.
To calculate the first vector (variable v1),
convert the layer’s anchor point to world space coordinates and
subtract from that value the location of the camera in world space. What
you’re doing is subtracting two points in space. Remember, in After
Effects, each 3D position in space is represented by an array: [x,y,z].
The result of subtracting two points like this gives you a vector. This
vector has a magnitude representing the distance between the two points
and a direction (in this case, the direction from the layer to the
camera). You can use normalize() to convert the vector to what
is known as a unit vector, which maintains the direction of the original
vector but sets its length to 1. This simplifies the upcoming
determination of the angle between two vectors.
Next you create the second vector (variable v2). You can create the necessary unit vector in one step this time by using toWorldVec([0,0,1]) to create a vector of length 1 pointed along the layer’s z-axis.
Now
you have your two vectors. To calculate the angle between two vectors,
you use what is known as the vector dot product. I won’t go into great
detail about how it works (there’s a lot of information on the Internet
if you’re curious), but it turns out that if you use unit vectors, the
vector dot product will directly give you the arc cosine of the angle
between the two vectors. Luckily, the expression language gives us a
built-in function, dot(), to calculate the dot product.
So now you can calculate the angle you need (and store it in variable angle) in three steps. First you take the dot product of the two vectors, producing the arc cosine of the angle. Then you use Math.acos() to convert that to an angle . Because the result of Math.acos() will be in radians, you need to convert it to degrees so that it will be in the same units as the limits minAngle and maxAngle. Fortunately, the expression language provides radiansToDegrees() to make the conversion.
The final step is to use the interpolation method ease() to smoothly execute the fade as the angle increases.
Audio Triggers Effect
Earlier, you learned about linking an effect to an
audio level. You can take that idea one step further and use audio to
trigger an animated effect. The difference is subtle but significant. In
the earlier examples, the effect tracked the audio level precisely,
leaving the result at the mercy of the shape of the audio level’s
envelope. Here, you’re going to use the transitioning of the audio level
above some threshold to trigger an animation. The animation will run
until there is another trigger event, which will cause the animation to
start again from the beginning.
This is a powerful concept and there are many ways to
use it. This example triggers a decaying oscillation that is actually
contained within the expression, but you could easily adapt this to run a
keyframed animation using valueAtTime() or to run a time-remapped sequence.
The heart of this expression is what I would call a
“beat detector.” The expression basically walks backward in time, frame
by frame, looking for the most recent event where the audio level
transitioned from below the threshold to above the threshold. It then
uses the difference in time between the triggering event and the current
comp time to determine how far along it should be in the animation. At
each new beat, this time resets to 0 and runs until the next beat. Take a
look at this monster:
threshold = 20.0;

A = thisComp.layer("Audio Amplitude").effect("Both
Channels")("Slider");

// beat detector starts here

above = false;
frame = timeToFrames();
while (true){
  t = framesToTime(frame);
  if (above){
    if (A.valueAtTime(t) < threshold){
      frame++;
      break;
    }
  }else if (A.valueAtTime(t) >= threshold){
    above = true;
  }
  if (frame == 0){
    break;
  }
  frame--
}
if (! above){
  t = 0;
}else{
   t = time - framesToTime(frame);
}

// animation starts here

amp = 75;
freq = 5;
decay = 2.0;

angle = freq * 2 * Math.PI * t;
amp * (-Math.cos(angle)+1)/ Math.exp(decay * t);
This
expression has three sections. The first section defines the audio
level that you want to trigger the animation and stores it into the
variable threshold. It then defines variable A to use as shorthand notation for the slider control containing the keyframed data for the audio level.
The next section is the actual beat detector. In
general, the expression starts at the current comp time and determines
if the level is currently above the threshold. If it is, the expression
moves backward in time, frame by frame, until it finds the most recent
frame where the audio level was below the threshold. It then determines
that the triggering event occurred on the frame after that (the most
recent frame where the level transitioned from below the threshold to
above it). That transition frame is converted to time using framesToTime(),
that value is subtracted from the current comp time, and the result
(the time, in seconds, since the triggering event) is stored in variable
t.
However, if instead the audio level at the current comp time is below
the threshold, the expression has more work to do. It first moves
backward from the current comp time, frame by frame, until it finds a
frame where the audio level is above the threshold. Then it continues
on, looking for the transition from below the threshold to above it. The
elapsed time since the triggering event is then calculated and stored
in variable t.
There are some other things going on in this routine,
but they mostly have to do with special cases, such as a time when
there hasn’t yet been a triggering event (in which case the animation is
held at the first frame), or when the level is above the threshold but
it has been there since the first frame.
There are some JavaScript elements in this section that you haven’t seen before. Two forward slashes, //, denotes the start of a comment. The routine consists mainly of a giant while() loop. This loop is unusual in that its terminating condition is set to true, so it will never end on its own. It will continue to loop until one of the break statements is executed.
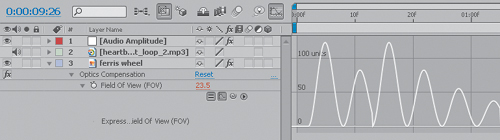
When After Effects arrives at the last section of the expression, variable t contains the necessary information: how long it has been since the last triggering event. The final section uses it to drive a decaying oscillation routine with Math.cos() and Math.exp(). First you define the amplitude of the oscillation with the variable amp. Then you define the frequency of the oscillation (oscillations per second) with the variable freq. Variable decay determines how fast the oscillation decays (a higher number means a faster decay).
Math.cos() creates an oscillating sine wave with amplitude amp and frequency freq, then Math.exp() reduces the amplitude of the oscillating wave at a rate determined by variable decay (Figure 2).