Using the Compound Shape tool
You have one last task for this file. Notice the
skyline scene? The client has asked that the entire width of the design
be filled with a skyline, so you need to add one more building.
Rather than creating a single complex custom path,
you will use the Compound Shape tool to temporarily group multiple
vector shapes together as you draw them, making it easy to move the
objects at the same time, yet also allowing for quick and easy editing
of any shape within the compound group. You can also test effects such
as punching, intersecting, or cropping overlapping vectors. When you use
the Subselection tool (
 ), each vector is easily accessible and editable.
Note
Yes, you could just copy one of the existing buildings, but you already know how to copy and paste!
|
Adding
a pattern works much the same way as adding a gradient. The available
preset patterns are arranged alphabetically in the Fill Category Pattern
submenu in the Property selection list (or you can create your own).
They are bitmap images that have been designed to seamlessly tile inside
a vector shape.
1. | Create an exact copy of the custom shape by choosing Edit > Clone.
| 2. | Choose Pattern > Wood from the Fill Category menu in the Properties panel.
As with the gradient, the control arms allow you to change the direction of the pattern or even distort it.
| 3. | Place the cursor over one of the arms (not the points) to rotate the pattern to suit the orientation of your object.
| 4. | Delete the object from the Layers panel.
|
TipTip
The Path panel (choose Window > Others > Path)
opens up a lot of possibilities for creative design, even if you are not
a whiz with the Pen tool. You can punch out corners, knock holes out of
a shape, distort existing paths, and have a great degree of control
over anchor points.
|
Working with compound shapes
Before you begin, take some time to study one of these compound shapes.
1. | Lock and hide the foreground layer, then unlock and expand the skyline layer.

|
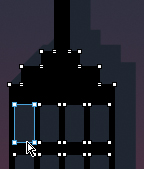
2. | Select the Pointer tool and click on the leftmost building. Notice that it is made up of multiple shapes.
|
3. | Select
the Subselection tool and click on any of the windows in the building.
Notice that only the selected window remains active; none of the other
shapes remain selected.

|
4. | Press Delete. Only the one shape is removed.
|
5. | Press Ctrl/Command+Z to undo the deletion.
|
6. | With the window still selected, look to the right side of the Properties panel.
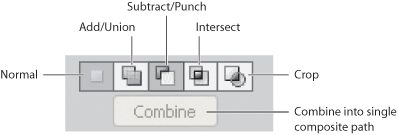
The Compound Shape tool consists of six controls: Normal, Add/Union,
Subtract/Punch, Intersect, Crop, and Combine. Normal is the default
setting; each drawn shape is a single independent object. When you draw a
vector shape such as a rectangle, ellipse, or polygon, or use the Pen
tool, you can use the other tools to group shapes together.

The rectangles that make up the windows are set to Subtract/Punch, which
means they literally punch a hole through the larger rectangle of the
building.
|
7. | Change
the condition of the selected rectangle from Subtract/Punch to
Intersect. The entire building fill color disappears and only the single
window (with its solid shadow effect) remains visible. In fact, if you
click away from the building, you will see only the one rectangle,
floating on the canvas.
|
8. | Make sure the window is selected and change the shape’s condition back to Subtract/Punch. |