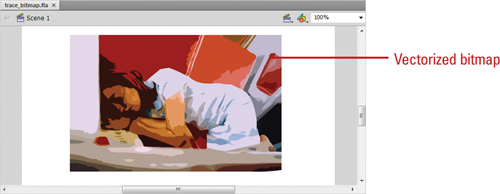
Flash provides a procedure to convert
bitmaps into vector art. When Trace Bitmap is used, Flash interprets
the pixel information in the bitmap and converts it into vector shapes.
The results can be unpredictable in quality and have unwieldy file
sizes if the bitmaps are very complex. However, there are several
parameters in the Trace Bitmap dialog box that can be modified to
strike a balance between file size and quality.
Trace a Bitmap
1. Drag a copy of a bitmap to the Stage from the Library panel; make sure the bitmap is selected on the Stage.
|
2. Click the Modify menu, point to Bitmap, and then click Trace Bitmap.
Trouble?
The Trace Bitmap command is disabled if you select a broken bitmap (a bitmap fill).
|
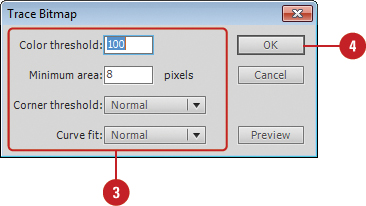
3. Specify values and options to determine how close the vector shape resembles the bitmap:
- Color Threshold. If the
difference in the RGB color value for two pixels is less than the color
threshold, the pixel colors are considered the same. Enter a value
between 1 and 500. The higher the value, the lower the number of colors.
- Minimum Area. Determines how many neighboring pixels to include in the threshold calculation. Enter a pixel value between 1 and 1000.
- Curve Fit. Determines how smoothly Flash creates vector outlines.
- Corner Threshold. Controls whether to preserve sharp edges or create more smooth contours.

 |
4. Click OK.
|
Adobe recommends using the following
settings in the Trace Bitmap feature to produce a vector version that
is closest to the original bitmap: Color Threshold = 10, Minimum Area =
1 pixel, Curve Fit = Pixels, and Corner Threshold = Many Corners.
However, depending on the complexity of the bitmap, this can produce
very large and unwieldy file sizes and, in some cases, take a long time
for Flash to complete the operation.