The Polygon tool might not seem like it has
features to automatically create a gear shape and this is partially
true. The Polygon tool produces symmetrical shapes that can be
dynamically edited; they can be dramatically modified and still keep a
special base property. Gears are symmetrical. The trick to creating a
complex-looking gear to weld to the initials “D” and “G” is to slightly
modify a polygon so it becomes a multi-spoke star shape first. Then you
add a control node to the object and drag the node to reposition it.
This is one of those things it’s easier to see while you do, but in the
following steps, you’ll modify a polygon you create so that the spokes
end in a blunt, straight edge instead of a point. This gets
you 90 percent of the way to creating an elegant gear shape; the other
10 percent is demonstrated in the following sections.
Creating and Modifying a Polygon
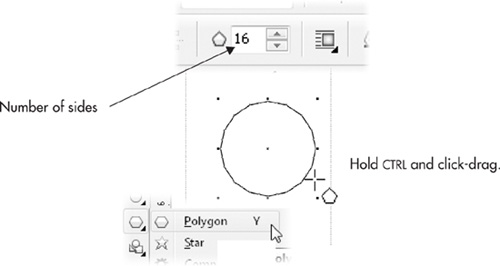
Choose the Polygon tool from the toolbox (it’s just below the Ellipse tool). On
the property bar, set the number of sides to 16. This will produce a
polygon with 16 control points and control points in-between. Hold CTRL
(this constrains the shape to equal width and height), and then
click-drag on the page until the width and height fields on the property
bar (the second-from-left fields) tell you the shape you’re creating is
about 3 inches. At this point, release CTRL and your mouse button. Your polygon should look like the illustration here.

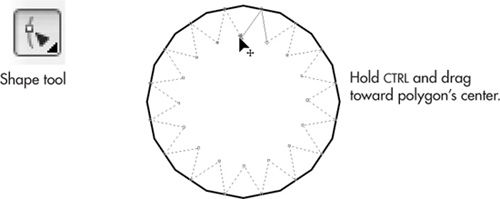
Choose the Shape tool; hold CTRL,
click one of the control points along the path of the polygon, and then
drag until the result is a star shape, shown here. The reason for
holding CTRL as you drag is that it
keeps the control point from drifting to the left or right as you move
it. Otherwise this would produce a radial saw blade shape and not a star
whose path segments mirror each other.

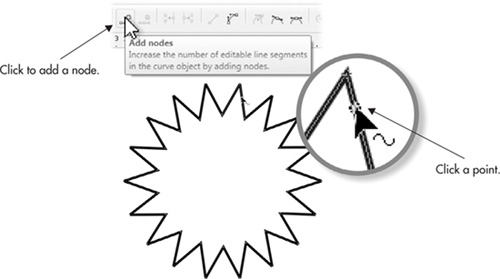
With the Shape tool still active, click a point on the path, as shown in Figure 2.
Then click the Add Node(s) button on the property bar. You’ve created a
change in the property of the path, although it doesn’t look like a
change yet. The polygon can still be dynamically reshaped. Look closely
at the polygon path—you added a control node, but there are actually 16
added control nodes, because you made a change to a dynamic object.

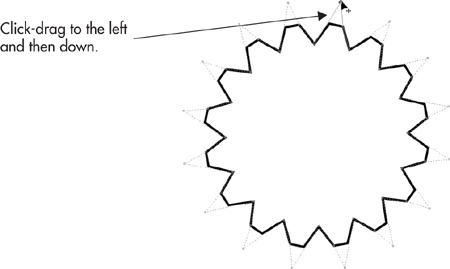
Take
your time on this step: with the Shape tool, drag the top control node a
little to the left and then a little down. Stop when you have the shape
shown here. The polygon looks very much like a 16-tooth gear now,
doesn’t it?

|