IT tutorials
 
Office
 

Microsoft Access 2010 : Viewing the Design of a Form, The AutoForm Feature

- Free product key for windows 10
- Free Product Key for Microsoft office 365
- Product Key Free : Microsoft Office 2019 – Serial Number
2/2/2013 6:04:39 PM

1. Viewing the Design of a Form

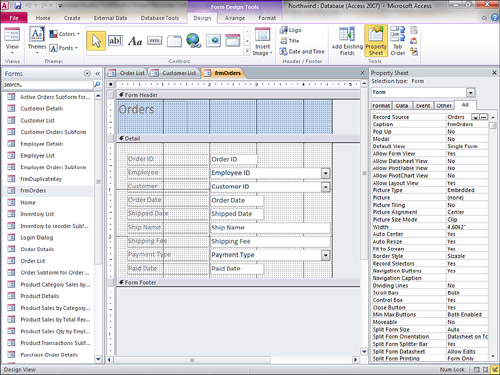
You can use the View tool on the Ribbon to toggle back and forth between Design view and Form view. Figure 1 shows a form in Design view. When you are in Design view, you can modify the underlying blueprint of the form. You can move and size controls, and you can add and remove controls. In fact, you can change the entire look, feel, and functionality of the form.

Figure 1. A form in Design view.


2. Closing a Form

To close a form, click the close button (the X) in the upper-right corner of the form. If you try to close a form without having made any design changes—that is, changes that you make to the design of the form—Access does not prompt you to save. This is because Access saves all data changes as you move from row to row. If you close a form and save design changes, those changes are permanent for all users of the form.

3. The AutoForm Feature

You can quickly build forms by using the AutoForm feature. The AutoForm feature gives you absolutely no control over how a form appears, but it provides you with an instantaneous means of data entry.

Create a Form by Using the AutoForm Feature

Creating a form by using the AutoForm feature is amazingly easy. Here’s how it works:
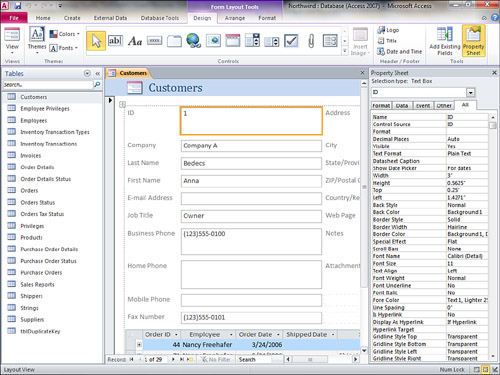
1.
Select the table or query on which you want to base the new form. Select the Customers table for this example.

2.
Select Form in the Forms group on the Create tab of the Ribbon. Access creates a form based on the selected table or query (see Figure 2).

Figure 2. Access creating a form based on the selected table or query.

Saving a Form

Although Access automatically saves all the data changes that you make to a form, it is up to you to save all the design changes that you make to the form. As you work with the design of a form, you should periodically click the Save tool on the QuickAccess toolbar to save changes. When you close the form, Access prompts you to once again save your changes. Here’s the process:

1.
Click the close button (the X). A dialog box appears, asking whether you want to save your changes.

2.
Click the Yes button.

3.
If you have not yet named the form, Access prompts you with the Save As dialog box, asking you to provide a name for the form.

4.
Enter a form name and click OK.

Naming standards suggest that you use the frm prefix to name every form.


The name of a form can be up to 64 characters and can contain text, numbers, and spaces.


Sub-datasheets are available within forms, just as they are in datasheets.

 
Others
 
- Microsoft Access 2010 : Sorting Records, Filtering the Data Underlying a Form
- Microsoft OneNote 2010 : Taking Notes (part 2) - Creating More Writing Space in the Middle of a Page, Creating More Writing Space at the End of a Page
- Microsoft OneNote 2010 : Taking Notes (part 1)
- Microsoft Visio 2010 : Printing Scenarios (part 4) - Printing High-Quality Materials
- Microsoft Visio 2010 : Printing Scenarios (part 3) - Printing Multiple Drawings on a Single Sheet, Printing Scaled Drawings at Reduced Size
- Microsoft Visio 2010 : Printing Scenarios (part 2) - Printing Any Size Drawing on Any Size Paper
- Microsoft Visio 2010 : Printing Scenarios (part 1) - Printing Tiled Drawings
- Microsoft Visio 2010 : Understanding Printing
- Microsoft Project 2010 : Creating Master Schedules (part 3) - Cross-Project Linking Options and Showing Links Between Projects
- Microsoft Project 2010 : Creating Master Schedules (part 2) - Setting Up Cross-Project Links
 
 
Top 10
 
- Microsoft Visio 2013 : Adding Structure to Your Diagrams - Finding containers and lists in Visio (part 2) - Wireframes,Legends
- Microsoft Visio 2013 : Adding Structure to Your Diagrams - Finding containers and lists in Visio (part 1) - Swimlanes
- Microsoft Visio 2013 : Adding Structure to Your Diagrams - Formatting and sizing lists
- Microsoft Visio 2013 : Adding Structure to Your Diagrams - Adding shapes to lists
- Microsoft Visio 2013 : Adding Structure to Your Diagrams - Sizing containers
- Microsoft Access 2010 : Control Properties and Why to Use Them (part 3) - The Other Properties of a Control
- Microsoft Access 2010 : Control Properties and Why to Use Them (part 2) - The Data Properties of a Control
- Microsoft Access 2010 : Control Properties and Why to Use Them (part 1) - The Format Properties of a Control
- Microsoft Access 2010 : Form Properties and Why Should You Use Them - Working with the Properties Window
- Microsoft Visio 2013 : Using the Organization Chart Wizard with new data
Technology FAQ
- Is possible to just to use a wireless router to extend wireless access to wireless access points?
- Ruby - Insert Struct to MySql
- how to find my Symantec pcAnywhere serial number
- About direct X / Open GL issue
- How to determine eclipse version?
- What SAN cert Exchange 2010 for UM, OA?
- How do I populate a SQL Express table from Excel file?
- code for express check out with Paypal.
- Problem with Templated User Control
- ShellExecute SW_HIDE
programming4us programming4us