A sales report that displays daily, weekly, and
monthly totals in a hierarchical format, such as an outline, helps your
reader to sift through and interpret the pertinent information. In
outline format, a single item can have several topics or levels of
information within it. An outline in Excel indicates multiple layers of
content by displaying a plus sign (+) on its left side. A minus sign (-)
indicates that the item has no contents, is fully expanded, or both.
Create an Outline or Group
 Organize data in a hierarchical fashion—place summary rows below detail
rows and summary columns to the right of detail columns.
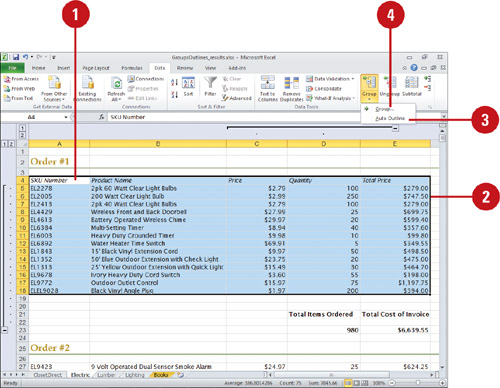
 Select the data that you want to outline. Select the data that you want to outline.
 To create an outline, click the Data tab, click the Group button arrow, and then click Auto Outline. To create an outline, click the Data tab, click the Group button arrow, and then click Auto Outline.
 To create a group, click the Data tab, click the Group button arrow, and then click Group. Click the Rows or Columns option, and then click OK. To create a group, click the Data tab, click the Group button arrow, and then click Group. Click the Rows or Columns option, and then click OK.
Work an Outline or Group
- Click a plus sign (+) to expand an outline level; click a minus sign (-) to collapse an outline level.
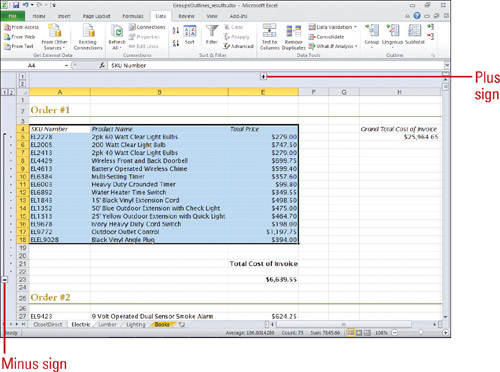
You can ungroup outline data.
Select the data group, click the Data tab, click the Ungroup button
arrow, click Ungroup, click the Rows or Columns option, and then click
OK.
You can clear an outline. Select the outline, click the Data tab, click the Group button arrow, and then click Clear Outline. Converting Text to Columns
The
Convert to Columns Wizard helps you separate simple cell contents into
different columns. For example, if a cell contains first and last names,
you can use the Convert to Columns Wizard to separate first and last
name into different columns. The wizard uses the delimiter—such as a
tab, semicolon, comma, space, or custom—to determine where to separate
the cell contents into different columns; the wizard options vary
depending on the delimiter type. For example, the cell contents Julie, Kenney uses the comma delimiter.
Convert Text to Columns
 Select the range you want to covert to columns. Select the range you want to covert to columns.
 Click the Data tab. Click the Data tab.
 Click the Text to Columns button. Click the Text to Columns button.
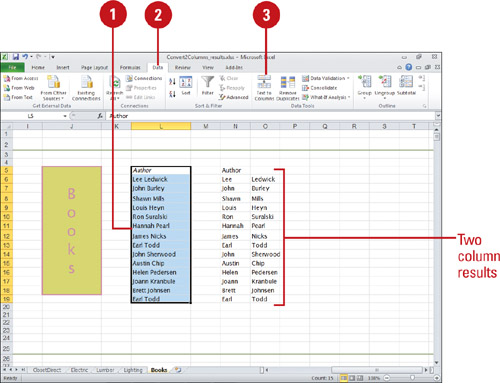  In Step 1, click Delimited. In Step 1, click Delimited.
 Click Next. Click Next.
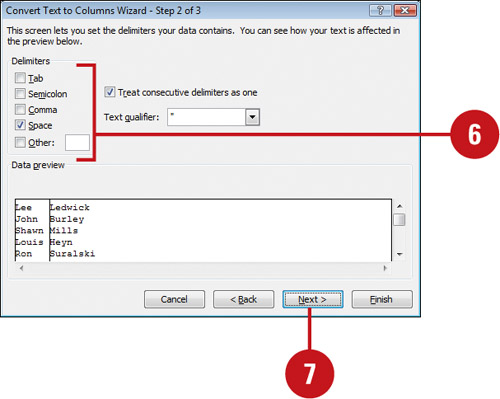
 In Step 2, select the delimiter type you want to use, and then clear the other check boxes. In Step 2, select the delimiter type you want to use, and then clear the other check boxes.
The wizard options vary depending on the selected delimiter.
 Click Next. Click Next.
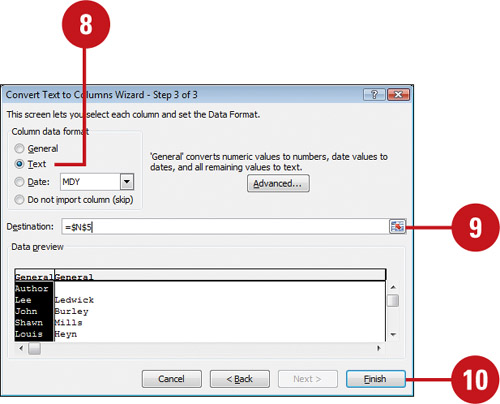
  In Step 3, click a column in the Data preview box, click the Text option, and then repeat this for each column you want. In Step 3, click a column in the Data preview box, click the Text option, and then repeat this for each column you want.
 Click the Collapse Dialog button, select a new destination for the separated data, and then click the Expand Dialog button. Click the Collapse Dialog button, select a new destination for the separated data, and then click the Expand Dialog button.
 Click Finish. Click Finish.
|