In PowerPoint 2003 and earlier, you applied
tabs and indents to entire text boxes only; you could not set them for
individual paragraphs, as in Word. In PowerPoint 2007 and 2010, however,
you can set them for each paragraph, so you have more control.
1. Working with Indents
Each level of bullet (or numbering) on the Slide
Master has a preset indent defined for it. There are two separate
indents: one for the first line of the paragraph, and another for
subsequent lines. They are represented on the ruler by triangles:
First line indent:
This down-pointing triangle represents the positioning of the first
line of the paragraph. Because bulleted lists are the default, and the
bullet character hangs to the left of the rest of the paragraph, by
default, the first line indent is set to be farther to the left.
Hanging indent:
This up-pointing triangle represents the positioning of the second and
subsequent lines in a multiline paragraph. If it is a single-line
paragraph, this indent is ignored.
Left indent:
This rectangle controls both of the triangles as a single unit. If you
want to move both triangles and maintain the spacing between them, you
would drag this rectangle.
You can drag these symbols on the horizontal ruler to change their positions, as shown in Figure 1.
(Hold down Ctrl as you drag if you want finer control over the
positioning.) You can also click the Increase List Level or Decrease
List Level buttons in the Paragraph group on the Home tab to change the
overall left indent.
You can also control indentation more precisely by
using the Paragraph dialog box's Indentation controls. These controls
let you specify indentation at intervals as small as 1/10 of an inch,
but they do not have an exact one-to-one relationship with the indent
markers on the ruler, so you have to do a bit of mental translation.
There are three indentation settings in the Paragraph dialog box, as shown in Figure 2. Open this dialog box by clicking the dialog box launcher in the Paragraph group on the Home tab. The settings are as follows:
Before Text: This is a general left indent setting. It sets both the hanging indent marker and the left indent marker.
Special:
This controls what happens to the first line. The choices are Hanging,
First Line, or None. To indent the first line to the left of the others,
choose Hanging. If you want the first line to the right of the others,
choose First Line.

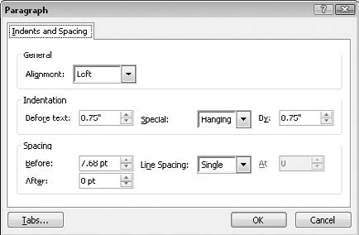
By: If you chose Hanging or First Line, this sets the amount by which the first line will be offset from the Before Text setting.
NOTE
Unlike in Word, there is no right indent marker for paragraphs in PowerPoint.
2. Working with Tabs
Default tab stops occur every 1″ on the ruler. Each
time you press the Tab key (except at the beginning of a paragraph), the
insertion point moves to the next tab stop. If you press tab at the
beginning of a paragraph, the paragraph is demoted one outline level.
(Usually that demotion also involves an indentation as well, but the
indentation is defined on the Slide Master in that case.)
In PowerPoint 2010, each paragraph can have its own
separate custom tab stops set. (PowerPoint 2003 and earlier defined a
single set of tab stops for the entire text box.) To set tab stops,
follow these steps:
View the slide containing the text box in Normal or Slide Master view and select the paragraphs to affect.
If the Ruler does not appear, choose View  Ruler.
Click inside the text box for which you want to set tabs.
Click the Ruler where you want to set the tab. A little L appears, showing that you've just placed a left tab stop.
You can also set centered, right-aligned, or
decimal-aligned tab stops. To set one of these, click the Tab Type
button at the far left of the Ruler. Each time you click this button, it
cycles through the available tab stop types, as shown in Table 1.
To get rid of a tab stop, drag and drop it off the Ruler.
Table 1. Tab Stop Types
| Tab Appearance | Type |
|---|
 | Left |
 | Center |
 | Right |
 | Decimal |
You can also set tab stops via a Tabs dialog box for more precision. To access the Tabs dialog box, follow these steps:
Select the paragraph(s) to affect. To affect all slides, select the placeholders on the Slide Master in Slide Master view.
On the Home tab, click the dialog box launcher in the Paragraph group. The Paragraph dialog box opens.
Click the Tabs button. The Tabs dialog box opens, as shown in Figure 3. From the Tabs dialog box, you can do any of the following:
Set a Tab Stop:
Type a number in the Tab Stop Position box to represent the number of
inches from the left edge of the text box. Click the button in the
Alignment section that represents the desired alignment, and then click
Set.
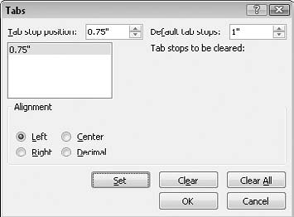
Clear a Tab Stop:
To clear just one stop, select the stop to clear and then click the
Clear button. To clear all custom tab stops, click Clear All.
Change the Default Tab Stop Interval:
The default interval is 1″. To change that, use the increment buttons
in the Default Tab Stops box to increase or decrease the value, or type a
new value directly into the box.