1. Creating Page Breaks
WORD AUTOMATICALLY INSERTS
a page break when text fills the page. This page break sometimes
doesn’t fall where you want it to. You can override Word’s automatic
page break by creating your own page break. You can make a page break at
a shorter position than Word chooses, but you cannot make a page
longer.
A manual page break is sometimes called a hard page
break because, unlike the page breaks that Word inserts, a manual page
break doesn’t move if you delete text above it, adjust the margins, or
otherwise change the amount of text on the page. Insert a manual page
break by positioning the insertion point where you want the new page to
begin and choosing one of the following methods:
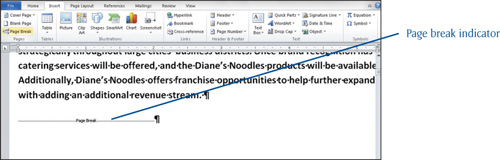
If you are in the default Print Layout view, you see
the text below the insertion point move down to the next page of the
document. However, if you have the Show/Hide characters active, you see
the words ”Page Break,” along with a dotted line, where the new page
begins, as shown in Figure 1.
Tip
You can show or hide the hidden characters by choosing Home > Paragraph > Show/Hide ¶.
You cannot delete Word’s automatic page
breaks, but you can delete the manually inserted hard page breaks at any
time. Simply click the mouse pointer at the beginning of the text after
the page break indication, and then press the Backspace key. Word
deletes the manual page break, and the document text readjusts to fit on
the pages correctly.
2. Using Section Breaks
WHEN YOU NEED TO APPLY different page formatting options to only a portion of the document, you need to break the document into sections.
For example, when page 1 requires different margin settings from the
rest of the document, you must break page 1 into its own section. If
only pages 16–18 need to be printed in landscape orientation, you can
break pages 16, 17, and 18 into a section.
Most section breaks involve entire pages; however, if
you need different columns, they don’t necessarily have to be on
different pages. Word allows for four different types of section breaks:
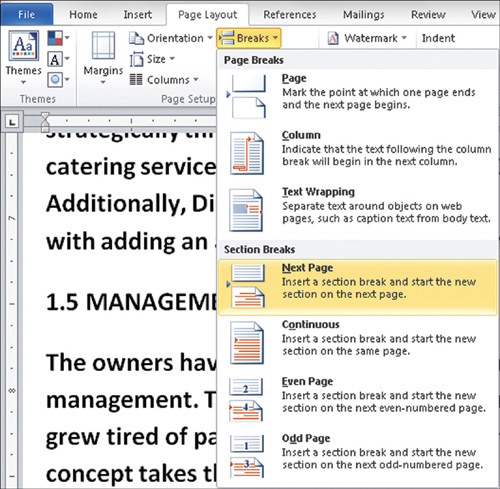
Next Page: Inserts a section break and starts the new section on the next page.
Continuous: Inserts a section break and starts the new section on the same page.
Odd Page: Inserts a section break and starts the new section on the next odd-numbered page.
Even Page: Inserts a section break and starts the new section on the next even-numbered page.
Section formatting options include the following:
Margins: The amount of space between the text and the paper edge.
Paper Size: The paper size you intend to use when printing.
Paper Orientation: The direction the text prints on the paper edge.
Paper Source: When printing, which paper tray the printer should pull paper from.
Page Borders: Bordered lines that appear around the entire document page.
Vertical Alignment: The placement of text between the top and bottom margins.
Headers and Footers: Text that appears at the top or bottom of every document page.
Columns: How text in newsletter-style columns flows from one column to the next on the same page.
Page Numbering: Sequential numbering for each document page.
Line Numbering: How Word automatically counts the lines in a document and displays the appropriate number beside each line of text.
Footnotes and Endnotes: A note of text placed at the bottom of a page or at the end of the document typically citing a reference used in the document.
To insert a section break, position the mouse where
you want the new section to begin, choose Page Layout > Page Setup
> Breaks, and select the desired section break type from the
drop-down list as shown in Figure 2. A section break controls the formatting of the text that precedes it.
Depending on the type of
section break you choose, from the default Print Layout view, you see
the text below the insertion point remain at the same location or move
down to the next page of the document. However, if you are in Draft view
or you have the Show/Hide characters active, you see the words ”Section
Break” and the type of section break in action, along with a dotted
line, where the previous section ends (see Figure 3).