6.1 Toolbox Components
Now let’s look at the components on the Toolbox that
you use in the course of your application development. First, there are
a couple of warnings. On your Toolbox, you might see tabs for Windows
Workflow 3.5 or even a Windows Workflow 3.0 tab.
Caution
Avoid using most of these components because they
will not work properly with the UCMA components. The UCMA components
are built on top of and extend the older Windows Workflow v3.0 and v3.5
components, and can handle the call control logic to keep your
application endpoint from dropping the call.
However, there are a few exceptions. You can (and
will) use the Windows Workflow v3.0 Code and IfElse activities to add
branching logic and the capability to add code blocks your workflow.
The IfElse activity gives you the capability to make decisions and send
your calls down different logic branches. When the Code activity is
dropped into your application, you can attach code behind to do such
things as query a database and handle other programming tasks in your
application.
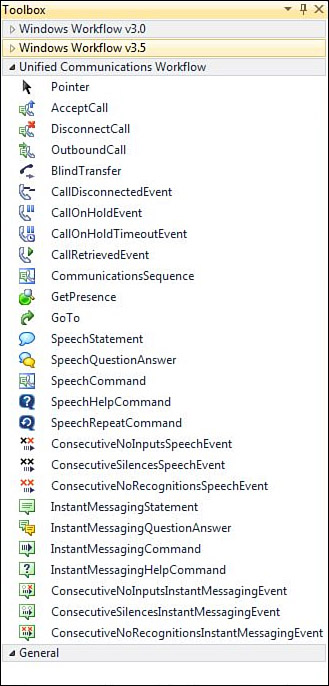
A quick look at the Toolbox, which is shown in Figure 8, shows that the activities are grouped logically in three or four groups.

The first group of activities handles call control.
In this group, you find activities for accepting a call (AcceptCall),
transferring a call (BlindTransfer), making outbound calls
(OutboundCall), and hanging up a call (DisconnectCall). This group of
activities enables you to control how your application handles a call.
For example, after accepting a call, you might want to prompt the user
with a menu of phone extensions that he can select to get information
about your business or products. After selecting from the menu prompt,
send the call to the correct department using the blindTransferActivity.
You also see activities for handling call events
such as CallDisconnectEvent or the CallOnHoldEvent. This group of
activities enables you to control how your application responds to
typical events that occur in a phone call or IM, such as the caller
hanging up or closing the IM chat window. You can also use these
activities to log the caller information or update a SQL database with
the results of the call.
Next you see the CommunicationsSequence activity,
which is the basic container in which you put all the other activities
that make up the application call flow. This activity knows and
understands the concept of a call and is necessary to keep the call
alive.
Following that you see a GetPresence activity along
with a Goto activity. The former enables you to get the presence status
of a user and comes in handy for deciding how to deal with a caller.
For example, the party you want to transfer the call to might have her
presence showing as Busy, so you can send the caller to the target’s
voicemail rather than opening an IM chat with the caller.
The gotoActivity gives you an easy way to divert
your call flow to some other place in your Workflow logic. Although you
can almost always use nested IfElse activities to control your logic,
this can cause your Workflow to get quite large and hard to understand.
Use of the gotoActivity simplifies your Workflow, making it easier to
read and maintain.
The next two groups are similar in functionality.
The first group handles voice calls and the second group duplicates the
same functionality for IM chats. With the right branching logic, you
can have your application handle both.
Note
We discuss only the speech-related activities because the Instant Message activities are the same.
Notice two activities that interact with the user.
The first SpeechStatement enables you to play a message to the caller.
Think of this as a greeting or providing instructions. The application
plays its prompt and simply moves on without expecting user input.
If you want to ask the caller something or give the
caller choices, use the SpeechQuestionAnswer activity. This activity
does exactly what its name implies: It asks the caller a question and
receives the caller’s answer. You can use this activity to find
information, such as what type of pizza the caller wants or the
caller’s account number. After you drop this control into your
Workflow, set the prompt (your question) and then attach a grammar that
controls the acceptable inputs nine answers. Grammars
are XML files that list the allowed user input and assign the values
the speech recognition engine will return to your application. For
example, if you ask the caller what type of pizza she wants, your
grammar would have choices, such as “cheese,” “pepperoni,” “meat
lovers,” or “deluxe.”
The different command activities, such as
SpeechHelpCommand and SpeechRepeatCommand, are activities that handle
global commands and are normally scoped to the whole Workflow. However,
when you nest CommunicationsSequence activities, they can be scoped to
individual CommunicationsSequence activities to change the behavior for
the container. They enable the user to say “Help” or “Repeat,” and you
can use the SpeechCommand activity to create your own command such as
one that responds to the user, saying “Operator.”
The command activities are active anytime there is
speech recognition taking place. For example, if you ask the user what
type of pizza he wants to order and during recognition the caller says,
“Operator,” your application can respond accordingly and direct the
caller to a live person. Using commands like this keeps you from
needing to add “Help,” “Repeat,” or “Operator” to all your grammars.
6.2 Error Condition Components
The
next set of components handle error conditions such as the user
remaining silent (ConsecutiveSilencesSpeechEvent) or saying something
that isn’t valid for the question asked and isn’t in the grammar—for
example, ConsecutiveNoRecognitionsSpeechEvent. The default logic for a
SpeechQuestionAnswer activity is to simply loop and repeat the
question, but these activities enable you to have more control. For
example, you might determine that after three wrong replies that you
want to send the caller to an operator. You can do this by using a
ConsecutiveNoRecognitionsSpeechEvent activity and setting its
MaximumNoRecognitions property to three. After the user has three wrong
replies, ConsecutiveNoRecognitionsSpeechEvent fires and you can the
transfer the call to the operator.
The ConsecutiveNoInputsSpeechEvent is a special
case. It works the same as the other two Event handlers, but it doesn’t
matter whether the events were caused by silence or no recognition.
After you reach the value of its MaximumNoInputs, it fires. Note that
it does so on any combination of silence or no recognition events. It
is kind of a catch all and you will probably find yourself using it in
most cases.
Tip
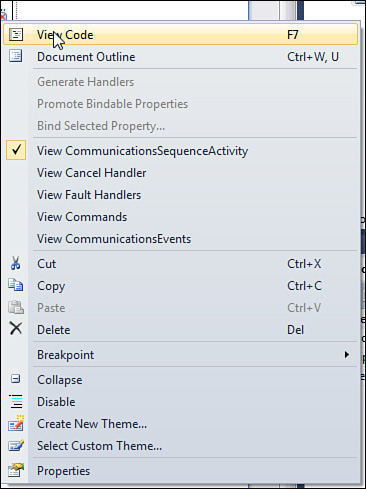
If you try to drop one of the event-handling
components into your Workflow, you will find it cannot be done. To use
the event handlers, right-click the communincationsSequence Activity
(see Figure 9) and then click View CommunicationsEvents. This also applies to speech commands and fault handlers.

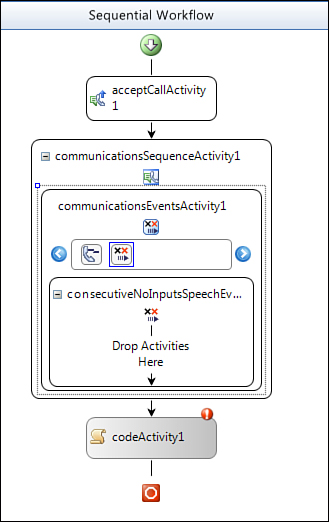
After completing these steps, your designer looks something like the one shown in Figure 10. Now, simply drag and drop the appropriate Speech event into the box between the blue arrows.

Next, set the properties for the event such
as the name and MaximumNoInputs properties. Then drag and drop
components into the canvas to control your call flow. For example, you
might want to add a SpeechStatement to tell the user to stay on the
line for an operator and drop a BlindTransfer activity into the
Workflow to transfer the caller.