Large organizations these days must manage
their information properly, so they know who to point a finger at when
they are sued. And when they are sued, they need to freeze a current
state of all relevant content. In order to freeze relevant content they
need to be able to discover relevant content that needs to be frozen.
The previous paragraph covers three important
aspects of enterprise content management. To manage information, you
need to have proper records management. To freeze documents, you need
to be able to place certain documents on hold. And to identify which
documents need to be frozen, you need to perform eDiscovery.
SharePoint 2010 allows you to do all these tasks and
gives you flexibility to perform each one. Let's start with records
management.
Records management can be done in-place, or
centralized. Centralized records management will involve the creation
of a records center, which is something you can either craft yourself,
or you can use an out-of-the-box site definition called Records Center.
In contrast, in-place records management will allow you to perform
records management tasks right where the content is. Thus you will be
able to select a document in a document library and choose to declare
it as a record for instance. There are many other ways to declare a
document as a record, though. Documents can be declared as records
automatically, based on preset information management policies, or they
can be declared as records via workflows. In fact, there is even a
SharePoint designer workflow activity that will allow you to declare a
document as a record. This truly allows you to make the process of
recordization truly ingrained into your existing business processes.
Once a document has been declared as a record, you
will be able to apply various rules to it, such as its editability, and
perhaps you have a centralized records center in which such content can
be routed at a later date, perhaps using a retention policy or similar.
There is no right or wrong approach between the two,
and most organizations will end up using a mixture of both in-place and
centralized records management.
Holds and eDiscovery work in a similar fashion.
Let's say I am this huge multibillion-dollar organization in the
business of giving legal advice to my clients. One of my clients ends
up losing a lot of money and believe they lost that money because of
bad advice I gave them. So they are now suing me for giving them bad
advice. So I need to prove that my advice was good. In doing so, I (or
my lawyers) will need to freeze a state of all pertinent content that
deals with this client. Thus, I need to place all this content on hold,
which obviously has a downside: current work that requires editing on
the content grinds to a halt. So maybe I want to make a copy of the
content and freeze the copy instead. As I will show you shortly,
SharePoint 2010 allows you to address all these scenarios easily.
And finally because a document has been declared as
a record or has been placed on hold, I need to be able to click any
document and view its current compliance details. In other words, I can
find out whether a current document is on hold or not. If so what are
the details of the hold? Is the current document a record? If it is a
record, what are the details of this record?
So you have in-place records management eDiscovery,
and Hold. There are two other concepts I need to talk about before I
dive into showing all this in action. One is auditing and reporting;
the second is retention and expiration.
Auditing and reporting
refers to the ability to produce per-item level audit log reports. You
can keep tabs on events such as who saw what information! Also part of
reporting is an overall file plan report. Fileplan is something that is
perhaps more pertinent to centralized records management, though it can
be applied to in-place records management as well. But in short, it
refers to a folder-like structure you would create, and the various
information management policies can be hierarchically applied. Content
can then be routed using content organizer rules into appropriate
folders. A fileplan report allows you to see an overview of all your
content management policies. As you may guess, file plan is one of the
most critical and evolving decisions you will take in any serious ECM
project.
Finally, there is retention and expiration.
Retention and expiration is a concept that can apply to both in-place
records management and centralized records management. The whole idea
here is that you have certain metadata with any collected SharePoint
content. This metadata can be normal columns or metadata columns. Based
on that metadata, and perhaps even other rules, you can create policies
that move content from one basket to another. In moving content from
one basket to another, you can treat the content differently; you can
make the content less or more discoverable, you can make it less or
more searchable, you can permanently freeze it for further changes, or
you can even destroy it (commonly referred to as disposition of content).
Good! With the theory behind us, let's see all this in action.
But before I start, I should mention once again that
everything you are seeing here is available as a centralized preset
site definition (records center or documents center), or as features
you can activate in any site you want.
Okay, so let's start! Create a site definition using
the blank site definition. In this site definition, create a document
library called MyDox, and another Wiki library called MyWiki.
Go ahead and put some random content in both of them. Also, for the
site collection, go ahead and activate the in-place records management
site collection level feature.
Now, go to the MyWiki document library and access
Library Settings; you should see a link for Information Management
Policies. Clicking that link will show you all the existing content
types in the document library and whether any retention policies are
associated with the content type. One thing to note is that when you
are creating information management policies, you should first create
your own relevant content types and then create those information
management policies on those content types! This makes sense because
for example Winsmarts sends invoices to clients; those invoices are in
many document libraries; each invoice needs to have a retention policy
applied to it; and so I should attach such a policy to the content type
invoice, not to the various document libraries where such content
appears.
To keep things simple for now, click the Wiki Page
content type, and you will be taken to a page where you can set up
various information management policies on the given content type:
Barcodes and Labels:
These are used for physical records management. Imagine that you have
some old printouts from the 1970s sitting organized by cardboard boxes
in a temperature-controlled room; you can still organize those boxes in
your document library, and the document library can generate the
barcode or appropriate label, which can then be stuck to those boxes.
Auditing:
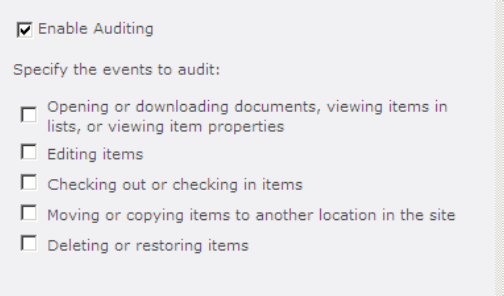
Auditing allows SharePoint to keep a log of a history of certain events
performed on the document. These events can be seen in Figure 1.
Retention:
Retention policies allow you to specify how content is moved between
different buckets/containers within your SharePoint installation and is
eventually deleted. You can specify how exactly the content gets moved
based on various conditions you can add. The combination of the
condition (formula) with the appropriate action together forms a
retention policy. You also have the ability to treat records and
nonrecords differently. I will talk about records shortly, but you care
about records more than nonrecords, so you probably want to apply
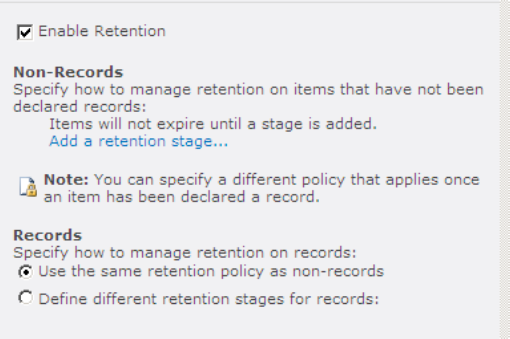
different retention policies to them. Check the Enable Retention check
box Click the Add a retention stage link, which will allow you to add a
retention stage (see Figure 2).
Click the Add a retention stage link, choose to add a retention policy, and set up a new retention policy as shown in Figure 3.
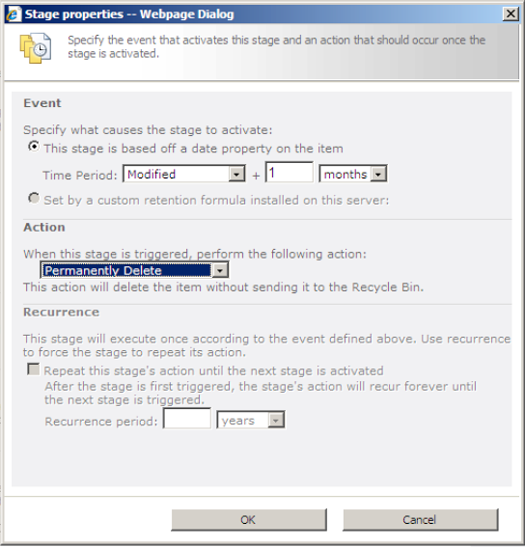
Remember that a retention policy is based on a
formula and an action. Well there you have it! The formula here is
Modified + 1 month, so any document whose modified date > 1 month
will match this formula. Then if something matches, what action do I
want to perform on it? Well, I want to permanently delete it. Poke around a bit and see what other formulas and actions you can
specify. You will see that one of the actions you can specify is the
ability to declare an artifact as a record. Thus, you have the ability
to declare records through retention policies just in case your end
business users are too lazy to declare records manually (which they
probably will be!). As soon as you add the information management
policy, you will also note that you can add many stages to the same
retention policy. This is very useful because you can specify things
such as running a document through seven stages, after which you assume
that this is a useless document and delete it to save on storage costs.
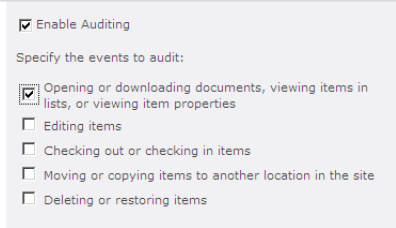
Also, while you're at it, set an auditing policy that enables auditing for opening and viewing of the content as shown in Figure 4.
Go ahead and save this newly created information
management policy. You've just set up a retention policy and an
auditing policy ! Now the wiki page you created, if left untouched for
> 1 month, will get deleted automatically. However, everyone who has
viewed this page will be logged as a part of your auditing policy.
But before I show you how, I'd like you to do one
more thing! Go ahead and activate one more feature in the site, called
Holds and eDiscovery. Once this feature is activated, a new section
will become available under site settings called Holds and eDiscovery.
In this section, you will see three links:
Hold reports: Tells you what content has been placed on hold.
Holds: Allows you to create one or more holds. Each hold is managed by a hold administrator.
Discover and Hold content: Allows you to execute search queries and places all matched documents on hold.
Thus, before you can start placing stuff on hold,
you need to make sure your search is running. On the settings page for Search Service Settings, look for
the Content Sources link on the left side. When you see a content
source called Local SharePoint Sites, issue a full crawl on that
content source. This page will look like Figure 5.

Once the crawl is finished (i.e., your content is
now searchable), come back to the site collection settings of the root
site collection at port 80 where you had created the MyDox and MyWiki
document libraries, and click the Discover and Hold Content link.
This page is split into three sections:
Search Criteria: Lets you pick search criteria; all content matching search criteria will be placed on hold for you.
Local Hold or Export:
Allows you to either hold and freeze the content where it is or copy
the content to a specified destination location and place the hold
there. This will allow the content to be continued to work upon, and a
snapshot is placed a hold on in an alternate location.
Relevant Hold: Allows you to specify the specific hold, along with its administrator that you intend to place these documents under.
In my case, I had the word Random appear on my wiki, so I searched for the keyword random.
I decided to place a hold on the content directly where it was, and I
created a hold called Random Hold whose administrator was
Winsmarts\administrator. After specifying all these details to your
hold content form, click the Add results to hold button at the bottom
of the page. The message shown in Figure 6 appears
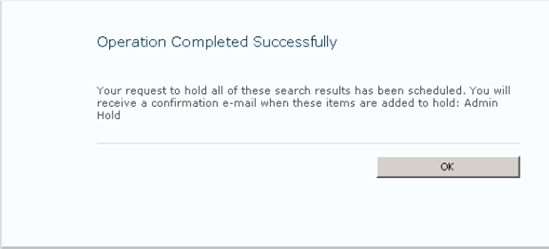
In the background and using a job, SharePoint will
place a hold on all content that matches your search query, and it will
send you an e-mail when the hold is complete!
Note that you also have the option of selecting a
document individually and placing it on hold. For instance, in this
case, go to the MyWiki document library, and using the Library tab in
the ribbon, choose to view all pages in the MyWiki document library.
Then in the ECB menu of any wiki page, choose to view Compliance
Details; you will see the dialog box shown in Figure 7.
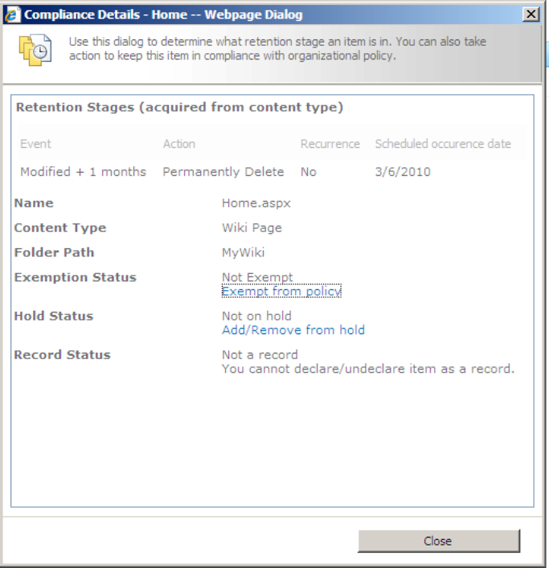
The Compliance Details dialog box shows you a number
of things. It shows you the retentionstages on the item; whether or not
the item is exempt from any information management policies, such as
auditing; and right from here you can choose to place an individual
document on hold or remove a hold on an individual document! Go ahead
and place a document on hold or wait for the timer job to place all
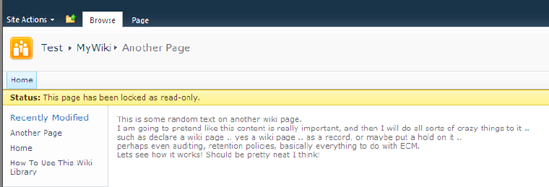
searched documents on hold. After a document has been placed on hold,
the wiki page shows clearly that the document is on hold and is thus
unavailable for further changes. This can be seen in Figure 8.
Now there is one other interesting thing I want to
show you! Look at the Compliance Details dialog box one more time. What
do you see? There is a choice at the bottom that tells you that this
particular document is not a record. Not only that, it tells you that
this "item" cannot be declared as a record. Bummer! I thought I had
turned the In-Place Records Management feature on in this wiki page
library. Well, simply activating that feature isn't enough! You also
need to specify where in the site collection the ability to declare
records is available. There are two places where you can specify it.
The first place is under site collection settings
under a link called Record Declaration Settings. This page allows you
to specify three things.
You
can choose record restrictions: to have no restrictions on records,
block deletes on records, or block edits and deletes on items that have
been declared as records.
You
can choose to make available where the ability to declare records is
available. From here, you can either turn it on globally within the
site collection or turn it off globally. But if you turn it off
globally, you can still turn it on a per-location basis on individual
lists and document libraries. Note that I said, lists and
document libraries, so starting with SharePoint 2010, all sorts of
SharePoint content can participate in the RM lifecycle. How exciting!
To access that section, you may visit any list or document library, go
to list or document library settings, and look for a link called Record
Declaration Settings. On this page, you can choose to inherit the site
collection's record declaration setting, override the site collection's
setting and always allow the facility to declare records, or override
the site collection's setting and never allow the facility to declare
records. You can also choose to automatically mark all added items or
documents into this list as records.
Finally,
back under the site collection record declaration settings, under
Declaration Rules, you can choose to specify who can declare records
and who can undeclare records. This setting can be seen in Figure 9.

Now you know how to make record declaration
available! So, go ahead and make declaration of records available in
the wiki library. Choose to mark a few documents as records, and you
will see that the wiki pages icons show little locks by them (see Figure 10).
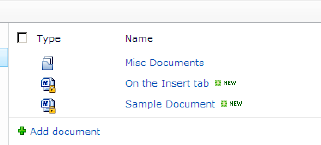
As you will see, declaring any item or
document as a record also trims the ECB menu, the ribbon, and
appropriately reflects the details in the Compliance Details dialog box.