3.3 Window Color and Appearance
To
customize your desktop even further, use the Window Color link near the
bottom of the Personalization window to access the Window Color and
Appearance feature. From this link, what you see will vary greatly
depending on whether you are running in Aero mode or the older, less
flashy Windows Basic (non-Aero) mode. Figure 5 shows both boxes.

As
you can see, the difference in these interfaces is like that between a
butterfly (Aero) and a caterpillar (non-Aero). Let’s explore the Aero
approach first and then the non-Aero.
Aero Mode
In
Aero’s Window Color and Appearance window, simply click a color button
and the scheme will change. Microsoft has made it easy to choose color
schemes this way, without putting you through the hassle of applying a
specific color to each GUI element (title bars, document workspace,
scrollbars, and so on) or choosing schemes by names that don’t mean
much to you, such as Wheat. (You can still assign individual colors if
you want to by clicking the Advanced Appearance Settings link.) The
effects of choosing a color button are immediately displayed across all
open windows and applications
when you click on it. Drag the Transparency slider to alter how
translucent your window borders, title bar, and other elements will be.
This effect is also instantly applied across the interface. Very slick.
Want
to adjust the exact color hue, saturation, and brightness? Click the
Show Color Mixer button. Three sliders show up. Adjust as you please.
(Saturation means how pure the color is, by the way.)
Non-Aero (Basic) Mode
High
Contrast (helpful for the visually challenged) or Windows Basic looks
can be achieved by returning to the Personalization window and
selecting a non-Aero theme from the Basic and High Contrast Themes
section. If you prefer the look of Windows 2000 and older versions,
select Windows Classic in the theme list.
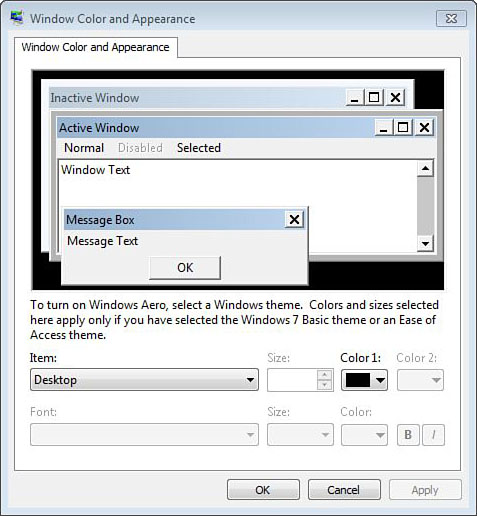
Click Window Color to open the Window Color and Appearance dialog box (see Figure 6).
You can alter the color settings, component size, and fonts of each
individual component of a windowed display for most non-Aero themes.
Careful—you can do some serious mischief here, creating some egregious
color schemes to attract the fashion police or the scorn of a co-worker
who passes by your desk frequently. Or you can design or choose schemes
that improve readability on screens (or eyes) with certain limitations.

To
change the settings, use the various pull-down lists or click on a
window element in the preview area, such as the Active Window title
bar. Then you can click Color 1 or Color 2 and assign colors from the
color picker. In some cases, two colors are assignable because some
elements (for example, title bars) transition from one color to another.
Tip
If
you spend considerable time creating a color, component, and font
styling, be sure to save it as a theme and give it a unique name (for
example, Laura’s Theme). You do this by clicking OK in the Window Color
and Appearance dialog box and then, in the Personalization window,
choosing Save Theme. Otherwise, if you switch to another view, even for
a second, you’ll lose all of your previous settings. |
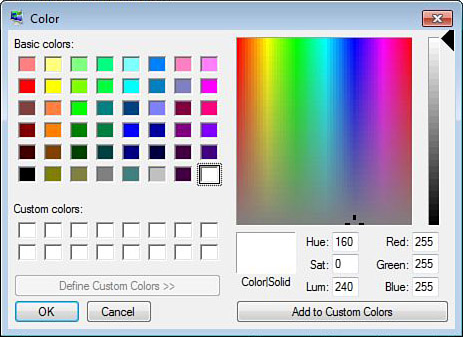
When using the color picker, clicking the Other button opens the Color dialog box (see Figure 7). You work with two color mix controls here. One is the luminosity bar (which looks like a triangle arrow pointing left), and the other is the color refiner cursor (which looks like a set of crosshairs).

Just
drag these cursors one at a time until the color in the Color/Solid box
is the shade you want. As you do so, the numbers in the Hue/Sat/Lum and
Red/Green/Blue boxes below the color refiner change.
Luminosity is the amount of brightness in the color.
Hue is the actual shade or color. All colors are composed of red, green, and blue.
Saturation is the degree of purity of the color; it is decreased by adding gray to the color and increased by subtracting gray.
You
also can type in the numbers if you want, but using the cursors is
easier. When you like the color, you can save a color for future use by
clicking Add to Custom Colors.