Installing Network Monitor
Network Monitor is a free protocol analyzer, or
network sniffer, available from Microsoft. It is used to capture and
analyze network traffic. At the time of writing this, the current
version is 3.4. You can download and install it on Windows Server 2008
or Windows Server 2008 R2 with the steps in the following table.
Tip
The free version of Network Monitor in previous
versions of Windows was limited. It didn’t work in promiscuous mode and
captured only traffic sent to or from the collecting computer. However,
Network Monitor version 3.x does work in promiscuous mode.
| Step | Action |
|---|
| 1. Access Microsoft’s download site. | Go to Microsoft’s download site (http://www.microsoft.com/downloads/) and type Network Monitor. |
| 2. Locate Microsoft Network Monitor. | Click the link for the current version of Microsoft Network Monitor. |
| 3. Download the version for your system. | Locate
the download for your operating system (x86 for 32-bit systems, x64 for
64-bit systems, and ia64 for Itanium based 64-bit systems). Click Download. Click Save. Browse to a location on your system and click Save. |
| 4. Launch the install file. | Launch Windows Explorer and browse to where you saved the download. Double-click it to start it. |
| 5. Start the installation. | A small dialog box appears indicating this will install the Microsoft Network Monitor and the Microsoft Network Monitor Parsers. Click Yes. |
| 6. Review the Welcome page. | Review the information on the Welcome page and click Next. |
| 7. Review the license agreement. | Review the End-User License Agreement, select I Accept the Terms in the License Agreement, and then click Next. |
| 8. Decide on automatic updates or not. | Select whether you want to use Microsoft Update and click Next. |
| 9. Start a Typical install. | Click Typical to install the most common program features. Click Install. |
| 10. Complete the installation. | When the Completing the Setup Wizard page appears, click Finish. The installation of the Parsers starts. This runs and completes without any more user interaction needed. |
Starting and Using Network Monitor
The following steps show how to launch Network Monitor and capture some traffic.
Note
If you’re already familiar with Network Monitor, you
can skip this section because it is basic. However, it does provide
some context for launching and using Network Monitor from the command
prompt with nmcap.
| Step | Action |
|---|
| 1. Launch Network Monitor. | Start Network Monitor 3.4 by clicking Start, All Programs, Microsoft Network Monitor 3.4, Microsoft Network Monitor 3.4. You might be prompted to use Microsoft Update. Choose Yes or No. |
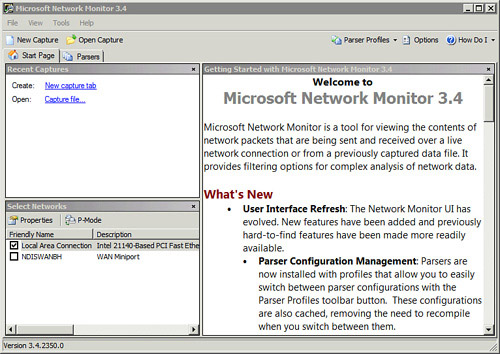
| 2. Select the NIC. | In the Select Networks section (bottom left) ensure that at least one NIC is checked as shown in Figure 1. This is the NIC that data is collected on and if one isn’t selected, data won’t be captured.
Tip
If you want the capture to use promiscuous mode, click the button for P-Mode in the Select Networks section.
|
| 3. Open a capture window. | Click New Capture at the upper left. This opens a capture window. |
| 4. Start a capture. | Click the Start button to start the capture process. |
| 5. Generate ICMP traffic. | Launch a command prompt and ping another computer on the network. This generates some basic ICMP traffic. Click Stop.
Note
Depending on network activity, you might capture much more traffic than just the ICMP echoes.
|
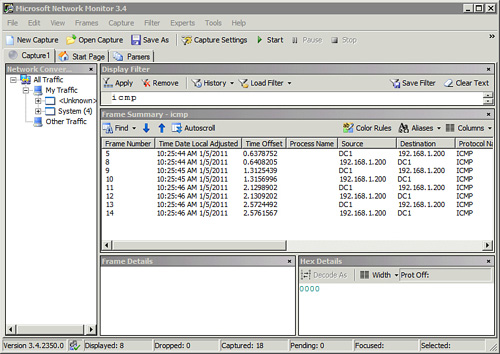
| 6. Filter ICMP traffic. | Type icmp in the text box below Display Filter. Click Apply. Your display should look similar to Figure 2.
Notice how the filter removed all non-ICMP traffic. |
| 7. Save the capture. | Click Save As. Type ping and click Save. This saves the capture as ping.cap. |
| 8. Close the capture. | Right-click over the Capture tab and select Close This Tab. |
| 9. Open a saved capture. | Click Open Capture. Select the ping.cap capture file you just saved and click Open. You can now browse through the saved capture. |
| 10. Clean up. | Close all open windows. |

