|
Like any type of insurance, backups are
something you hope you never have to use. Unfortunately, in the real
world, stuff happens:
Important information inside a document is deleted or edited. Important files are permanently deleted by accident. Hard drives and entire systems kick the digital bucket.
These and similar situations are when you thank your
lucky stars (or your deity of choice) that Windows Home Server has been
on the job making nightly backups, because now you can restore the file,
folder, or system and get back to more important things.
Restoring Backed-Up Files
Follow these steps to restore a file or folder on a client computer:
1. | Using
the computer you want to use to store the recovered file or folder
(which could be the original computer or another client), Log on to the
Windows Home Server Dashboard.
Note
One of the remarkable things about Windows Home
Server is that you can restore objects from computers other than your
own. For example, if an image, song, or video was backed up on your
media PC, you can access that PC’s backups and then restore the file to a
folder on your own computer.
| 2. | Display the Computers and Backup tab.
| 3. | Click the computer you want to work with.
| 4. | Click Restore Files or Folders for the Computer. The Restore Files or Folder Wizard appears.
| 5. | Click
the backup you want to use for the restore, and then click Next. If the
backup includes two or more partitions, the Choose a Volume dialog box
appears. (If the backup includes only a single partition, skip to step
7.)
| 6. | Select
the partition that contains the file or folder you want to restore, and
then click Next. The wizard gathers the partition data.
| 7. | Navigate to the folder that contains the data you want to restore.
| 8. | Select the file or folder. To select multiple items, hold down Ctrl, and click each file or folder.
| 9. | Click
Next. The wizard prompts you to select a restore location. The default
location depends on which computer you’re using to run the restore:
- The original computer— In this case, the default restore location is the original location of the file or folder.
- Another computer— In this case, the default restore location is a folder named Restored Items that the wizard creates on your desktop.
| 10. | Adjust
the restore location, if needed, and then click Next. If some or all of
the objects already exist in the destination folder, Windows asks how
you want to handle the conflict:
Windows XP displays a dialog box asking
whether you want to replace the existing file or folder. Click Yes to
replace the existing file with the backup copy. (If you don’t want the
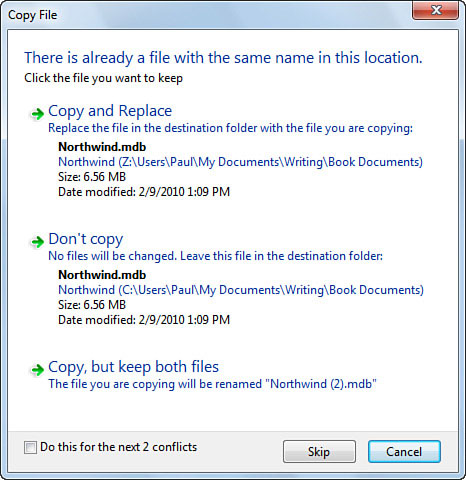
existing file to be replaced, click No, instead.) Windows 7 and Vista display a Copy File dialog box like the one shown in Figure 1.
You have three choices: Click Copy and Replace to have the backup copy
replace the existing item; click Don’t Copy to bypass copying the backup
version and leave the existing item as is; or click Copy, But Keep Both
Files to leave the existing file as is and add the backup copy to the
folder with (2) appended to the file’s primary name.
|
Tip
If Windows 7 or Vista detects multiple conflicts, you can save time by activating the Do This for the Next X Conflicts check box (see Figure 1) to resolve the conflict in the same way with each file.
Restoring a Computer to a Previous Configuration
Losing
a file or two or even an entire folder is no big deal because, as you
saw in the previous section, recovering the data requires nothing more
than a simple copy-and-paste operation. It’s a much more serious problem
when your entire system goes south due to a hard drive crash, a virus,
or some other major problem.
Before Windows Home Server, restoring a computer was a
day-long affair that involved reinstalling the operating system and all
your programs, reconfiguring Windows, re-creating email accounts, and
salvaging as much of your data as you could.
With Windows Home Server, however, restoring a
computer is pretty close to painless because it already has your entire
computer backed up, so its main chore is to take that backup and apply
it to the computer. Because the backup includes not only your data, but
Windows, your applications, and your settings, at the end of the restore
you have your computer back up and running. You may lose a bit of work
or changes that you made since the most recent backup, but that’s a
small price to pay for having your system back on its feet without much
fuss on your part.
Before attempting the recovery, you should, of
course, remedy whatever problem caused the system crash in the first
place. If your hard drive died, replace it with one that’s as big or
bigger than the original. If your system was infected by a virus,
purchase a good antivirus program and run a scan of your computer after
the restore, because there’s a possibility that restoring the computer
could also restore the virus. Also, because the restore process requires
access to Windows Home Server, make sure your computer has a physical
connection to the network router or switch.
Note
The recovery will almost certainly fail without a
wired connection to your network, because the recovery program won’t be
able to locate your server over a wireless connection.
With your hardware ready to go, here are the steps to follow to restore your computer:
1. | Turn off the computer, if it isn’t off already.
| 2. | Insert the bootable USB flash drive that contains the computer’s recovery key.
| 3. | Start the computer.
| 4. | Access
your computer’s setup or BIOS configuration, locate the boot options,
and then configure the computer to boot to the USB flash drive.
| 5. | Restart the computer, which now boots to the USB flash drive.
| 6. | Select
either Full System Restore (32-Bit Operating System) or Full System
Restore (64-Bit Operating System), and then press Enter. After a few
minutes, the Full System Restore Wizard appears and prompts you for the
regional and keyboard settings you want to use.
| 7. | Change
the settings as needed (the defaults are probably fine for most folks),
and then click Continue. The wizard asks whether you need to install
additional drivers.
| 8. | If
you don’t need to install additional device drivers, click Continue and
skip to step 13. Otherwise, click Load Drivers to view the list of
devices that the wizard found.
Tip
Windows Home Server includes all of a computer’s
device drivers as part of the computer backup. If you notice that a
device is missing, you can load those drivers onto a USB drive. Using
another computer, insert a USB flash drive and then run through steps
1–7 from the previous section to open the most recent backup from the
computer you’re trying to restore. Select the Drivers for Full System
Restore folder (it’s part of the system root folder; usually C:\), and
then restore that folder to the USB drive. You can then use that USB
drive to install extra drivers, as described here in steps 9–11.
| 9. | Copy the device driver files to a USB flash drive, and then insert the flash drive.
| 10. | Click Install Drivers.
| 11. | Click
Scan. Windows Home Server locates the drivers on the flash drive or
floppy and then installs them. When you see the message telling you that
the drivers were found, click OK.
| 12. | Click Continue. Windows Home Server restarts the Full System Restore Wizard.
| 13. | Click
Next. The wizard locates Windows Home Server on your network and then
prompts you to enter the Windows Home Server password. (If the wizard
fails to find your home server, click Find My Home Server Manually,
click Next, type the server name, and then click Next.)
| 14. | Type the password, and click Next. The wizard logs on to Windows Home Server.
| 15. | How you proceed from here depends on whether the wizard recognizes your computer:
If the wizard thinks it recognizes your
computer, the option for the computer’s name is activated. If that
option is not correct, click Another Computer, and then use the list to
select the computer you’re restoring. If
the wizard doesn’t recognize your computer, it displays a list of
computers that have available backups on Windows Home Server. Select the
computer you’re restoring, and click Next.
| 16. | The
wizard now displays a list of the computer’s stored backups. Select the
backup you want to use for the restore. (If you’re not sure, you can
click Details to see more information about the selected backup.) Click
Next. The wizard asks you to choose the volumes (partitions) that you
want to restore.
| 17. | Select
the Let the Wizard Fully Restore the Computer option, and then click
Next. The wizard displays a summary of the partitions it will restore.
Note
There’s no rule that says you must restore the entire
system. For example, if your computer has two hard drives and only one
of them crashed, you need to restore only the crashed drive. To prevent
Windows Home Server from restoring a drive, select I Will Select the
Volumes to Restore, click Next, and then select the partitions you want
to restore.
Tip
If you need to perform disk maintenance of any kind,
click the Run Disk Manager button. This loads the Disk Management
snap-in, which enables you to format partitions, change partition sizes,
delete partitions, change drive letters, and more. Right-click the
partition you want to work with, and then click the command you want to
run.
| 18. | Click
Next. Windows Home Server begins restoring the computer. After a few
seconds, it displays an estimate of how long the restore might take.
(The length of the restore depends on the size of the partitions and the
amount of data you’re restoring; it could take as little as 15 minutes
or as much as an hour or two.)
|
When the restore is complete, the wizard
shuts down and then restarts your computer. Note that your computer
might require a second reboot after Windows Home Server detects the
machine’s devices and installs their drivers.
|