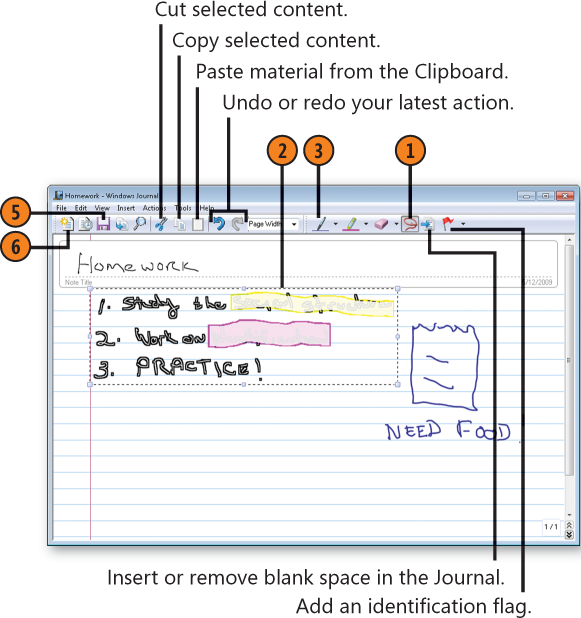
The Windows
Journal is an extremely versatile tool that provides an ideal palette
on which you can assemble diverse types of information. Although it's
primarily for writing notes and making quick sketches on a pen-sensitive
or touch-sensitive computer, you can modify the content, move it
around, and even convert your handwriting into text.
1. Write and Draw
If the Journal isn't already running, click Windows Journal in the Tablet PC folder on the Start menu to start the program.
Write a title for the note using your stylus, your finger, or your mouse.
If
you want to use a different pen color or shape, click and choose your
options from the Pen drop-down menu. To make additional changes, choose
Pen Settings, and make your selections in the Pen And Highlighter
Settings dialog box.
Write the content of your note, and draw pictures using your stylus, touch, or mouse.
To
highlight any material, click the Highlighter button and drag the
highlight over the desired items. To use a different highlight color or
width, click the down arrow next to the Highlighter button. To return to
writing or drawing, click the Pen button again.
To delete content, click the Eraser button and drag the Eraser over the content you want to remove.
Click Save to save the note. Click Save periodically to save your most recent edits.
Tip:
To always open a note with a specific template,
pen color, or shape, or to design your default page using line spacing
and a background picture, choose Options from the Tools menu, and make
the settings you want.

Tip:
To use a different background—for example, music
staffs, graph paper, or a monthly calendar, among others—choose New
Note From Template from the File menu, and select the background you
want from the list in the Open dialog box.
2. Modify and Use Your Content
Click the Selection tool, and drag the selection around the material you want to change.
To modify the content, do any of the following:
Drag it to a new location.
Drag a sizing box on the border of the selection rectangle to increase or decrease the size of the content.
Click the Cut or the Copy button to move or copy the content to the Windows Clipboard.
Choose Format Ink from the Edit menu to change the color and thickness of the ink or to apply bold or italic formatting to the selection.
Choose Convert Selection To E-Mail from the Actions menu to convert writing to text and then send the text in an e-mail message.
Choose Convert Handwriting
To Text from the Actions menu to convert the writing to text, and then
either copy the text to the Windows Clipboard or replace the selected
writing with text.
Point to Change Shape To on the Actions menu, and choose the shape you want the selected content to be converted to.
Click the Pen button, and add more writing or drawings.
Click any of the editing buttons to modify your document.
Click New Note to create a new note, or click the Close button to end your work in the Journal.

Tip:
When you choose to
convert handwriting to text, a dialog box appears in which you can
correct the handwriting-recognition results. If the results are so bad
that the correct text isn't offered as an alternative, use your physical
keyboard or an on-screen keyboard to enter the correct text.