One of the important
networking layers used by all Microsoft networks—including, of course,
your Windows Home Server network—is called Server Message Block (SMB).
It is via SMB that Windows PCs can share folders on the network and
access folders that other Windows PCs have shared. In a very real sense,
SMB is the network.
SMB’s
central role in Windows networking is good news if you have a Mac in
your household. That’s because all versions of OS X support SMB
natively, so you can use your Mac not only to view the Windows Home
Server shares, but to open and work with files on those shares. (That’s
provided, of course, you have permission to access the share and OS X
has an application that’s compatible with whatever file you want to work
with.) You can even switch things around and view your Mac shares from
within Windows.
Even better, Windows Home
Server 2011 now supports Macs right out of the box. Specifically, Window
Home Server 2011 comes with a program called MacConnector, which does
the following:
- Locates the Windows Home Server on the network.
- Registers your Mac with Windows Home Server.
- Configures your Mac to receive local and network health alerts.
- Installs the Launchpad application, which gives you quick access to manual backups, Remote Web Access, and the shared folders.
- Enables you to configure Time Machine to back up your Mac to the server.
The next few sections provide you with the details.
Connecting to the Windows Home Server Network
First, connect your Mac to
the Windows Home Server network. If the Mac is near your network’s
switch (or router, depending on your configuration), run a network cable
from the device to the Mac. If you’re using a wireless connection
instead, follow these steps to connect your Mac to the wireless portion
of your Windows Home Server network:
1. | Click the System Preferences icon in the Dock.
|
2. | Click Network to open the Network preferences.
|
3. | Click AirPort.
|
4. | Use the Network Name list to select your Windows Home Server wireless network ID.
Tip
OS X normally shows the AirPort
status icon in the menu bar. If you see that icon, a faster way to
initiate a wireless connection is to click the icon and then click the
name of the network you want to join.
|
5. | If your network is secure, make sure the Wireless Security list displays the correct security type.
|
6. | Type the security key in the Password text box, and then click OK to return to the Network window. As shown in Figure 1, the Status should show Connected.

|
7. | Close the Network preferences window.
|
Running the Windows Home Server MacConnector Setup Program on Your Mac
With your Mac ready, here are the steps to follow to install the Windows Home Server MacConnector:
1. | Launch Safari and navigate to http://server/connect, where server is the name (or the IP address) of your Windows Home Server machine. The Connect Your Computer to the Server page loads.
|
2. | Click Download Software for Mac. Safari downloads the MacConnector software.
|
3. | Double-click MacConnector in the Downloads window. Your Mac asks you to confirm that you want to open the application.
|
4. | Click Open. Mac OS X prompts you for your Mac’s administrator credentials.
|
5. | Type an administrator’s username and password, and then click OK. The Connect a Computer to the Network Wizard loads.
|
6. | Click Continue. The wizard prompts you for your server name or IP address.
|
7. | Type
the name or IP address, and then click Continue. The wizard checks your
system to ensure it meets the minimum requirements for using the
connector software. If your Mac passes muster, the wizard next prompts
you for a network name for your Mac. The default is your Mac’s name,
without the spaces, truncated to 15 characters, if necessary.
|
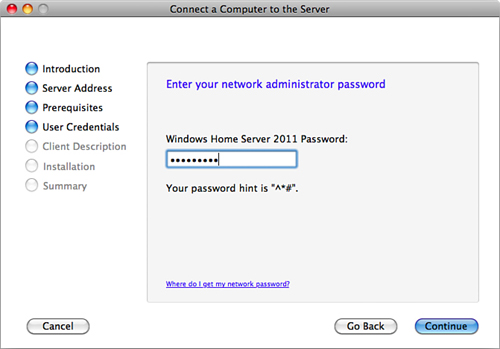
8. | Adjust the name as needed, and then click Continue. The wizard now asks for the Windows Home Server password, as shown in Figure 2.

|
9. | Type the Windows Home Server password, and then click Continue. The wizard prompts you to enter a description for your Mac.
|
10. | Type
the description, and then click Continue. The wizard asks if you want
to start Launchpad automatically each time your Mac starts.
|
11. | If you don’t want Launchpad to start automatically, deactivate the check box.
|
12. | Click Close.
|
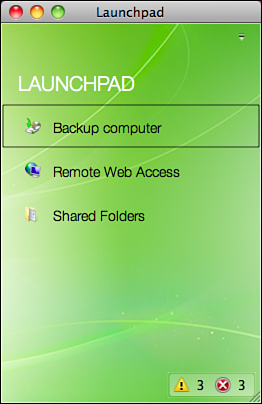
Your Mac opens Launchpad and
prompts you to log on. Type a username and password of a Windows Home
Server account, and then press Return. Launchpad appears, as shown in Figure 3.
From here, you can back up your Mac, use Remote Web Access, or access
the server’s shared folders. Note, however, that if you want to use
Dashboard, you must use it on the Windows Home Server machine directly,
since there’s no Mac version of Dashboard.
