The Windows Home Server
Dashboard gives you quite a few ways to work with the server’s shared
folders, including adding new shared folders, moving a shared folder,
accessing shadow copies, and deleting a folder. The next few sections
take you through all of these shared folder tasks.
Creating a New Shared Folder
Windows Home Server’s predefined shared folders
should suit most needs, but you might require other folders to hold
different file types. For example, you might want a folder for scripts, a
folder for downloaded programs, or a folder to hold user calendars. Windows Home Server allows you to create as
many shared folders as you need. Again, it’s possible to create and
share folders outside of the Dashboard, but if you want use the simple
permissions system, you need to create and share the folder within the
Windows Home Server Dashboard.
Follow these steps to create a new shared folder:
1. | Launch Windows Home Server Dashboard.
|
2. | Select the Server Folders and Hard Drives section.
|
3. | Display the Server Folders tab.
|
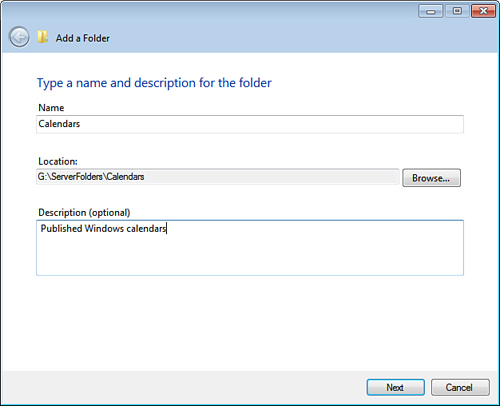
4. | Click Add a Folder. Windows Home Server launches the Add a Folder Wizard, shown in Figure 1.

|
5. | Type a name for the folder.
Note
The folder name must consist of only letters,
numbers, spaces, hyphens (-), underscores (_), or periods (.), and it
must end with a letter or number.
|
6. | Type an optional description. (This text appears in the Description column of the Server Folders tab.)
|
7. | Click Next. The wizard asks you to set the access level for the users.
Caution
Note that the default access level for all users is
Read (except for the Guest user, which is set to None). If you want a
particular user to have full control over the new share, be sure to
change that user’s access level to Full.
|
8. | Click an access level command:
- Everyone (Full Access)—Click this command to give all users Full Access (Read/Write) permission on the new folder. Skip to step 12.
- Everyone (Read Access)—Click this command to give all users Read Only permission on the new folder. Skip to step 12.
- Specific People—Click this command if you want to apply different access levels to different users.
|
9. | If
you clicked the Specific People command, the wizard prompts you to
choose the access level. For each user, use the Access Level list to
select the option that corresponds to the access level you want to
apply: Read/Write, Read, or No Access.
|
10. | Click
Add Folder. Windows Home Server creates the folder and applies the
access permissions. The new folder appears in the Server Folders tab.
|
11. | The wizard prompts you to configure backups for the new folder.
|
Moving a Shared Folder
Because Windows Home Server 2011 no longer comes with
Drive Extender, it no longer maintains a storage pool, so the server
hard drives now operate much like hard drives on any other Windows
operating system. In particular, if a hard drive gets full and there are
no old or unnecessary files to clean out, then you have no choice but
to add another hard drive to the system and use it to store any new
files you add to the server.
Of
course, even without Drive Extender, Windows Home Server isn’t quite
the same as any other Windows OS. In particular, there are those
built-in shared folders that are just so easy to configure, access,
share, and stream. If you add a new hard drive to the server and the old
hard drive containing the shared folders is full, don’t you effectively
lose access to the shared folders (at least as far as adding new files
goes)?
On the face of it, the answer is a disappointing
“Yes.” Fortunately, however, Windows Home Server 2011 enables you to
move a shared folder to a new location. So if your original 500GB hard
drive is bursting at the seams and you add a shiny, new 2TB drive to the
server, you can move all the Windows Home Server shared folders to the
new drive and carry on with your life just as it was before.
Here are the steps to follow to move a shared folder to another drive:
1. | Launch the Windows Home Server Dashboard.
|
2. | Select the Server Folders and Hard Drives section.
|
3. | Display the Server Folders tab.
|
4. | Select the folder you want to move.
|
5. | Click Move the Folder. Windows Home Server runs the Move a Folder Wizard.
|
6. | Select the hard drive destination for the folder.
|
7. | Click Move Folder. Windows Home Server moves the folder to the new location.
|
8. | When the operation is complete, click Close.
|
Accessing Previous Versions of Shared Folders or Files
Windows Home Server 2011 implements an interesting
new technology called Shadow Copies of Shared Folders. The idea is that,
twice a day (at 7:00 a.m. and at 12 noon), Windows Home Server creates
copies of all its shared folders, as well as the files in those shared
folders. These files are called shadow copies,
and each one is essentially a snapshot of the folder’s or file’s
contents at a particular point in time. Because each shadow copy of a
shared folder or file is a version of that object, any shadow copy that
was taken prior to the current version of a folder or file is called a previous version.
Windows Home Server offers three different scenarios for using previous versions of shared folders and files:
- Recovering an overwritten file—If
you copy a file to a shared folder that already contains a file with
the same name, you might overwrite the existing file. If you later
decide you need the original file, you can restore a previous version of
the file.
- Recovering an accidentally deleted file—If
you use a client PC to delete a file from a shared folder, that
deletion is permanent. If you then realize that you deleted the file
accidentally, you can restore a previous version of the file.
- Recovering a higher-quality version of a file—If
you open a file from a shared folder, make lots of edits, formatting
changes, and other modifications, and then save the file, you might
later decide that your changes were for the worse. You can use the
file’s shadow copies to recover an earlier version of the file that
doesn’t include your changes.
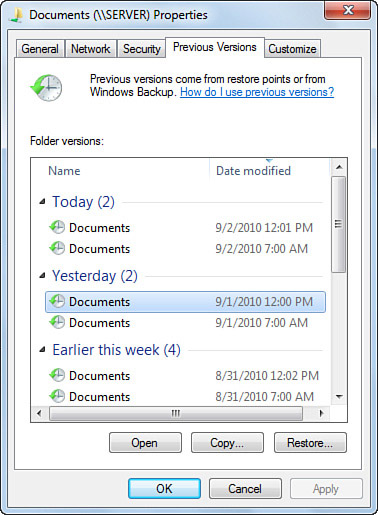
To revert to a previous version of a shared folder or
file, right-click the folder or file, and then click Restore Previous
Versions. This opens the object’s Properties dialog box with the
Previous Versions tab displayed, as shown in Figure 2.

Clicking a version activates the following three command buttons:
- Open—Click
this button to view the contents of the previous version of the folder
or to open the previous version of the file. This is useful if you’re
not sure which previous version you need.
- Copy—Click
this button to make a copy of the previous version of the folder or
file. This is useful if you’re not sure that you want to restore the
whole object. By making a copy, you can restore just part of the object (say, a few files from a folder or a section of a file).
- Restore—Click this button to roll back changes made to the folder or file to the previous version.
Deleting a Shared Folder
If
you no longer need a shared folder, you should delete it so that it
doesn’t clutter the Server Folders tab. Windows Home Server enables you
to delete any folder that you’ve created yourself. (You can’t remove the
predefined shares, such as Music and Documents.) Follow these steps to
delete a shared folder:
1. | If you have any data in the shared folder that you want to preserve, open the folder and copy or move it to another location.
|
2. | If
the shared folder is open either on the server or on a client, close
the folder. (Technically this step isn’t strictly necessary because
Windows Home Server closes all open instances of the folder
automatically. However, if any files from that folder are open, you must
close them.)
|
3. | Launch the Windows Home Server Dashboard.
|
4. | Select the Server Folders and Hard Drives section.
|
5. | Display the Server Folders tab.
|
6. | Click the folder you want to delete.
|
7. | Click Delete the Folder. Windows Home Server asks you to confirm and warns you that the deletion will be permanent.
|
8. | Activate the I Understand That the Folder and Its Contents Will Be Permanently Deleted check box.
|
9. | Click Yes. Windows Home Server deletes the folder. |