9. Search Tricks
Most
of us rely on the Windows Search tool on a daily basis to find and
organize files. It's a tremendously powerful tool, but if you leave its
defaults intact, you'll be missing out on a lot of its potential.
Vista's Search tool is easy to use: just click the Search
box in the upper-right corner of any Windows Explorer window and type a
few letters of what you're seeking; the search results will show up
below in a few moments.
When you initiate a
search, Windows doesn't start looking through all of your folders and
files. Rather, it merely runs your query against its own index of files,
much like Internet search engines such as Google or Yahoo!. But, just
like search engines, Vista's search results can be out of date, to the
point of omitting some files or including others that have since been
deleted.
The good news is that you can customize
Vista's Search feature to include more files, get your results sooner,
and even make search results more accurate.
The
bad news is that the settings that affect searches are scattered across
five different windows, so it's somewhat difficult to see the big
picture when choosing search options.
9.1. Build a good index
If
you want to improve your searches, the best place to start is with the
indexing feature itself. In Control Panel, open the Indexing Options
window to show the folders in which Windows currently looks for files.
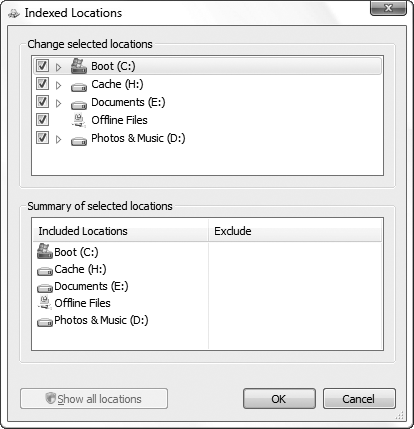
Click Modify to open the Indexed Locations window shown in Figure 8.

Here,
place a checkmark next to each folder to include in the index; you can
index an entire drive, or use the tiny arrows to expand branches and
index only certain subfolders. (If the Show all locations button is available at the bottom of the window, click it now to have full reign over your hard disk.)
By
default, only your personal files are indexed. But if you plan on
hacking up Vista , you may want to
index your entire drive. This will make it easier to find .exe files in the Windows folder, for instance, but doing so will increase the size of the index, which may slow down the rest of your searches.
For
privacy purposes, you may wish to exclude certain folders by clearing
their checkboxes. You can further speed up searches by also excluding
folders you don't need to search. All the folders you've included or
excluded appear in the Summary of selected locations section.
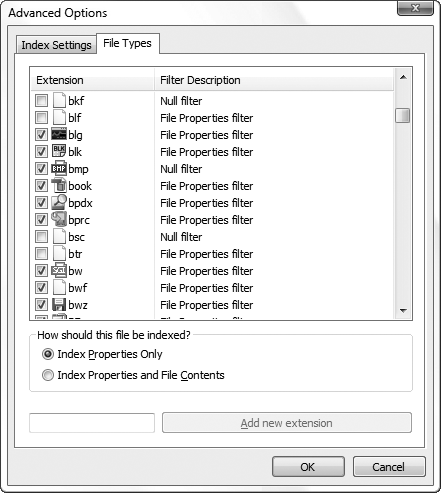
Click OK when you've selected folders to index, but you're not done yet. Next, click the Advanced
button to open the Advanced Options window. Most of the options shown
here are fairly self-explanatory, but what may not be obvious is that
Windows won't index many file types unless you select them by hand in
the File Types tab, shown in Figure 9.

Just
place a checkmark next to each file type you want to index; if you're
serious about getting complete results, you'll want to check them all.
Why? Say you're looking for a DLL file in the Windows\System32 folder and you decide to use the Search tool to find the file. So, you click the Search box and type, say, mapi32.dll. Now, if DLL files aren't indexed, the search results will be empty, erroneously indicating that the file doesn't exist!
Of
course, the more file types you index, the larger the index becomes,
and the longer your searches might take. One way to mitigate this is to
select the Index Properties Only option, but this will only take you so far.
You see, the Filter Description column shows you exactly how much Vista knows about any particular file; if it says File Properties filter or Null filter—as
it does for DLL files—Windows is able to index the file's name, date,
and size, but not much else. Only if it says something more specific,
such as Plain Text filter for text files, or Microsoft Office Filter for Excel spreadsheets, will Windows bother opening the file to index its contents. So, even if you select the Index Properties and File Contents option here, you won't be indexing the contents of that many files.
When you're done, click OK,
and then close the Indexing Options window. Although the settings will
take effect right away, it'll take some time for Windows to rebuild the
index to the point where these settings will make any difference in
search results. (It could be minutes or days, depending on what you've
selected.)
9.2. Search outside the index
Vista's
search index makes searches much faster, but at a price: the search
results are often incomplete. This is particularly true on removable
drives; even though you may've instructed Windows to index these drives,
it won't do so when they're not connected, and may even purge the index
of their contents when you disconnect them.
Not that big a deal, right?
Wrong.
When you conduct a search on a location that's supposed to be in the
index, yet contains no indexed files, your searches will turn up empty.
This means you can be looking at a folder full of files, say, that start
with s, but when you type s*.* in the Search box, you get nothing.
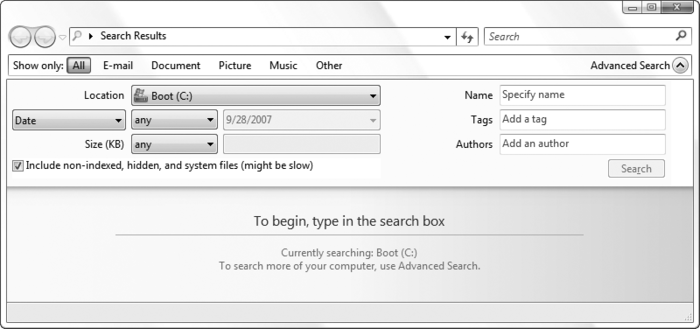
The solution is to click the Advanced Search button under the Search box. You don't see Advanced Search? When the search is complete, scroll to the bottom of the search results, and under Did you find what you were searching for?, click Advanced Search. Or, if you don't want to wait for the search to finish, click the Search Tools drop-down, select Search Pane, and then click Advanced Search.
Once the Advanced Search pane (Figure 10) is open, turn on the Include non-indexed, hidden, and system files (might be slow) option, and then watch as Windows populates your window with up-to-date search results.

Unfortunately,
there's no way to instruct Windows to automatically search non-indexed
files when you're looking at an indexed location, but there are two
different workarounds. For one, you can tell Windows to abandon the
index altogether; in Control Panel, open Folder Options, choose the Search tab, and turn on the Don't use the Index when searching the file system (might be slow) option.
But
a better choice is to simply exclude removable drives and folders from
your index, as described earlier in this section. When you search an
explicitly excluded folder, Windows automatically skips the index and
searches the actual files therein.
9.3. Other search tips
Who's in the mood for some advanced search syntax? Here are some helpful shortcuts you can type right in the Search box.
|
To accomplish this:
|
Type this in the Search box:
|
|---|
|
Find files containing multiple terms in any order
|
bottomless peanut bag
|
|
Find files containing an exact phrase
|
"bottomless peanut bag"
|
|
Find files with at least one of the search terms
|
peanuts OR pecans OR cashews
|
|
Exclude a search term
|
peanuts NOT filberts
|
|
Combine operators
|
(peanuts OR filberts) AND (almonds OR hazelnuts) NOT cashews
|
|
Look only in filenames, not file contents
|
name: shiny
|
|
Search by filename extension
|
*.jpg
|
|
Show all files in all subfolders
|
*.*
|
|
Find files newer than a certain date
|
modified: >01/12/1997
|
|
Find files in a date range
|
(modified: >09/20/2002) AND (modified: <12/20/2002)
|
|
Find files matching a general date
|
modified: 2007
|
|
Find files of a certain size
|
(size: >10 MB) AND (size: <20 MB)
|
|
Search metadata
|
author: "Hoban Washburne"
|
|
Search music by tag
|
kind: music artist: ("Carbon Leaf" OR "Nerf Herder")
|
Note
that Boolean operators AND, OR, and NOT must appear in uppercase. Also,
as you can see, the AND operator is more or less optional; it's used
here mostly for clarity. |
|
By default, Windows looks inside compressed archives like .zip and .cab
files for other files to index, and this can lead to a rather strange
phenomenon. If a search finds a file that happens to be inside a .zip archive, the search results won't tell you this; instead, the Folder and Folder path
columns will just be blank. If you get tired of seeing extraneous,
unlabeled results in your searches, disable Vista's built-in .zip support.
As
you work, Windows indexes your files in the background. In theory, this
should happen only when the computer is idle, but in practice, it's not
unusual to hear the hard disk thrashing while seeing SearchIndexer.exe consuming more than a trivial percentage of processor cycles in Task Manager .
If you need to complete a processor-intensive task as quickly as
possible, or if you just want better performance in a game, you can
temporarily stop the search indexer task without disabling the search index altogether. Just open the Services window (services.msc), find Windows Search in the list, right-click and select Stop.
It will start up again automatically the next time you load Windows, or
you can start it manually by right-clicking the service again and
selecting Start.