1. Setting Up a Wireless Network
Getting connected to a wireless network is pretty straightforward. Here’s how:
If
you haven’t already connected to a wireless network via the Available
Networks dialog, choose Start, Control Panel, Networking and Sharing
Center, and then choose Set Up a New Connection or Network. You can
choose from several options: If you have a
wireless router or network, or if you’re within range of a wireless hot
spot, click the Connect to the Internet option. You should also click
this option if you are using a broadband connection to the outside
world. If you have a broadband modem
(DSL) or a cable modem, and you have a Point-to-Point over Ethernet
(PTPoE) account (one that requires a user ID and password to connect),
choose the Broadband option. If you have a dial-up modem or ISDN, click the Dial-up option.
Follow the instructions to log in to your Internet account, including giving this connection a name. If you intend to allow other users of your computer to use this connection, click the permission box. From this point on, your connection to your wireless network can be used, with a few limitations: If
this is your in-house network and intended to be used only for
connecting multiple computers to the printer, scanner, or other shared
devices, you may not be able to get to the Internet on this particular
network. If you have plugged your wireless network into some form of
outside network connection, such as a broadband connection that’s
plugged into the wireless network, then you can use the wireless network
to connect to that, and thence to the outside world. If, on the other
hand, you don’t have that outside connection, then you will be unable to
use the wireless network If this network is connected via the Internet to a business network, that will be the network you can use. If
you’re using a coffee shop’s wireless connection or possibly a
municipal wireless system, you’ll be able to browse the Internet.
So, for example, our
office has a DSL line, connected to a wireless router. We can use that
wireless connection to access the Internet via the DSL line. In
addition, Google has implemented a municipal wireless network in the
area, so we can also use their wireless network to directly access the
Internet. 2. Viewing and Connecting to Available Wireless Networks
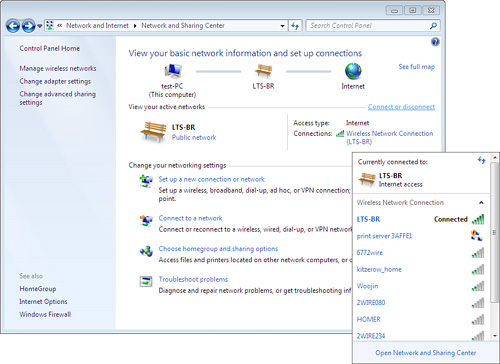
To see what your options are, and to connect to a nearby wireless network, follow these steps:
1. | On the Network and Sharing Center window, you will see a list of available networks.
Tip
If you’re used to the
way Vista handled network connection, Windows 7 shows fewer network
adaptors than Vista. The navigation, sharing, and discovery options have
been moved to other sections. The Network and Sharing options in Vista
have been moved to the Choose Homegroup and Sharing Options window in
Windows 7. The navigation options from Vista have been moved to the
Network and Internet option on the Control Panel in Windows 7.
| 2. | To connect to an existing network, in this case a wireless network, click Connect to a Network, as shown in Figure 1.

| 3. | On the right of your screen, you’ll see the Currently Connected To window, with the list of your current connections.
|
Note
The
number of bars shown on the right for each connection shows the
strength of the connection. More bars, of course, is better and means a
faster connection. Some networks require a network security key or
password or phrase. These are indicated by a small yellow icon above the
bars on the right. To connect to one of those networks, ask the network
administrator or the service provider for the security key or password.
Caution
Whenever you can, you
should connect only to security-enabled wireless networks. If you
connect to a network that’s not secure, someone with the right tools may
be able to see everything that you do, including the websites you
visit, the documents you work on, and the usernames and passwords that
you use. Changing your network location to Public can help minimize the
risk.
|