3.3. CSS Layout Box Model
All CSS block elements are rendered in the browser
according to the CSS box model. The box model, established by the W3C
CSS standards body, determines how much room a block element actually
takes up on the page. The amount of space required for a block element,
such as a <div> tag, is a combination of the declared width, plus the padding, border, and margin settings. For example, say a <div>tag has the following style declared:
#myBox {
  width:200px;
  padding:10px;
  border:5px;
  margin:10px;
}
Although nominally, the myBox style appears
to be 200 pixels wide, CSS specifications indicate that it will
actually take up 250 pixels of space. Here's how the space requirement
is figured:
200 pixels content area width
           10 pixels padding-left
           10 pixels padding-right
            5 pixels border-left
            5 pixels border-right
           10 pixels margin-left
           10 pixels margin-right
          250 pixels width total
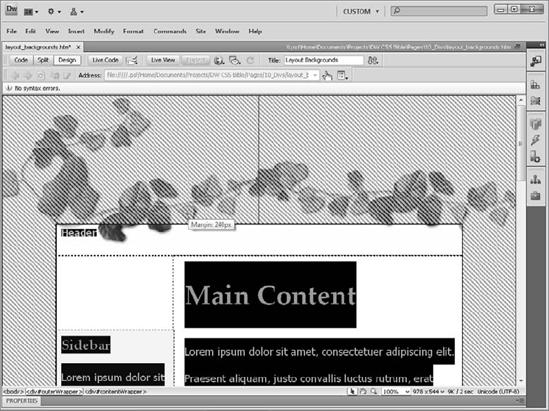
To make it easy for you to design with the box model
in mind, Dreamweaver provides the CSS Layout Box Model visual aid. When
enabled, any selected <div> tag or otherwise affected
block element depicts all the contributing elements: content area (the
width), padding, borders, and margins. Both the padding and margins are
shown with colored diagonal lines, although in opposing directions, as
shown in Figure 7.
Dreamweaver not only reveals how the layout element
is constructed visually, but you'll also receive a wealth of
information from tooltips that appear as you move your cursor around
the element. The information in the tooltip varies according to
cursor's position:
Hover over the content area to see all the CSS properties, including those related to the box model.
Move your cursor over the padding or margin areas to see their respective values — for example, Margin: 10px.
With the cursor over the border, the tooltip reveals the current values for the margin, border, and padding properties.
I recommend turning on the CSS Layout Box Model
feature in the fine-tuning and debugging stages of your Web page
development; it's a great tool for understanding exactly why elements
on your page are positioned the way they are.
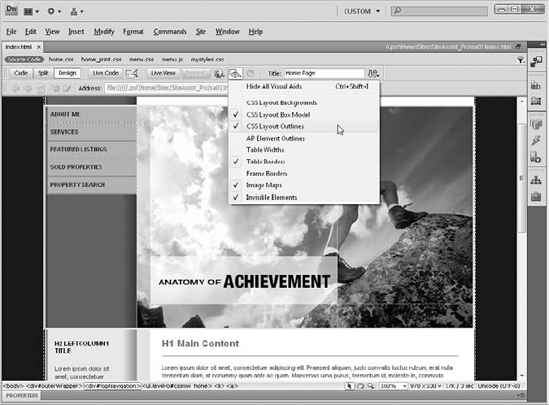
3.4. CSS Layout Outlines
CSS Layout Outlines, when enabled, place a border around <div> tags and other block layout elements (see Figure 8). The outline is a dashed style for inserted <div> tags and a solid border for drawn Dreamweaver AP elements.
I tend to keep CSS Layout Outlines enabled during
most of my design process; I find having the outlines visible quickly
allows me to insert content in just the right places and, more
importantly, select the <div> tags for quick refinement.
|
In this Technique, you apply previously defined CSS styles to a variety of <div> tags to create a basic layout.
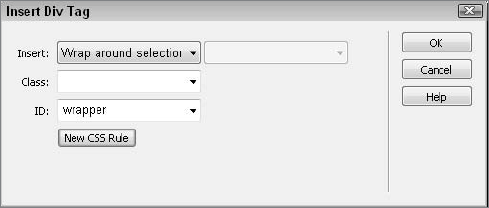
From the Techniques site, expand the 10_Divs folder and open div_start.htm. The
first style to apply acts as a container for the entire page; to apply
this properly, you'll need to position the cursor properly. Place your cursor in the series of links on the page and click the <p> tag in the Tag Selector. From the Insert panel's Layout category, click Insert Div Tag. When the Insert Div Tag dialog box opens, make sure the Insert list is set to Wrap Around Selection. From the ID list, choose Wrapper and click OK.
Next, add the first of three <div> tags, the header so that it appears with the wrapper <div> tag:
From the Insert panel's Layout category, click Insert Div Tag. From the Insert list, choose After Start Of Tag and then, when the adjacent list appears, select <div id="wrapper">. From the ID list, choose Header and click OK. Click Delete to remove the selected placeholder text.
Now you're ready to insert the middle <div> tag after the header <div> tag:
From the Insert panel's Layout category, click Insert Div Tag. From the Insert list, choose After Tag and then, when the adjacent list appears, select <div id="header">. From the ID list, choose Middle and click OK.
The final <div> wraps around navigation links and forms the bottom area, the footer:
Place your cursor in the series of links on the page and click the <p> tag in the Tag Selector. From the Insert panel's Layout category, click Insert Div Tag. When
the Insert Div Tag dialog box opens, make sure the Insert list is set
to Wrap Around Selection and, from the ID list, choose Footer; click OK
when you're done.
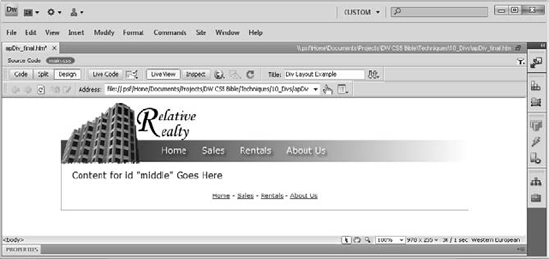
Your new CSS-based layout is now ready to be filled out with content.
|