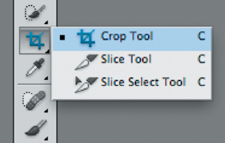
3. Crop Tool
With the Crop tool you can change a viewer’s
perception of an image. You can choose to tighten the area of interest
of an image, which allows you to de-emphasize (or even eliminate) parts
of a photo and improve the image by better framing the subject.
You can invoke cropping in two ways. The first method
involves making a selection with the Rectangular Marquee tool and then
choosing Image > Crop. Although this works fine, it does not offer as
much control as using the second method, the Crop tool. Let’s put
method two into action:
Tip: Cropping Keyboard Shortcuts
To toggle the shielded area off, press the forward slash key (/).
To hide the selection border, press Command+H (Ctrl+H).
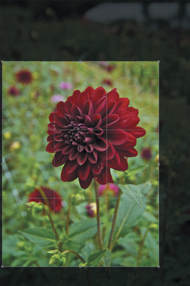
1. | Open the image Ch04_Field.tif .
|
2. | Choose the Crop tool from the Tools panel or press C.
|
3. | With
the Crop tool, make a selection to crop the image. In this case,
removing the large white blob in the upper-right corner (an out-of-focus
greenhouse) will improve the composition of the image.
|
4. | You
can refine the crop selection after it is made. Mouse over an edge of
the crop until the pointer changes to a double-headed arrow, and then
click and drag on the crop selection border to pull the crop tighter or
to expand it. Additionally, you can click and drag a corner of the crop
border to expand two sides at once.
|
5. | Examine
the crop. Make sure you’ve selected the Shield check box in the Options
bar. This gives you a better idea of the area to be cropped.
|
6. | When
satisfied with the crop, press Return (Enter) or click the Commit
button (check mark) in the Options bar. The shielded (darkened) areas
will be cropped. To cancel, press the Esc key.
|
Power crop
It is possible to crop and resize an image at the same time. I refer to this technique as a power crop,
and it is a huge time-saver. Before cropping, you can type the desired
size of your final image into the Options bar. When you drag to crop the
image, your box will constrain to the proper aspect ratio. This allows
you to resize and crop in one step.

Let’s crop an image to a 4-inch by 4-inch square at 300 ppi:
1. | Open the file Ch04_Bottles.tif.
|
2. | In the Options bar, type 4 in (as in inches) into both the Width and Height fields.
|
3. | In the resolution field, type 300 and set it to pixels/inch.
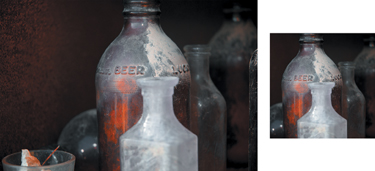
|
4. | Drag to crop the image. Your crop selection is constrained to the shape you specified in the Options bar.
|
5. | Click
the Commit button or press Return (Enter). When finished cropping, you
may want to click Clear to reset the tool’s default settings.
|
|
If you have a specific image size that you use often,
harness the power of Photoshop’s Preset Manager. You can create tool
presets that already have the values for a tool loaded:
1. | Type a desired size and resolution into the Options bar.
| 2. | When
the Crop tool is selected, you’ll see its icon in the upper-left corner
of the Options bar. Click the triangle to access the menu.
| 3. | You’ll see several preset sizes that are stored in Photoshop. Select the Current Tool Only check box to narrow the presets.
| 4. | Click the Create new tool preset icon in the menu (it looks like a pad of paper).
| 5. | Photoshop stores the preset crop size in a temporary preferences file.
| 6. | To
permanently save cropping sizes, click the submenu icon in the menu
(the small triangle in a circle). Choose Save Tool Presets, and save
them in a desired location.
|
|
Nondestructive cropping
Cropping is very important, but it’s also permanent.
When you crop an image, you permanently discard data. Nondestructive
editing is a workaround that allows you to crop an image and keep the
cropped pixels available for future use. Nondestructive editing provides
you with flexibility throughout the design process. Let’s put the
technique to the test:
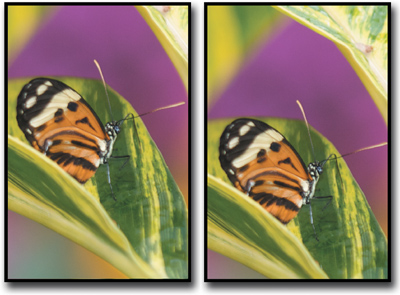
1. | Open the image Ch04_Butterfly.tif .
|
2. | To crop nondestructively, you must convert the Background into a standard layer. Double-click the word Background in the Layers panel. Name the layer Butterfly and click OK.
|
3. | Select the Crop tool by pressing C.
|
4. | Mark out an area to crop. Select a much tighter shot of the butterfly.
|
5. | In the Options bar, change the Cropped Area to Hide (Delete is selected by default).
|
6. | Click the Commit button or press Return (Enter).
|
7. | Select the Move tool by pressing V (as in moVe, the letter M
is used by the Marquee tool). Drag in the image and reposition it; the
original pixels are still available, allowing you to modify the crop in
the future.
Because the
cropped pixels were hidden (instead of deleted), details were preserved
outside the cropped area. This allows for the image to be repositioned
within the frame. Be sure to save the image as a PSD file or Layered
TIFF to preserve future flexibility.
Tip: Leave a Note
You can use Photoshop’s Note tool to leave a comment
that the image was cropped nondestructively. This will help you remember
in the future.
|
Tip: Pixel Restoration
You can choose Image > Reveal All to restore all hidden pixels after using the Hide method for cropping.
Perspective cropping
Some images will have visible distortion, which is
often caused by the camera not being square with the subject. If the
photographer was higher (or lower) than the image or if the photo was taken
at an angle, you will see distortion. In some cases, this distortion is
part of the shot composition and is desirable. In others, the
distortion can be distracting. Let’s square off an image:
1. | Open the file Ch04_Perspective.tif .
|
2. | Select the Crop tool by pressing C.
|
3. | Crop around the window in the photo as tight as you can to frame it.
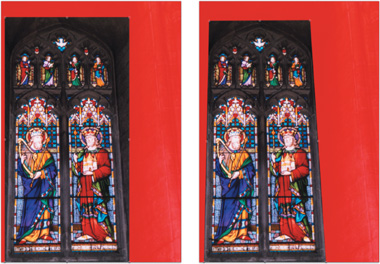
|
4. | In the Options bar, set the Crop to Delete, not Hide. Then select the Perspective check box.
|
5. | Click
the Shield Color to select a new color. In the Color Picker, select a
bright red to make it easier to see the cropped area.
|
6. | Drag
the upper-right and upper-left corners in toward the center. You are
trying to line up the crop borders parallel to the edge of the window.
The crop selection will no longer look rectangular.
|
7. | Click
the Commit button or press Return (Enter). The resulting image should
appear as if the photo was squared and the camera was level.
|