Begin a Design with a Concept
One of the most basic rules for creating a good
design is to begin with a concept. This might sound strange, and you
might be scoffing, “Of course I have a concept! I want to design a logo!” Designing a logo isn’t a concept; it’s a need.
To address this need, you’ll want to visualize the logo. In this
chapter’s example, you have a fictitious machine parts company, Dyson
Gears, and they want all five of their employees to proudly wear the
company’s logo on T-shirts. The company has a name, but not a logo;
therefore, it’s thinking-cap time before moving on to CorelDRAW’s tools.
One of the simplest and most effective approaches to
logo design is through the use of an iconic representation. For example,
if you ran an ice cream stand, a very simple and effective logo would
be a drawing of an ice cream cone. Don’t let the simplicity of this
approach put you off: Apple, Inc., has done very well through the years
with a logo of you-know-what! What sets apart a logo from every other
logo that’s a drawing of the vendor’s product is the artistic treatment
of the design. You can visualize an ice cream cone—it’s basically a ball
with a triangle beneath it. In CorelDRAW you can draw a circle and a
triangle and then apply Artistic Media strokes to the paths to make the
drawing look like a child’s crayon rendering or a Victorian oil
painting. You can copy and paste a dozen copies of the ice cream cone
and then use the Arrange | Align and Distribute commands to pepper a
page with all 12 flavors the ice cream stand sells. You can extrude the
simple shapes and make a 3D ice cream cone; you can apply fountain fills
to the objects... see how the treatment of a simple geometric shape
offers you dozens of logos to choose from?
Along these lines of thinking, a logo for
Dyson Gears would be visually outstanding if you took the initials “D”
and “G”, whose facing sides are rounded, and put gear teeth on them to
reinforce the idea that Dyson Gears is
gears, a literary conceit that works in commerce every day. That’s the
concept; read on to learn how to draw gears using a bold font as the base, create a visually stunning treatment for the gear design, add some compatible and striking text, and realize a concept.
Setting Up the Page for the Logo
Although CorelDRAW can open a new document by default
when you launch the program, you need to set up guidelines on a default
page so the T-shirt logo design will print edge to edge on a sheet of
inkjet transfer paper. If you measure an average T-shirt, you’ll see
that about 7 inches is a good width for a logo. You can pick up T-shirt
transfer paper at an office supply store (or even at the supermarket)
that measures full-page letter size: 8½×11 inches. So you’re in luck
twice: CorelDRAW’s default document size is the same as most T-shirt
transfer paper, and the maximum width of the logo will fit the
horizontal measure.
The following steps show you how to set up
nonprinting guidelines on a default page: T-shirt transfer paper needs
about ½ an inch in the clear on all sides so you can peel the transfer
from the T-shirt (which still gives you 7½ inches for the maximum design
width).
Setting Up Guidelines
Launch
CorelDRAW and then from the Welcome screen choose New Blank document.
In the Create A New Document dialog, choose CorelDRAW Default from the
Preset Destination drop-down list if it’s not already chosen for you,
choose Letter (portrait orientation) for the Size, name the file Dyson Gears.cdr, and then click OK.
You’ll
want to zoom into the ½-inch tick mark on the rulers for precise
placement of the guides. Most of us have a scroll wheel on our mouse,
and by default, CorelDRAW uses the wheel as a zoom feature. Put your
cursor at the top left of the page you see in the drawing window, and
then push the wheel away from you to zoom into this area. If your mouse
doesn’t have a scroll wheel, choose the Zoom tool from the toolbox (or
press Z), and then diagonally click-drag an imaginary rectangle around the corner of the page (the gesture is often called marquee-dragging or marquee-selecting).
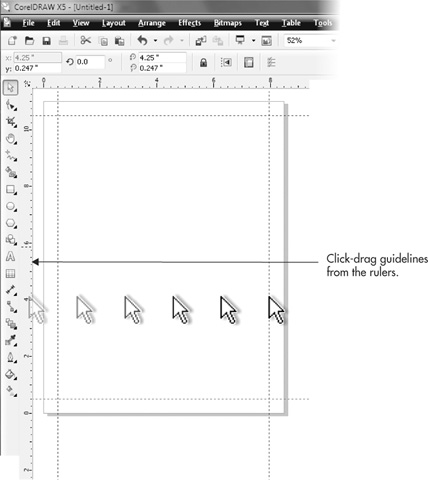
You
can use any tool to drag guidelines from the rulers. Place your cursor
first over the horizontal ruler at the top of the drawing window.
Click-hold, and then drag from the ruler onto the page, to the vertical
½-inch tick. If you didn’t get it quite right, you need to switch to the
Pick tool (press the SPACEBAR), and then click-drag the guideline to the ½-inch tick mark.
Similarly,
drag a guideline to the bottom ½-inch margin you’ll need. Then drag
vertical guidelines out of the vertical ruler (at the left of the
drawing window) to create ½-inch vertical margins inside the page. Your
screen should look like Figure 1 now.
Click
the Save button on the standard toolbar. Save Dyson Gears.cdr to a
location on your hard drive you can find later. Don’t close the
document; you’re not having enough fun yet.