Organizing Notes Chronologically
Although the date and time stamp that appears near
the top of each notes page tells you when that page was first created,
the actual notes on the page aren’t always created on the same day. You
might want or need to know when a specific line or paragraph of text
was added or updated.
For example, if you’re consolidating notes from
multiple notes pages or note containers, and you want to organize the
seemingly random paragraphs in chronological order (for example, a
transcription of events that happened at a seminar), you can look up a
hidden date and time stamp that OneNote automatically applies to each
paragraph of text when it is created or edited. When merging note
containers and consolidating notes, you can use this information to put
your text into the right order.
To check the hidden date and time stamp of a paragraph of text, follow these steps:
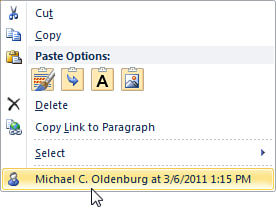
1. | Move the mouse pointer over the line of text in the second note container until you see the four-headed arrow icon next to it.
|
2. | Right-click the arrow icon.
|
3. | At
the bottom of the shortcut menu that appears, make note of the author
of the selected text and the date and time when it was created or last
edited (see Figure 3).
|
This
information is hidden because it’s actually metadata—a fancy word for
“data about data” (or “information about information”). This kind of
additional information exists in most other computer files, too. For
example, in Microsoft Word 2010, you can display the properties of a
document, which tell you all kinds of interesting information, such as
how long the document was edited, how often it was saved, and so on.
Similarly, when you import a photo from your digital
camera, its metadata tells you what camera you used to create the
picture, what exposure (or ISO) setting you used, and other items of
interest. Metadata is typically hidden from normal view because it is
not always needed. You can consider it as a sort of “on-demand”
feature. If you need to know this information, you can easily look it
up.
|
The hidden date and time stamp of text assumes that
the computer used to originally create or update this text was
correctly set to the current, local time. The author’s name shown in
front of the date and time stamp is taken from the optional
personalization you can apply to all of the programs in Microsoft
Office 2010. If you didn’t enter your name during installation or you
want to update the name on a specific computer, click the File tab in
OneNote and then click Options. In the OneNote Options dialog box that
opens, in the General category, look under the Personalize Your Copy of
Microsoft Office heading and then enter the name and initials of the
person using that particular copy of OneNote. If two or more people use
OneNote on the same computer, different names can be used for OneNote
personalization with each Windows user account that you’ve created.
|
Using Rule Lines and Gridlines to Organize Objects on a Page
Another way to organize information on the current
page is to use the optional rule lines or gridlines that can change a
blank notes page to resemble a paper notepad or college-ruled notebook.
This can be useful if you’re trying to better align paragraphs of
handwritten notes or when you want to visually organize other objects on your page, such as multiple screen clippings you’ve captured or pictures you’ve inserted on the page.
To apply rule lines or gridlines to the current page, follow these steps:
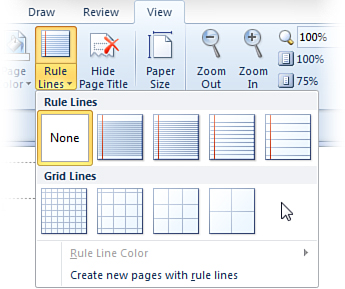
1. | On the ribbon, click the View tab.
|
2. | In the Page Setup group, click Rule Lines.
|
3. | On the pop-up menu that appears, click a style under either the Rule Lines or Grid Lines heading (see Figure 4).
If you don’t like the result, simply repeat the previous steps and
choose another style, or click None to remove the last style you
applied.
|
|
You don’t have to keep rule lines or gridlines
displayed if you only want to use them temporarily to line up the notes
and objects on your pages. When you’re done organizing the layout of
your page the way you want, follow the previous steps and apply the
style labeled None to remove the lines again.
|
If you do decide to keep rule lines or gridlines
displayed permanently, you can change their color to match that of your
text and visuals on your page. From the Rule Lines menu, click Rule
Line Color and then click the color you want.