Resizing a Table Column
When you type text into the cells in a table, the
rows and columns of the table will adapt to the size and length of the
text in and around those cells. Although you can only manually expand
table rows by using line breaks , you can manually adjust the width of a column with your mouse.
To resize a table column, do the following:
1. | Move the mouse pointer over the right border of any cell whose column you want to expand or contract.
|
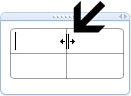
2. | When the mouse pointer changes to the resize cursor (see Figure4), click and drag the column border to the left or right until it is the size you want and then release the mouse button.
|
Although you can select individual cells in OneNote
tables for the purpose of copying and formatting them, OneNote 2010
does not offer a way to specify a precise size measurement of any parts
of a table. This is because tables in OneNote are primarily intended to
organize information on your notes pages. Because table cells
automatically adapt to their contents, setting cell-based properties
typically isn’t necessary.
|
If
the precise dimensions of a table are critical for some reason, you can
work around the lack of table properties in OneNote by creating a table
grid in another Office program (or even a drawing program), formatting
its cells with the exact dimensions you want, and then inserting a
picture of this table grid as a picture or screen clipping. After the
picture is inserted on your notes page, position it where you want it
to appear, right-click the picture, and then click Set Picture as
Background. Now you can click anywhere over the picture and type text
into the cells that appear behind the text. To precisely position note
containers over the grid in the picture, hold the Alt key while
dragging a note container to align it.
|
Selecting an Entire Table
You can quickly select all of the text in a table by doing the following:
1. | Click any cell in your table.
|
2. | On the ribbon, above the Layout tab, click Table Tools.
|
3. | In the Select group, click Select Table.
|
|
To select a table more quickly, right-click any
table cell, click Table on the shortcut menu that appears, and then
click Select Table.
|
An entirely different way to select a table or parts
of a table is to use the progressive Select All command in OneNote,
which is available through the Ctrl+A keyboard shortcut. Although this
command is not exclusive for use with selecting tables, its unique
behavior, compared with the Select All command in other programs, is
especially apparent when you try it out within a table.
Click in any cell in your table and then press
Ctrl+A. OneNote selects the current cell. Pressing Ctrl+A again will
extend the current selection to the entire row in which the previously
selected cell is located. If you press Ctrl+A once more, OneNote will
select the entire table. Finally, pressing Ctrl+A a fourth time will
keep the current table selected and also select the note container that
the entire table is placed in.
When your table is selected, you can format all its cells with the font, font size, text color, or cell alignment you want.
Selecting a Column in a Table
You can quickly select a column in a table by doing the following:
1. | Click any cell in your table.
|
2. | On the ribbon, above the Layout tab, click Table Tools.
|
3. | In the Select group, click Select Columns.
|
|
To select a column more quickly, right-click any
table cell, click Table on the shortcut menu that appears, and then
click Select Columns.
|
If the plural form in the Select Columns command
seems out of place, it’s because you can use this command to select
multiple columns, not just the current column. To do this, click any
cell in the first column that you want to select, hold down the Shift
key, and then click any cell in the last column that you want to
select. When you now use the Select Columns command, either on the
ribbon or on the right-click menu, OneNote will select all of the
columns between and including the columns of the two cells you selected.
After any column is selected, you can format it with the font, font size, font style, text color, or cell alignment you want.